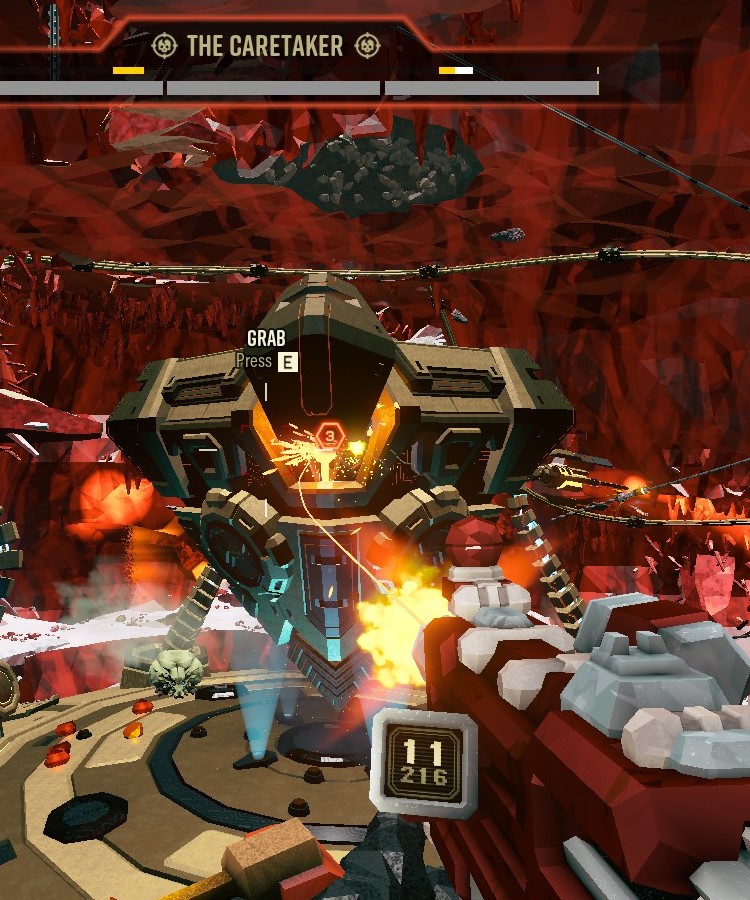
The Caretaker is the boss fight that awaits players near the end of an Industrial Sabotage mission in Deep Rock Galactic. Unlike the Glyphid Dreadnoughts, which comprise most of the Deep Rock Galactic boss roster, the Caretaker is an immobile, mechanical enemy. It possesses an impressive health pool that can go into 5-digit territory on higher difficulties. Couple this fact with its myriad forms of attack, as well as the ability to simultaneously apply pressure to every team member, and it’s no surprise that the Caretaker is considered one of the hardest bosses to fight in Deep Rock Galactic.
Note that this article is up-to-date with the latest patch so feel free to check out our full Deep Rock Galactic maintenance update guide. Without further ado, let us begin. The following guide will contain tips on:
- Terraforming
- Loadout notes
- The Actual Caretaker fight
- Enemy Roster
Paving the Way: Terraforming
This is the most often overlooked part of the Caretaker boss fight. Terraforming in Deep Rock Galactic refers to modifying the terrain in such a way that it becomes easier to fight and maneuver inside the cave.
Expanding the arena to give more room to dodge enemies, the Engineer plugging up holes in the ground, and the Driller destroying rock formations to clear lines of sight are some of the most common forms of Terraforming.

Even something as mundane as destroying terrain to clear up sightlines is still Terraforming.
It’s also one of the ways the team can greatly increase their chances in the Caretaker fight. All of this sounds like a complicated process, We admit, but in reality, it’s as simple as using your mobility tools to get around. Think about it, when the team first enters the Caretakers room upon mission start everyone is going to dig tunnels, and place platforms and ziplines just to get around.
By doing this, the team is unknowingly terraforming the room. This is our first bit of advice. While you’re navigating the Takers room for the first time, use your tools in such a way that while you’re creating ways to move around you’re also preparing it for the boss fight when you return to it later.
Another common example of Terraforming in Deep Rock Galactic.
In the Case of the Driller, the tunnels you dig out to reach resources on a higher platform, for instance, is the same tunnel your team will be using to move around the caretaker as they hunt down its open weakpoint.
Driller
The driller is the class most proficient at terraforming in Deep Rock Galactic, and his power drills will no doubt comprise the bulk of the effort. The quickest way to die to the Caretaker, or just about any boss fight, is to stay still. Because of this, constant movement is paramount.
For this reason, as the Driller, you want to dig tunnels in such a way that the team can maintain constant movement as they circle the caretaker..in short, creating a circular path with no obstructions to player movement around the boss arena. Most of this process will be done when exploring the room normally at the mission’s start, just by digging around to find resources.
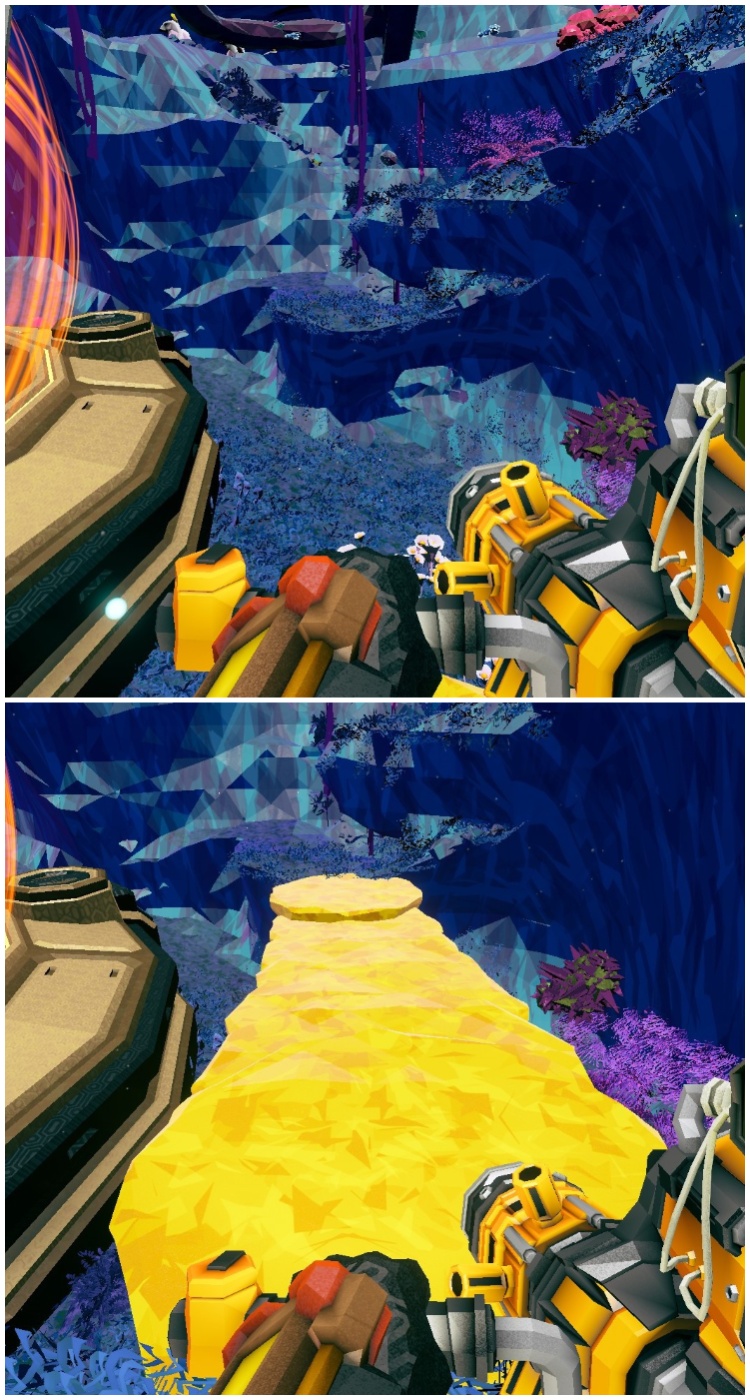
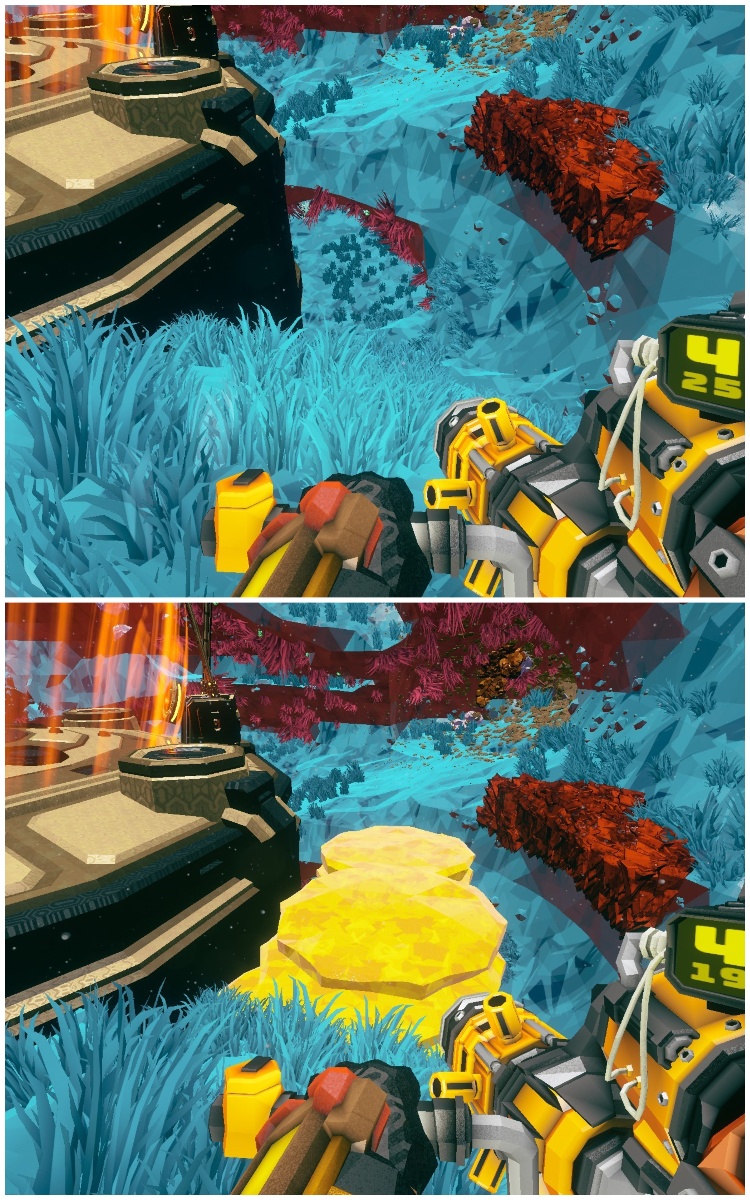
The Caretakers arena before terraforming. The boss was removed for extra visibility.
the rest can be completed when the team returns to the boss room for the finale. Oftentimes, the main cave is connected to several smaller ones that lead to the power stations. If these side caves are close to the main cave, consider linking them up with a tunnel.
This way they can provide a relatively safe place to grab a resupply or retreat from a Shredder/Sniper turret swarm.
The arena after some terraforming. Note the tunnel behind the shield.
Another important trick in the driller’s arsenal is making a place to throw C4 from. Sometimes the Engineer will create a “C4 bridge”(We’ll get to it in a bit) for the Driller to use, but if the terrain doesn’t allow for one, you’ll have to dig a hole in the ceiling.
Remember that you can place a waypoint above the caretaker by using CTRL + E. This waypoint is visible when you pull out the laser pointer and will guide you to the place you marked. The Caretaker has considerable explosive damage resistance, but by throwing a C4 on top of it (aim for its center) you can damage all 4 of its vents.

By doing this well, the Driller can skip the vent phase for the team. Be careful that the tentacles can still attack you while you’re on the ceiling, so make sure to make some extra space to dodge more easily. This extra space can also accommodate a resupply pod (if the team allows it).
One more important note, once deactivated, the Caretaker’s shield hitbox lingers for a couple of seconds. Your C4 will get stuck on it, and it’s wasted at that point. Throw a flare to check if the shield is still there.
![]()
In the very rare case that there is no place to safely call in a resupply, the Driller can create a space inside the wall to create some shelter for the team. This isn’t always ideal, however, so use it only when needed.
Aside from those, the Driller can clear out any obstructions that impede movement or line of sight to the Caretaker.
Removing an Obstacle to make more room to maneuver.
Engineer
The Engineers’ ability to create terrain is also a powerful terraforming tool. The Engineers role is similar to the Drillers. To create a path around the caretaker. This means plugging up holes that dwarves could fall in. It’s a simple function, but one that allows the team to fully focus on the Caretaker during the fight.
Platforms can be used to bridge gaps in the terrain. They can connect terrain masses of unusual shapes to create a smooth surface to run on. Extending a ledge when there’s not enough room to maneuver is another common yet useful trick in Engineers’ arsenal.
Platforms can be used to put his turrets into a better firing position. Placing platforms at the bottom of taller cliffs can aid team mobility. This way the team can simply jump down to the platform if the need to do so arises.
Same place as before, but this time the Engineer did his job Terraforming. Now the arena is much easier to maneuver in.
If for some reason there are areas without any cover, the Engineer can stack platforms to create a pillar to hide from some of the Caretaker’s attacks during a fight.

Be careful when using platforms as cover. Many attacks can still reach you there.
A resupply pod can be called in behind a pillar as well, but it’s not an ideal place for it usually, so as with the Driller’s trick, use it only when it’s needed.
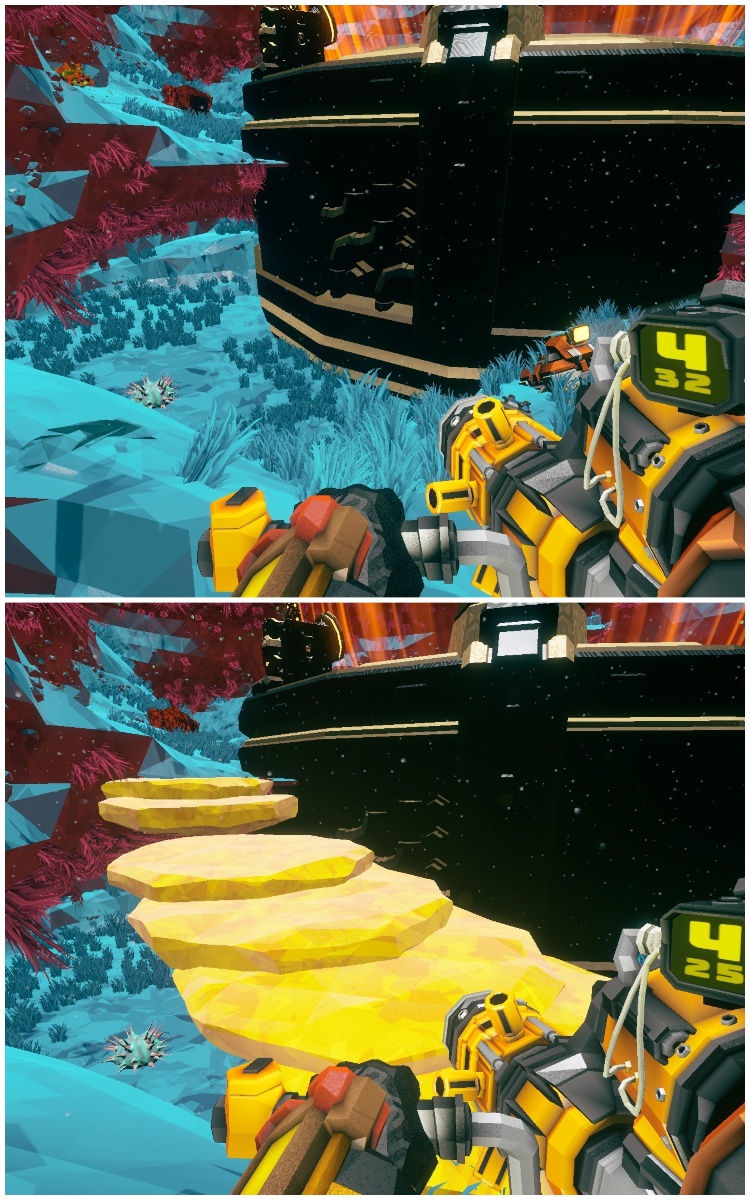
If the terrain allows it, the Engineer can create a C4 bridge for the Driller. This means finding some elevated place and then making a staircase out of platforms that leads right above the Caretaker.

The most basic version of the C4 bridge. It’s good practice to expand its end so the Driller has room to dodge.
C4 doesn’t fly far once thrown so right above the boss is more literal than it sounds. Make sure to make some extra space near the end of the bridge. The Driller will be attacked by tentacles so he’ll need the extra room to dodge.
Gunner
As the class is all about shooting things in the face, his terraforming potential is limited to using ziplines as well as pickaxing some minor obstructions while the Engineer and Driller do the rest. That being said, ziplines despite their limited use as a traversal tool are phenomenal in combat scenarios.
In combat, they’re a speed boost that lets the team quickly hunt down the Caretakers open weakpoint. They can allow the team to reposition easily, or get out of trouble. A zipline placed in the driller’s ceiling bunker can quickly get him back into the fight.
Sometimes ziplines can be used to connect various structures engineers create with their platforms. Of course, ziplines need to be at an angle to have a use. Thankfully, Caretaker rooms usually have enough verticality in them for this.
Scout
The Scout is the class with the lowest terraforming potential as his mobility tool only serves himself. Scouts upon entering the room will assist the team by lighting the room and mining hard-to-reach resources anyway.
Because of the Grappling gun’s fantastic mobility, Scouts benefit the least from terraforming. Scouts are still encouraged to assist in the effort by using their pickaxe, however. The Scout is the class that usually pulls out the batteries to initiate the caretaker fight after the rest of the team has gotten in position.
Loadout Tips: Weapons and Gear
This section of the guide contains some hopefully helpful notes on various bits of gear when it comes to the Caretaker fight in Deep Rock Galactic. Keep in mind that as this is a brief summary it’s missing many of the nuances that would normally be found in a detailed analysis.
With so many weapons, all of which have their mod trees and OCs, compiling them all in a single guide while keeping them concise would constitute an impossible endeavor.
Driller
The driller is the most unusual when it comes to weaponry as most of them deal elemental damage or rely heavily on inflicting enemies with status effects. This makes him somewhat of an oddity when fighting the Caretaker in Deep Rock Galactic. As a class, the Driller’s impressive crowd clear is balanced out by his weak single-target damage.
CRSPR Flamethrower
Rival gear will explode if set on fire, and the Flamethrower is the weapon system most adept at rapidly heating enemies. For this reason, it’s a top pick when you have to fight the Caretaker in Deep Rock Galactic, and it’s our recommendation for Drillers without any overclocks (and even experienced players).

It’s also a good crowd-clear weapon which means it can be used when hacking power relays. Using the extra range mod in T1B is heavily recommended, and taking the 100% extra heat mod in T2B is almost mandatory.
Heat radiance in T5A is also recommended as it dumps an extra 80 fire damage and heat (Heat warms enemies up, but deals no damage on its own) in a 4-meter radius around the Driller in the form of a pulse for every second spent holding the trigger.
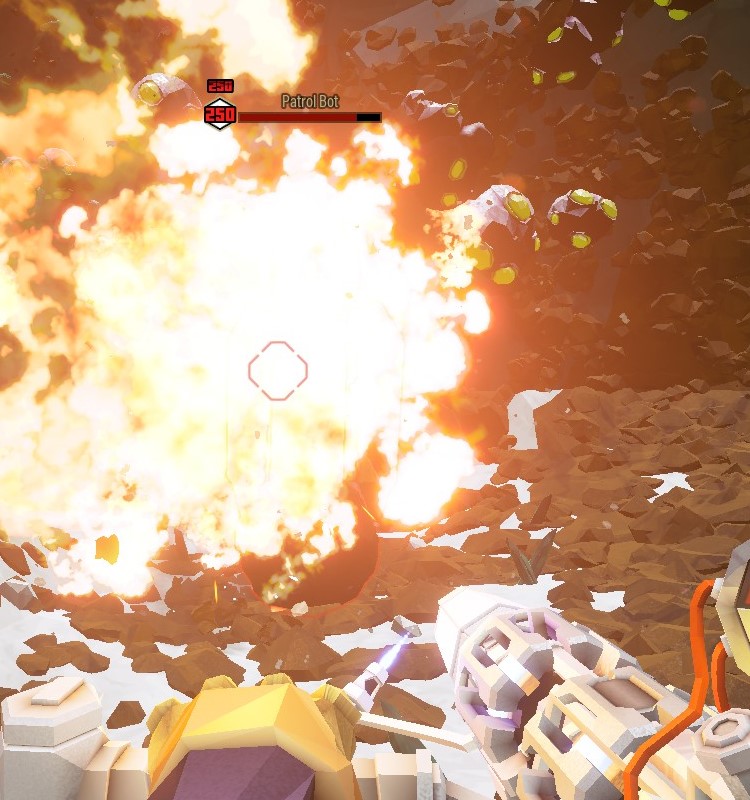
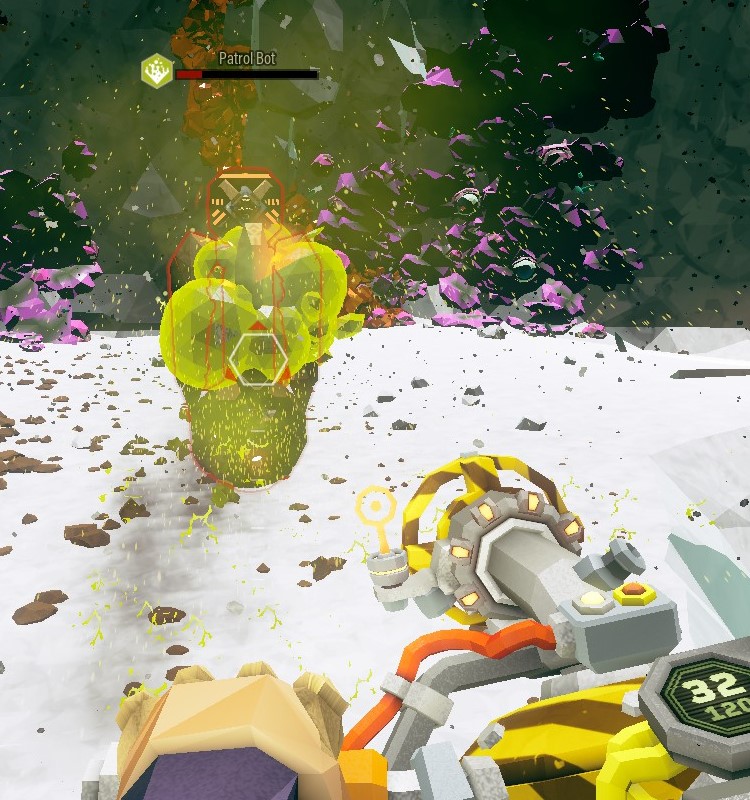
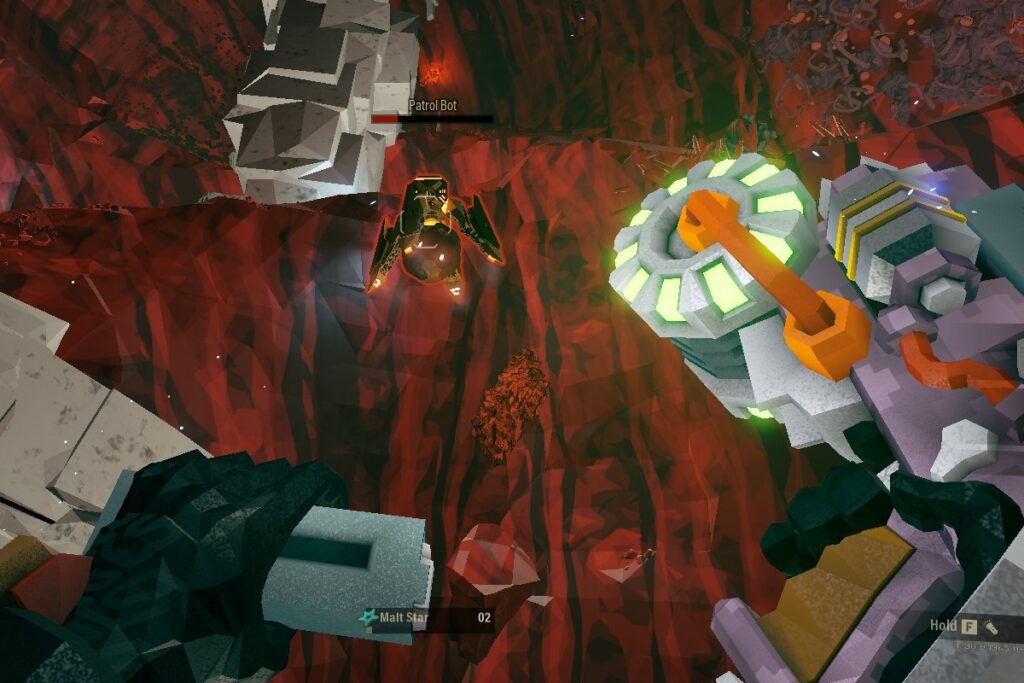
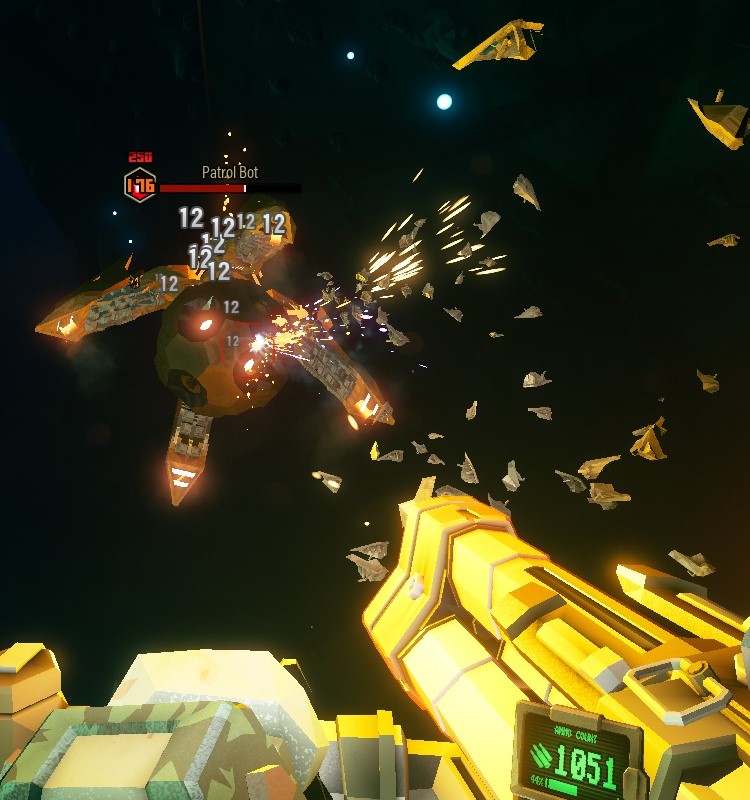
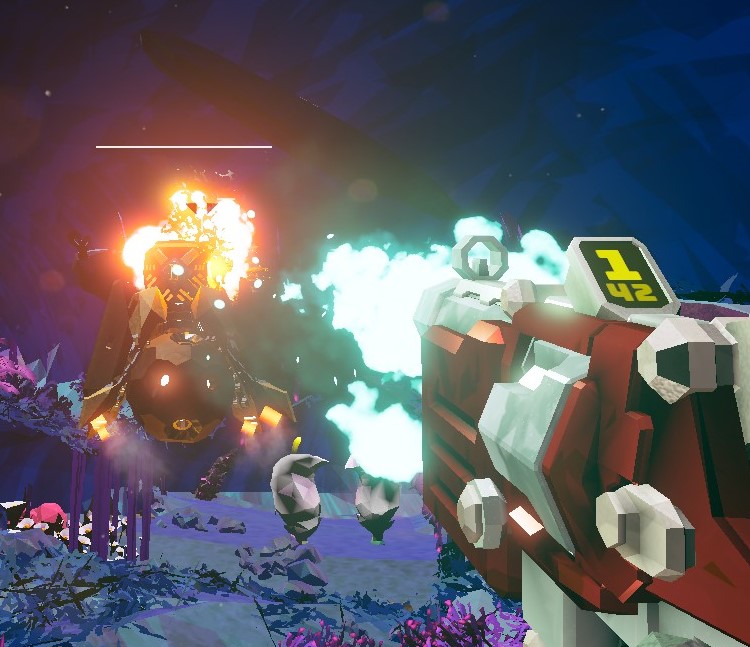
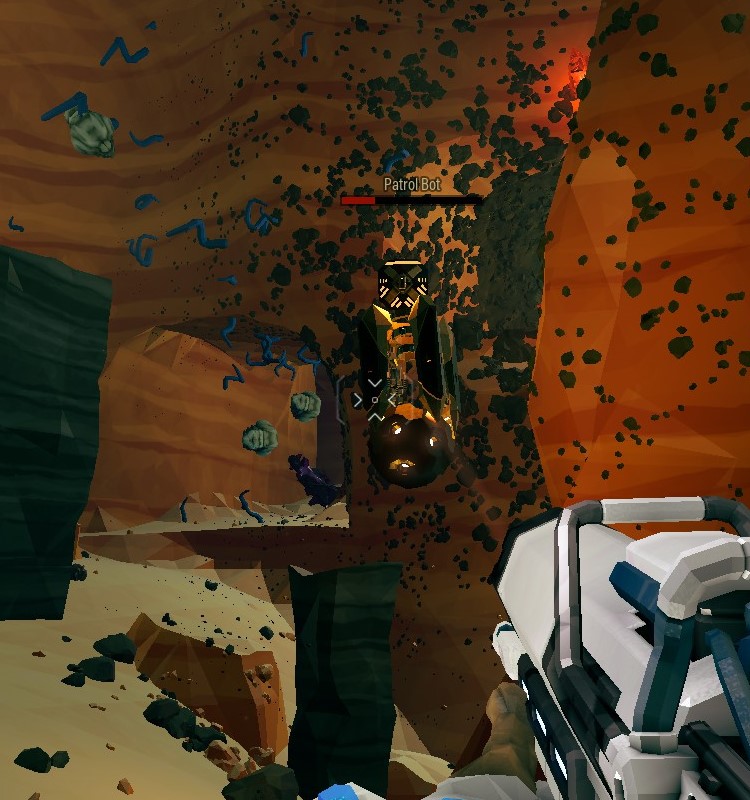
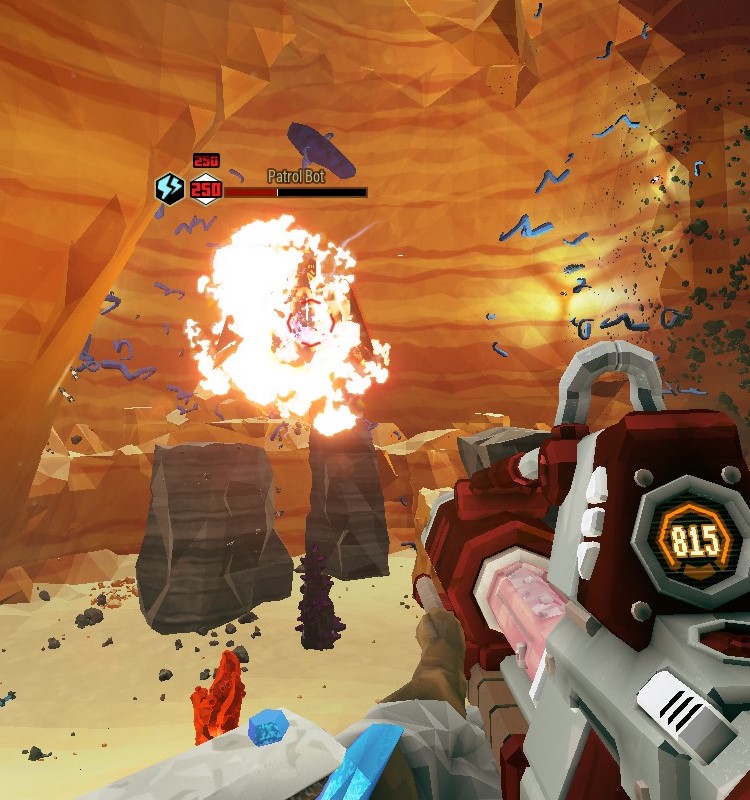
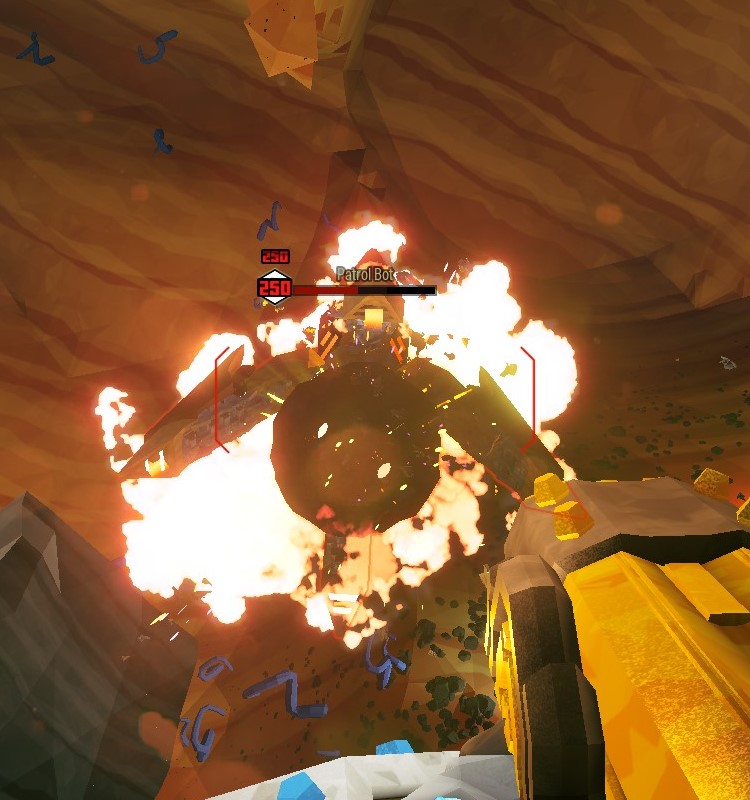
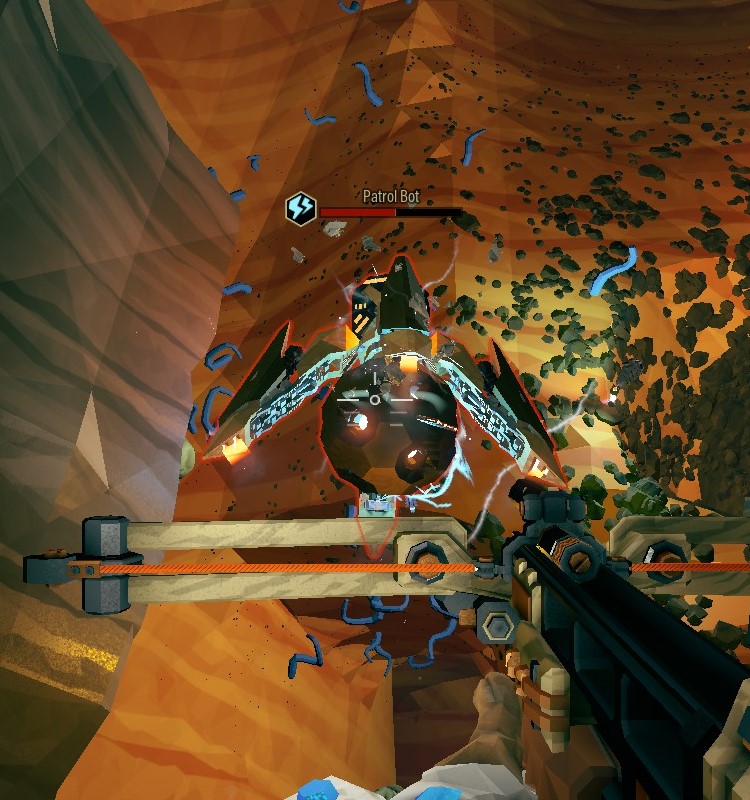
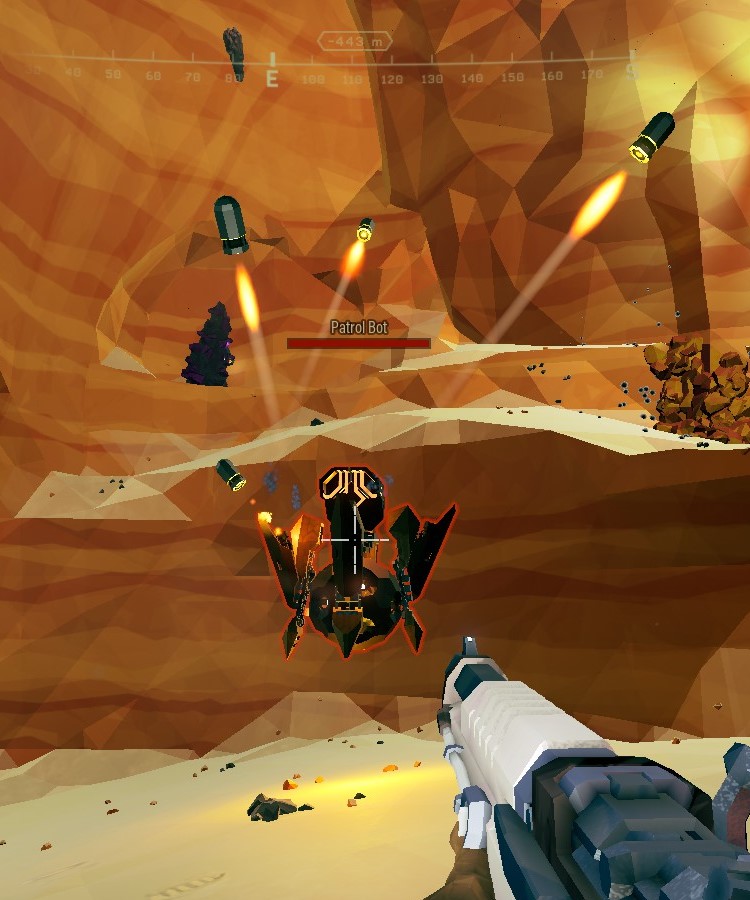
The flamethrower overheats a Patrol Bot.
This helps further by heating robots and instakilling Shredders within its area of influence. A hybrid sticky flame/heat setup can also work but will have to sacrifice sticky flame duration for the heat mod.
The Fuel Stream Diffuser Overclock can give the flamethrower a 20-meter range, allowing the Driller to burn enemies and even Sniper Turrets from relative safety. It does reduce flow rate (fire rate) a bit, however (this can result in more heat radiance procs, though). Face Melter finally finds its niche, because the extra flow rate allows the flamethrower to burn robots more quickly.
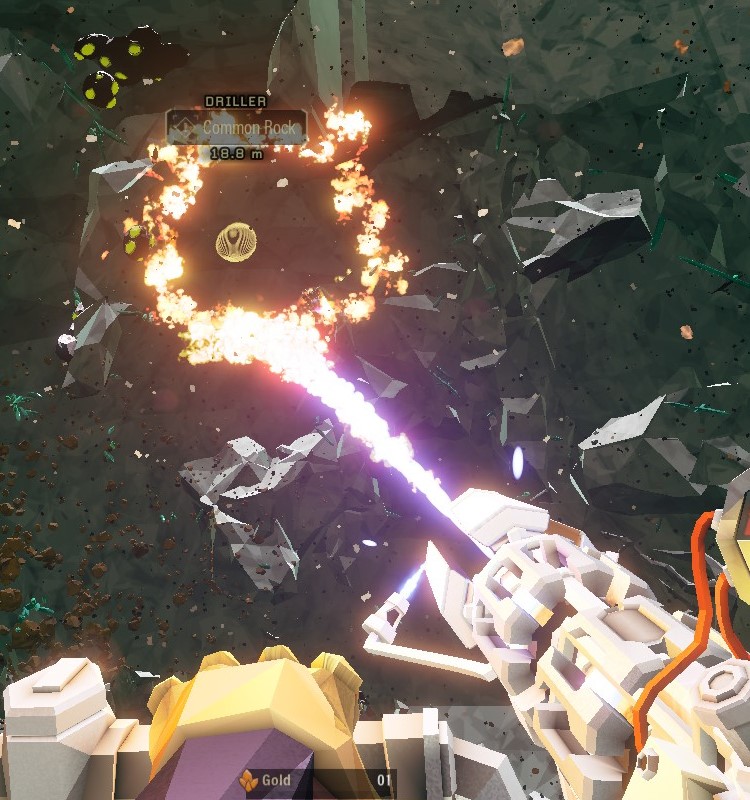
A demonstration of Fuel Stream DIffusers range buff.
Cryo Cannon
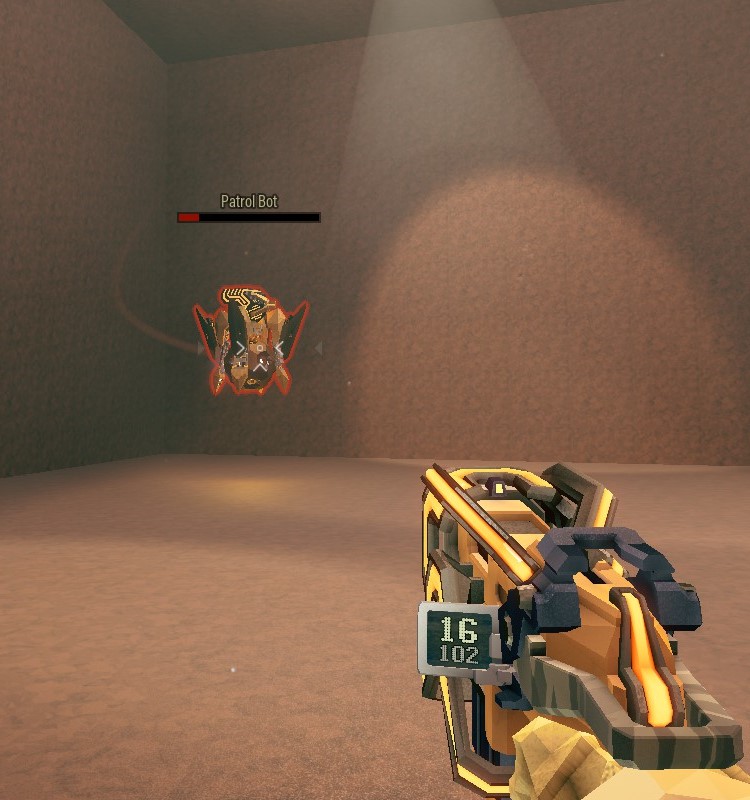
Cryo Cannon enjoyers are a bit out of luck. The power of the weapon comes from freezing opponents, and the robots have absurdly high freezing point values that range from 999 to 2000. The only exception is the patrol bot with its 375 freeze point value, which is the only target against whom the Cryo Canon can reasonably be used.

Frozen robots remain mobile, but they still take extra damage as if frozen. This, plus the weakness to melee damage, means a frozen patrol bot can be easily instakilled by a single Impact Axe. To help the Cryo Cannon, the devs made most robots take double damage from Ice-type damage.
The Cryo Cannon deals 6 Ice damage at a rate of 8 ticks per second, which is a lowly 48 DPS..so even with that large weakness to ice, the Cryo Cannon isn’t good at killing them. The only reasonable way to kill robots with the Cannon is to use the Ice Storm Overclock which doubles its Ice damage.
It is then recommended to pair it with the T4A damage mod which brings its damage up to a total of 18 per tick. This makes the gun ammo hungry, however. T5A, Cold radiance, dumps 60 cold (Not to be confused with the Ice damage type. Cold just lowers enemy temperature, it doesn’t do any damage to them) around the Driller and is heavily recommended to help freeze enemies.
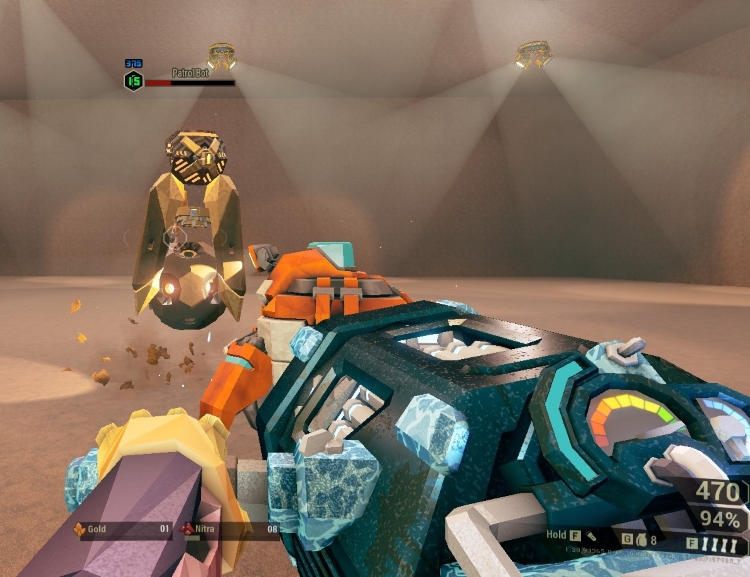
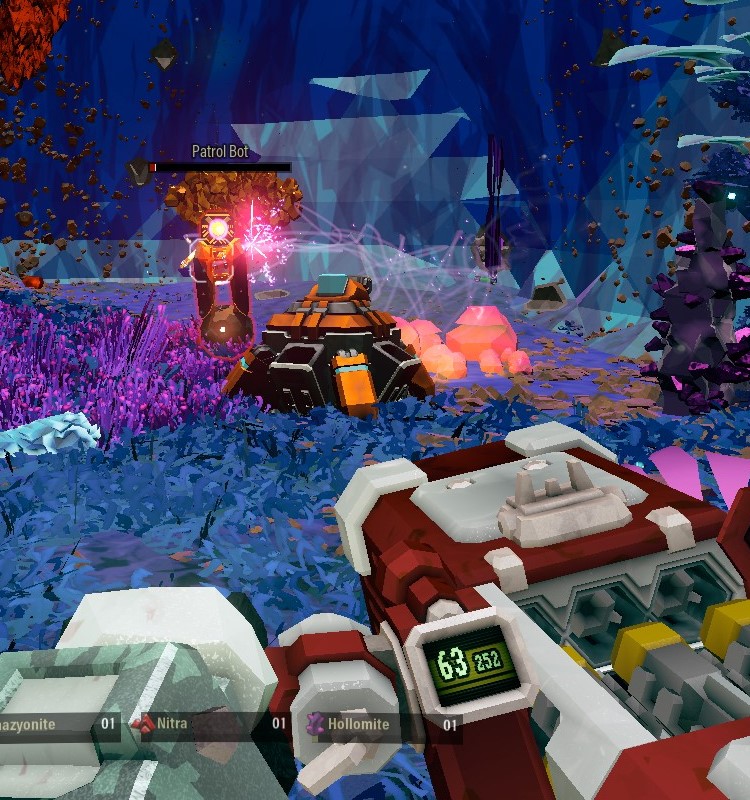
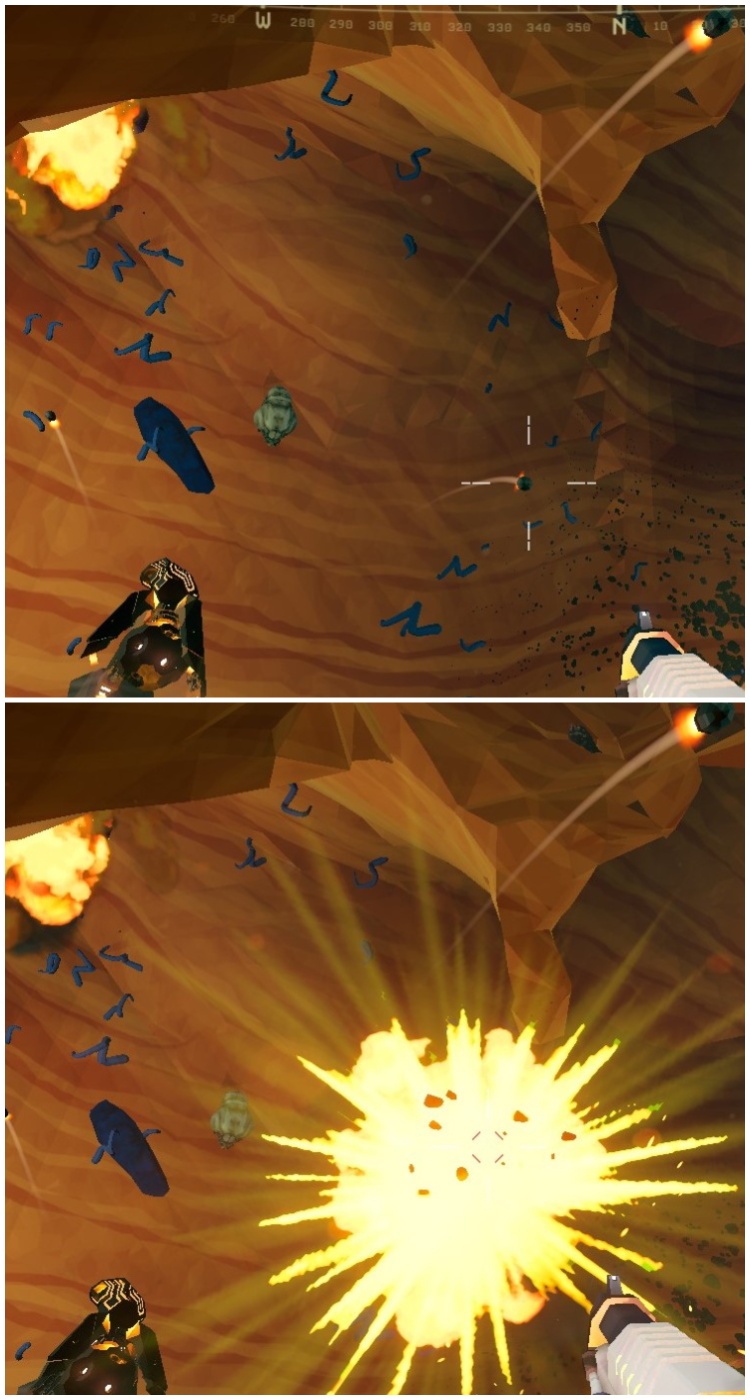
30 Ammo on a max damage Ice Storm Cryo Cannon build vs a Haz 5, 4-player scaled Patrol Bot.
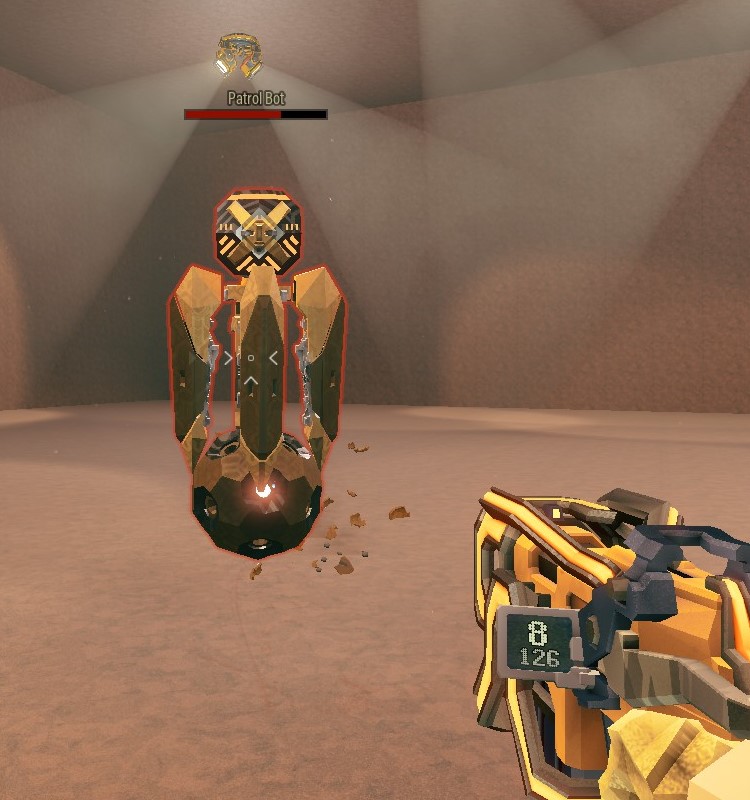
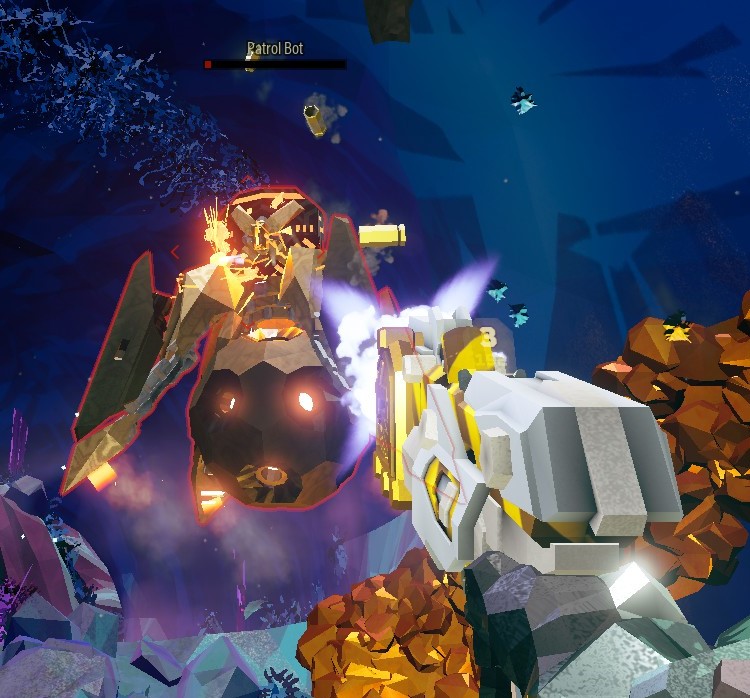
The Ice-Spear OC provides some use to people who just wish to run the Cryo Cannon but then have no use for it once the actual boss fight starts. A Single Ice spear to the weakpoint of a 4-player scaled, haz 5 Patrol Bot will deal enough damage to instakill it. Same goes for Turret-type enemies. Hitting these weakpoints with the spear can prove tricky sometimes, however.
Ice Spear instakilling a Patrol Bot.
Corrosive Sludge Pump
The Corrosive Sludge Pump fares a bit better as most robots take extra damage from its Corrosion damage type. That being said, the default Pump is a weapon that wants to create puddles to crowd control and clear weaker targets so it can feel anemic when fighting robots, especially Patrol Bots.
It works decently against stationary enemies because they can be afflicted by both puddles and direct attack DoTs (these are separate damage/slow sources). Its mode of attack makes it struggle against Shredders, unlike the previous two weapons. It’s often taken with the Volatile Impact Mixture Overclock.
Volatile Impact Mixture with the mod that buffs regular shot damage in T2C can spam its uncharged attack to deal decent damage when the need arises (it kills haz5, 4-player scaled patrol bots in 12-16 shots on average depending on how much time the DoT has to work) while still being able to crowd control enemies with the charged attack.

Several regular shots from Volatile Impact Mixture spammed into a Haz 5, 4-player scaled Patrol Bot.
The Sludge Blast OC focuses all fragments into a shotgun-like blast which deals extreme amounts of damage at point blank. Its damage scales with charged shot damage and fragment count. So both mods in T2A and T2B are a potential choice.
We prefer the latter as more fragments make it easier to hit targets while still dealing the same damage when fired point-blank. Despite its power, this is a hard sell as the OC turns the Sludge Pump into an ammo-hungry, low-range, single-target weapon.
Two Sludge Blasts vs a Haz 5, 4-player scaled Patrol Bot.
Subata 120
The Subata is a simple single-target hitscan pistol that’s all about quickly connecting a large amount of shots to enemy weakpoints. For this reason, the basic Subata is best used with the weakpoint damage mod in T4A that buffs it to 100% extra damage done to enemy weakpoints.
It can do good work when spammed into enemy weakpoints, especially the 3x weakpoint of a Patrol Bot, but it can also be somewhat anemic when fighting other robots. Patrol Bots move a lot, making repeated weakpoint shots difficult. It’s unremarkable against Snipers as they don’t have weakpoints.
One full mag (16 Bullets in this case) worth of damage if all bullets connect to the weakpoint of an Haz 5, 4-player scaled Patrol Bot.
The Explosive Reload OC is one of the possible choices on the Subata. It makes it so that each shot that embeds itself into an enemy deals 42 internal damage upon reload, and so relatively few shots can do decent damage.
It’s good against the Caretaker with its 1x weakpoint, but it’s not as strong as it was before on enemies with high weakpoint multipliers since it usually sacrifices the weakpoint mod for more ammo.
A full mag (8 Rounds in this case) shot into the body of a Haz 5, 4-player scaled Patrol Bot to demonstrate its damage. (It’s still best to aim for weakpoints whenever possible)
The Subata can combo with the Sludge Pump thanks to its T5C mod, Neuro-Corrosive Toxic Catalyst. Shooting an enemy affected by the Sludge Pump inflicts a DoT that lasts 5 seconds and stacks with every additional bullet.
Extra bullets don’t refresh the effect, they just add stacks, so it’s imperative to put in as many bullets as quickly as possible. The Subata is a decent, easy-to-use, yet somewhat unremarkable weapon..so it has always been a “love it or hate it” type of affair. A weakpoint Subata would be our pick for a driller without OCs.
Experimental Plasma Charger
The Experimental Plasma Charger has always been considered the strongest secondary in the Drillers arsenal thanks to its T5B mod, Thin Containment Field. When a normal shot connects to a charged one it causes an implosion that deals 240 Fire damage.
240 damage for 9 ammo in a 3-meter AoE is a pretty nice deal. It does take a lot of training to be able to use it properly so it’s not beginner-friendly. Also, robots don’t have any weaknesses or resistances to fire damage so TCF implosions just deal a flat 240 damage (not counting difficulty scaling).
A haz5, 4-man Patrol Bot has 1350 effective HP so it takes 6 implosions to bring down with the gun alone..or 32% ammo on a non-OC EPC with both ammo nodes. Because of this TCF EPCs usually end up taking a more supportive role, such as clearing bugs, quick mining, or terraforming.
A TCF implosion leaves behind a cloud of plasma thanks to the Persistent Plasma OC.
The Persistent Plasma OC spawns a field of plasma after a TCF/charged shot implosion that deals 35 fire damage per sec for 7 seconds. The plasma field also slows down enemies by 20%. This set of features gives the EPC some pretty potent anti-shredder and anti-swarm capabilities that can compensate for taking a single target primary.
Alternatively, the Heavy Hitter OC buffs EPCs regular shot damage and presents the EPC’s answer to single-target damage. It’s usually paired with the normal damage boost mod located in T1A. If it is then paired with T5A, Burning Nightmare, the EPC’s shots will deal 20 heat to the enemy.

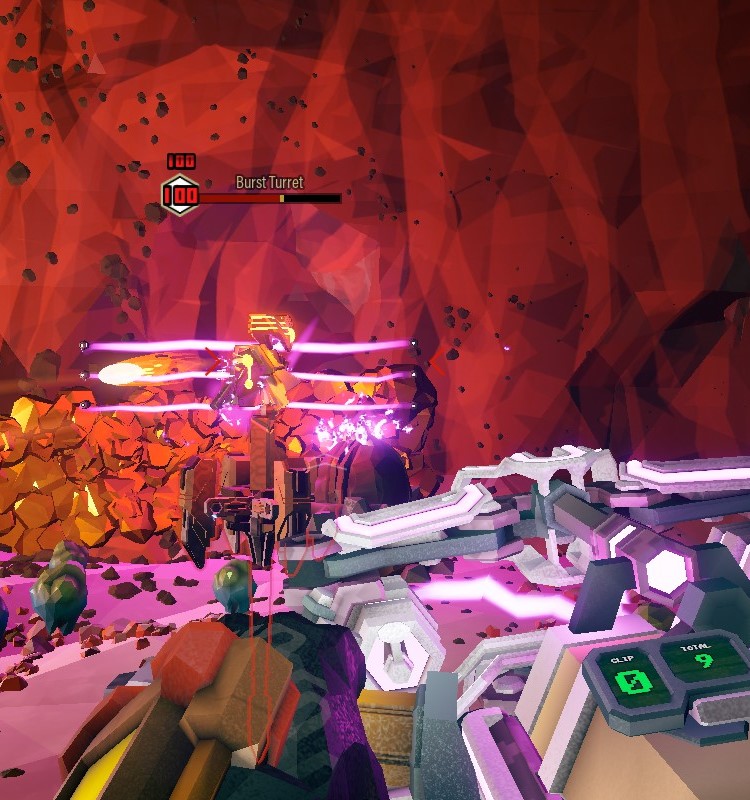
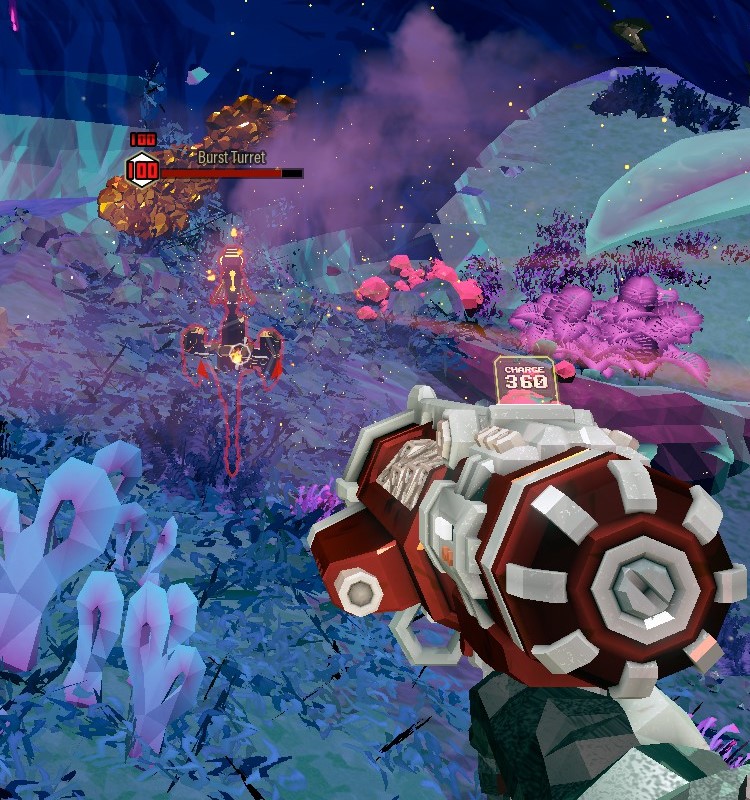
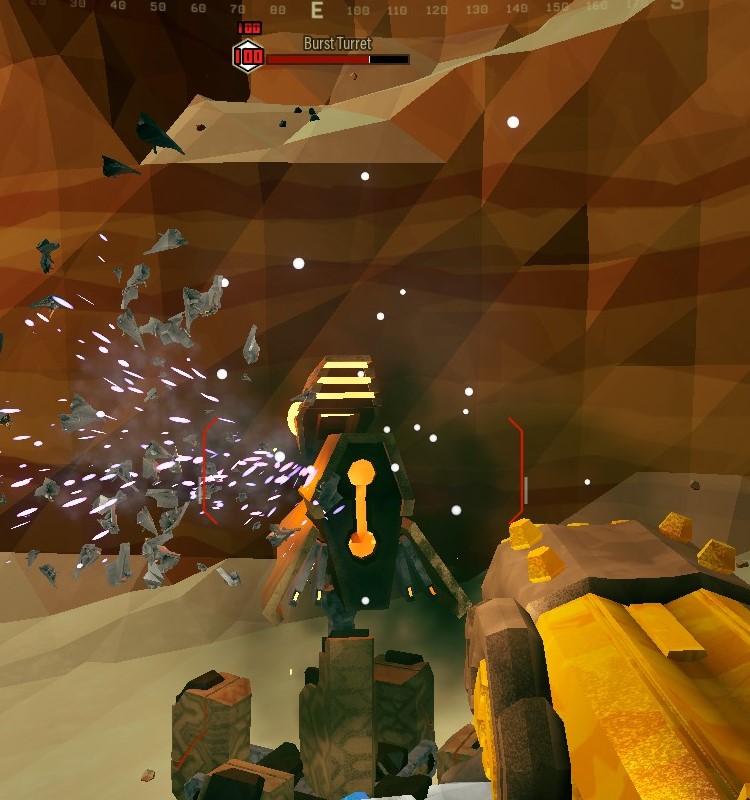
Heavy Hitter with the T5A “Burning Nightmare” mod setting a Burst Turret on fire.
This way Heavy Hitter can set Burster and Repulsor turrets on fire in 5 quick shots. It’s a good answer to Snipers since it only takes 3 shots in quick succession to ignite them. In some cases, it can be used against Patrol Bots as well.
Collete Wave Cooker
The Collete Wave Cooker is a weapon We wouldn’t recommend bringing to IS unless it’s being used to round out a loadout with a high single-target damage primary. The Wave Cooker is a low-damage weapon that at base can barely kill a grunt before it overheats. Its power comes from combining it with Driller’s primaries.
Bots on fire will get instakilled, they can’t be frozen (easily) and they’re immune to poison damage from neurotoxin. In short, there’s nothing for Colletes T5 mods to combo with. The only remaining T5 mod is Boiler Ray which causes bugs to explode, increasing its crowd clear potential against the weak bugs that most of the swarm consists of. And so we loop back to what we said at the start about the Wave Cooker.
Other gear
Impact Axes are the most common choice on IS since they help with Driller’s single-target damage. You can rapidly throw out axes by using animation canceling.
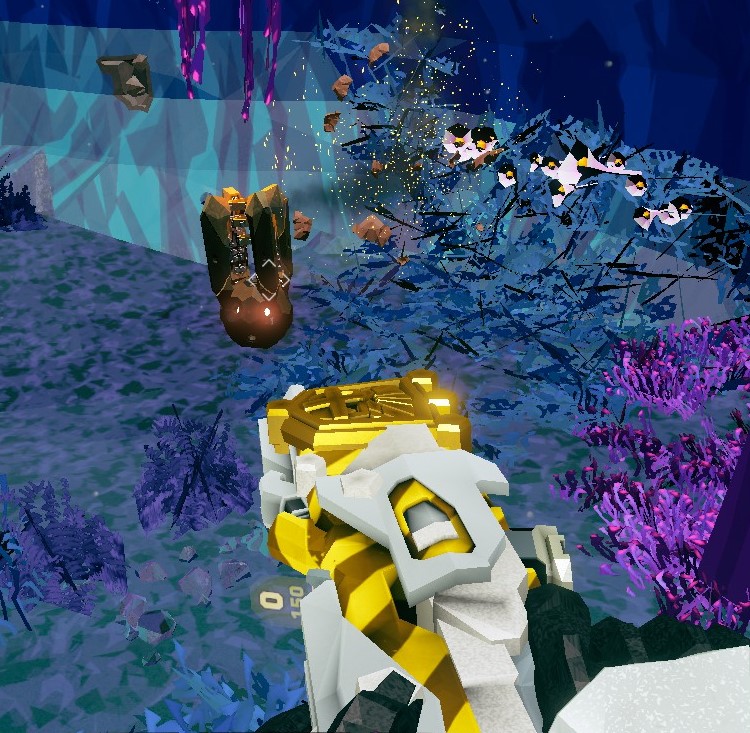
Press the laser pointer (or pickaxe button, but this one slows you down) just after throwing an axe to skip the throw animation, then repeat the process. Impact Axes can instakill tentacles during the Caretaker fight in Deep Rock Galactic on account of their 500% melee damage.
Some Drillers like to spam them into the Caretakers’s eye for a burst of damage. The rest of the grenades are unremarkable when fighting robots. HE grenades deal okay-ish damage due to the explosion weakness, but you only get a few of them.

Robots are immune to the poison DoT from the neurotoxin grenades. Neurtoxin grenade clouds can be detonated with a heat source, and they will deal enough heat to kill Burster and Repulsor Turrets as well as Shredders.
Spring Loaded Rippers are a weak grenade in general due to the way they operate. They deal explosive damage and not melee. As such it can do good damage to bots. But the only way to make it work is inside tight spaces where the Ripper can loop around to hit a bot several times.

The meta C4 configuration used to be going for both ammo nodes. Not for any Caretaker-specific reason, but simply because you could get 2 charges back per resuply. Now that C4 rounds up, resuplies will give 2 charges back even if you only take one ammo node. So, the meta is up in the air right now.
Our suggestion would be to grab the C4s Stun mod. It has a 100% chance to stun anything that can be stunned in a 10-meter radius. Robots are stun-immune usually but not Shredders. This way stun C4 can be used as a “Get out of jail free” card to keep the Driller safe.
Engineer
The Engineer is a flexible class thanks to his varied arsenal. His weapons are also capable of outputting some good burst damage when needed, which comes in handy in the Caretaker fight in Deep Rock Galactic.
“Warthog” Auto 210 Shotgun
The Warthog is a decent choice where simply shooting stuff is concerned. It is also the most commonly seen Engineer primary in a Caretaker fight because of its T5A mod, Turret whip. Shooting turrets causes them to fire a blast dealing 160 explosive damage in the direction they’re facing.
Engineers usually place turrets close to the Caretaker, often in some elevated position, so they can take care of Shredders and tentacles that way. Otherwise, it’s usually used as a simple workhorse gun and the fancier functions are offloaded to the secondary.
Because of this, there’s no hard rule on what OC to use on it. Stunner is used as a general OC for safety and a bit of extra damage while blasting bugs(Most bots can’t be stunned). Our favorite is the Magnetic Pellet Allignemt OC since it makes the gun more accurate and lets it deal bonus damage on weakpoint hits.
Turret Whip being used against a Haz 5, 4-player scaled Patrol Bot.
Some bring a Cycle Overload OC shotgun to burst down heavy targets (including the Caretaker) with mixed success depending on the enemy and range of engagement. This gun would be our pick for Engineers just starting.
“Stubby” Voltaic SMG
As for the Stubby, it’s the most rarely seen weapon on the Engineer. More so because of the weapon itself rather than the mission type in question. Those running the Stubby usually bring its only two meta options as of the time of writing. A max damage Stubby(usually with the weakpoint mod as well) with EM Refire Booster for some surprisingly good single-target damage or the Turret EM Discharge OC for swarm clear.
EM discharge can be used to damage the vents by placing them close to the caretaker’s weakpoints, but the damage done is extremely low. And while it can kill most of the Caretakers Shredders this way, it’s best to just use the turrets the way they were intended.
For those who insist on using the non-OC version of the gun in the Caretaker fight, our suggestion would be to build it for maximum damage and to grab the weakpoint mod in T4A. The Accuracy mod in T5C can help put a bit more distance from the Caretaker.
A max damage Stubby even without EM Refire Booster can one-mag a Haz 5, 4-player scaled Patrol Bot. Doing so is easier said than done, as usual.
LOK-1 Smart Rifle
the LOK-1 is a decent weapon but it requires a lot of getting used to the target lock mechanic. It locks onto a target’s center of mass, so shooting the constantly rotating Caretaker can be a pain. With its T5A mod, it can electrify targets, which allows it to combo with the Shard Diffractor.
The Loki is the type of weapon that needs OCs to shine. The Executioner OC can turn it into one of the highest single-target damage weapons in the game, which makes it great for the Caretaker fight in Deep Rock Galactic. Its other OC, the Explosive Chemical Rounds gives it some good crowd control. In a pinch, these explosions can be chained on robots for some servicible damage.
Deepcore 40mm PGL
The PGL without OCs is a weak weapon when it comes to dealing with Robots. Although rival tech is weak to explosion damage which this weapon solely relies on, it is too low to be used efficiently against them.
It can also spread heat with its explosion, but once again, it’s too weak to set the bots on fire… aside from Sniper Turrets on some loadouts. When bringing it into a Caretaker fight Engineers usually take either the Hyper Propellant or the Fat Boy OC.
Hyper Propellant turns its grenades into a massive, fast-moving projectile that deals tremendous damage to a single target. When it comes to Hyper Propellant, taking extra velocity can make the projectile move so fast the game will sometimes fail to register it hitting the enemy.
After a long while the armor break has been fixed on the Hyperpropellant and is now the best choice on it. The heat mod has also been fixed and will now properly convert half your direct damage into heat. Fatboy, aka mini-nukes, can be used to blow up the Caretaker’s vents with a little help from a C4 bridge, much like how a Driller would do it.
Breach Cutter
The Breach Cutter is a rarely seen Engineer secondary on IS. Most unusual since it is often considered to be one (if not the) best secondary option. This is because robots are small targets with surprisingly high HP values for their size, thus the beam which has to remain in contact to deal its damage, passes through them far too quickly.
Turrets and Patrol Bots take several beams to eliminate, making this weapon ammo-inefficient at dealing with Rival Tech in some cases. This doesn’t mean the gun is weak, just ammo-hungry.
Inferno is the recommended OC to make the gun do reasonably against the bots. It allows the beams to set enemies on fire.
The damage decreases the OC touts is a lie because it’s bugged. Oftentimes it does more damage to enemies. The exception are enemies that are resistant to fire damage like Opressors. Two shots will impart enough heat to instakill all turrets and tentacles if the shots connect to their head at the right angle.
Patrol Bots will take one less beam to kill on average, provided they aren’t given enough time to cool down. When fighting Patrol Bots try to shoot them from below when they fly up, this way the beam will spend more time inside the bot and hit the weakpoint, doing its maximum possible damage. Sometimes only 2 beams are enough to kill a Patrol Bot this way, but this is a pretty rare scenario.
Inferno overheating a Burst Turret.
Shard Diffractor
The Shard Diffractor is the most commonly seen weapon in IS. This is because, with its T4A mod, High-Intensity Heating, it can do a decent job at setting enemies on fire (a pattern is forming here). Paired with the extra damage to enemy weakpoints mod in T2A it’s usually used for single-target damage.
Its heat beam can easily ignite all turret types at any range. This makes it a powerhouse when dealing with the Caretakers Sniper Turret phase. Body shots to Patrol Bots will also ignite them. Accurate fire into a Patrol Bots weakpoint will usually see it destroyed the regular way before ignition can occur, especially with the T2A mod equipped.
In T5A, it has a mod that increases damage done to electrified or IFG-affected targets. This allows it to combo with the LOK-1 or the Stubby. It’s often paired with the Overdrive Booster OC. This OC doesn’t come with any malus to weapon stats.
Shard Diffractor bodyshots setting a Patrol Bot on fire.
Once initiated by pressing the reload key the Diffractor will consume 200% ammo to deal 250% damage. The beam can’t be stopped. Only canceled by switching weapons (this will consume 50% of remaining ammo) and the Engineer can’t move until the beam stops. This weapon would be our recommendation for Engineers just starting.
Other Gear
Grenades are usually picked by what is needed to round out the Engineers’ loadout. If taking the grenades just for the Caretaker fight then the options are either SSGs or L.U.R.E.s. Mines don’t do enough damage to be a threat to the Patrol Bots the boss will spawn during the fight, and Shredders won’t trigger them.
A similar story repeats with Plasma Burster grenades, although some Engineers do bring them to throw them at the Caretaker’s vents for a small bit of extra damage. SSG can aid the Engineer against Shredder swarms while still providing good value while fighting bugs. Lures are Engineers’ “Get out of jail free” card and they work on Patrol Bots, Shredders, and the Caretaker’s tentacles. Lures are our pick for beginner Engineers.
As for turrets, it’s dual turrets with the Defender System mod in T4A. This has been the meta for years now in Deep Rock Galactic and the Caretaker fight doesn’t change that. Two turrets bring the same level of ammo economy as the single turret, the same enemy breakpoints, but a good chunk more firepower.
Gunner
The Gunner is something of a generalist; having weapons that easily complement each other. When carrying a primary weapon geared for crowd clear, it’s common practice to pair it with a secondary that’s good at single-target damage and vice versa. (most classes do this to some extent as well) For this reason, the Gunner is a well-rounded class, and as such the IS mission type doesn’t usually change much about his loadouts when running with randoms.
“Lead Storm” Powered Minigun
The Lead Storm Minigun is Gunner’s premiere single-target primary. It’s simple to use and hitscan in nature so it’s a common sight in the Caretaker fight in Deep Rock Galactic. It’s also our pick for Gunners who don’t have any fancy Overclocks yet.

We even made a Minigun Build Guide for the no-OC gun some time back. With the T5C mod, Hot Bullets, the Minigun can also set distant targets on fire, further increasing its potency as a single-target weapon. With the accuracy mod in T1C the Gunner can maintain safe distance should the need to do so arise.
Its most commonly used OC, also called Lead Storm significantly increases its damage but roots the Gunner to the ground while firing. Some Gunners also bring the Burning Hell Overclock. With this OC, the gun projects a heat cone 5 meters in front of it but makes the gun overheat faster.
Hot Bullets heating a Patrol Bot when its weakpoint can’t be seen.
This can be a boon to the weapon since it can proc Hot Bullets faster. When Comboed with Hot Bullets the Minigun can set just about anything on fire easily. The obvious downside is that it forces the Gunner practically into melee range.
“Thunderhead” Heavy Autocannon
The Thunderhead Autocannon deals a part of its damage as an AoE explosion. This, combined with its reasonable fire rate when fully spooled up makes it a decent weapon against Rival tech. However, its poor accuracy and slow fire rate growth mechanic make it unwieldy during the Caretaker fight.

Gunners stay mobile in combat by “Bunnyhopping”. This means chaining jumps and firing the weapon in mid-air. That way the gun doesn’t slow him down. The aforementioned growth mechanic can make the Autocannon feel anemic as it has difficulty reaching maximum fire rate when under heavy assault by the Caretaker.
In combat against regular bots, it doesn’t have the accuracy to take advantage of their weakpoints, as a result, it has to break them through sheer volume of fire.
The mods that give it better accuracy or faster fire rate growth are in the same tier as the fire rate mod, and the weapon really needs fire rate to eliminate targets efficiently. Gunners bringing the Autocannon often rely on their secondary for single-target damage.

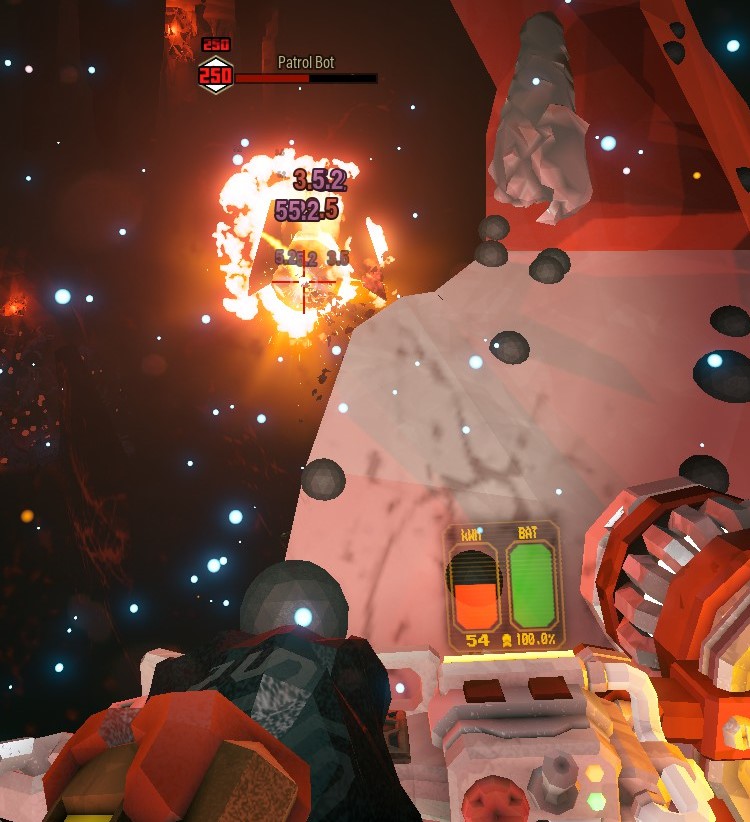
It took our 32311 Big Bertha an average of 5% total ammo to kill a Haz 5, 4-player scaled Patrol Bot at a distance of 10 to 15 meters.
Gunners who intend to use the Autocannon for single-target damage usually take the “Big Bertha” OC which makes the gun more accurate and deal a lot more damage per bullet. Sometimes Gunners take the Splintering Shells OC. We have no strong opinions one way or the other about it. The Neurotoxin Payload OC doesn’t work on robots so it’s used primarily for crowd clear during the hacking phases.
“Hurricane” Guided Rocket System
The Hurricane is a bit of a mixed bag but can perform great with certain OCs. In its non-OC form, the weapon is better as an AoE crowd-clear weapon. Building the non-OC gun for single-target damage just brings it up from mediocre to decent but sacrifices what it’s great at (AoE crowd clear) to do so.
Well…this is the usual census where Hurricane builds are concerned. However, since robots take increased damage from the explosive damage type, the non-OC gun can offer quite reasonable performance against most robots in a single-target role.

To the point where the rocket launcher with only the weakpoint mod equipped in T4A can kill a haz 5, 4-player scaled Patrol Bot in 13 rockets if all of them connect to its weakpoint. However, the no-OC Hurricane will suffer against the Caretaker as it has 45% resistance to explosive damage.
In T5A the rocket launcher has a mod that converts 33% of Area Damage and Direct Damage into heat. (Makes the gun weaker to let it heat enemies) While this sounds like a good deal, the amount of heat inflicted is low enough that it’s rarely worth using it on robots for reasons that are too long to list in a simple fashion.
Either because some robots (such as Patrol Bots) will be mostly dead by the time they ignite or the cost of ignition is too high to justify the ammo used in this manner. That being said the Jet Fuel Homebrew or the Plasma Burster Missiles OCs make it a great single-target weapon.

It only takes 6 rockets for a jet Fuel Homebrew Hurricane built for direct damage and weakpoint damage to kill a haz 5, 4-player scaled Patrol Bot if all of them connect to the weakpoint.
JFH sacrifices the AoE damage of a missile for a lot more direct damage. With damage in T1B and the weakpoint mod in T4A, the weapon becomes a good source of single-target damage. Plasma Burster Missiles are a good OC as well. Holding the crosshair over the enemy causes plasma rockets to spin around and hit the target not unlike a swarm of insects.
It’s usually built with Ammo in T1A. The AoE damage mod In T4B will add a small but reliable amount of damage to these rockets. Going for the weakpoint mod can add a lot more damage but can be inconsistent as the Rockets have a mind of their own. Overtuned Feed Mechanism is another choice. It simply buffs the fire rate so it slots into the regular single-target damage build on the non-OC gun.
Plasma Burster Missiles shredding a Haz 5,4-player scaled Patrol Bot.
“Bulldog” Heavy Revolver
The Bulldog Heavy Revolver is a common single-target option. It’s a weapon that deals a good amount of damage per shot and is all about hitting enemy weakpoints. For this reason, the Weakpoint mod in T3C is heavily recommended.
In its non-OC form, it’s more of a precise priority target killer rather than a weapon for magdumping into weakpoints of massive targets. However, since there are usually several resupply pods left by the time the team starts the Caretaker fight in Deep Rock Galactic, and it’s accurate enough to be spammed from a safe distance, it can be used in this role if the need occurs.
An OC commonly used with it is Six Shooter. The boost to fire rate makes it better at rapid firing into the Caretaker’s weakpoints and gives a few extra rounds as a bonus. Elephant Rounds goes the other way. It doubles the damage per bullet but makes the gun significantly unwieldy. It’s used to slowly snipe weakpoints from afar or quickly mag dump into the very same in close-quarters combat for a nice burst of damage.
It took only 5 bullets for a Six Shooter Bulldog with no damage mods to kill a Haz 5, 4-player scaled Patrol Bot. The reduced spread mod in T2B can make landing multiple weakpoint shots a quick process but will sacrifice ammo to do so.
As Rival tech explodes when ignited (and the Caretaker can’t be set on fire) Volatile bullets usually don’t find their place among IS loadouts. Another use for the Bulldog is with the Magic Bullets OC. This is the crowd-clear option. With both ammo nodes, neurotoxin in T5B and AoE explosion in T3B.
By shooting the ground next to bugs the bullets and their ricochets create explosions which have a chance to affect bugs with neurotoxin. Against robots, it doesn’t offer much as they’re immune to poison from neurotoxin. It can do some light anti-shredder duty thanks to the ricochets and explosions. The OC is usually brought to round out the Gunner’s loadout.

Two shots from an Elephant Rounds Buldog with no damage mods into a haz 5, 4-player scaled Patrol Bot. With both damage mods, ER can kill in two shots, but the loss of ammo is not worth it.
BRT-7 Burst Fire Gun
The BRT-7 is a much simpler weapon that also wants its user to shoot weakpoints. However, unlike the Bulldog which is a slow but precise weapon, the BRT is a fast burst-firing gun with mediocre accuracy. This can make it better for dumping damage into enemy weakpoints up close. This is the only thing the BRT usually does better than the Bulldog (depends on the build).
It’s built for Accuracy and Ammo with the T1B and T4B mods respectively. Going with the 6-round burst in T5B is the way to go for magdumping. The rest of the mods are usually fire rate and damage.
The three OCs its usually paired for single target damage are Lead Spray, Experimental Rounds, and Compact Mags. Lead Spray gives it tremendous damage, but its massive accuracy malus turns the weapon into a shotgun basically. It can throw good damage into the Caretaker’s eye, but hitting weakpoints of other robotic enemies can be problematic if not extremely close.
Lead Spray killing a haz 5, 4-player scaled Patrol Bot in one mag at point-blank range.
Experimental Rounds can do similar damage to LS but it sacrifices Max Ammo and Mag Size to achieve this. It does get to keep the gun’s base accuracy so in regular combat it tends to perform similarly despite the lower total damage pool just by the fact that it doesn’t miss as much. It’s not as good as LS at point-blank mag dumping due to the lower total damage pool, but that’s the point.
Experimental rounds doing the same despite its much lower mag size simply by being a lot more accurate.
Compact Mags give the gun extra ammo, so it can ditch the Ammo mod and go for the extra damage to weakpoints mod in T4C. Because of this, it can do the same amount of damage as ER when hitting weakpoints while usually having a bit more ammo (if the player can reliably hit weakpoints with it).
However, since it relies on crits to perform well, missed shots are heavily penalized. Its lower direct damage makes it anemic when shooting an enemy’s body.
Electro-Minelets is this weapon’s crowd control OC. Shooting the ground creates minelets that afflict enemies with an electrocution DoT. One full DoT is not strong enough to kill a grunt unlike Magic Bullet’s poison, but it provides a much greater and more reliable slow than the Magic Bullets neurotoxin. Use it with the Blowthrough mod. Like with Magic Bullets, it is often used to round out a loadout.
Armskore Coil Gun
The ArmsKore Coil Gun is a slow single-shot generalist weapon that’s usually used in a supportive role to the Gunner’s main gun. It can do good damage per shot or crowd control by stunning and fearing opponents or electrocuting enemies with its trail…but then it has to spend 1.9 seconds reloading.
Gunners often pair it with the “Born Ready” perks so they can holster the gun and have it auto-reload for the next time it’s needed. Because of all this, the non-OC weapon has the weakest single-target damage output amongst Gunners secondaries which limits its use in the Caretaker fight in Deep Rock Galactic. Gunners bringing it into the fight use it to support their main weapon.
Triple-Tech Chambers is the king of generalist build OCs. It allows the gun to fire two additional times. The second and third shots deal 75% of the first shots damage and create their trails (whose damage can stack). This way the Coil Gun can be used to dish out a burst of damage to a single target or create three electric trails for crowd control.
Shooting a haz 5, 4-player scaled Patrol Bots weakpoints with TTC at close range.
TTC is usually built for Ammo, Controlled Magnetic Flow in T2B, Stun, Shockwave in T4B, and Electric trail in T5C. Another option is the Hellfire OC, it creates a heat trail at full charge that can easily set all turret-type enemies on fire.
The heat trail when spammed is capable of killing Patrol Bots, but they usually move fast enough that most attempts end up being an exercise in futility. For some reason, the Caretaker’s tentacles are immune to Hellfire’s heat trail at the time of writing. The Hellfire coilgun with the T5B mod can be used to mass ignite bugs and Shredders, turning it into a crowd-clear option.
Igniting a turret using the Hellfire Coil Gun OC.
Other Gear
As with most classes, Gunner’s choice of grenade is usually to round out his loadout. Against the Robots, a direct hit from a flame grenade can instakill turrets. Two flame grenades can instakill the Caretakers tentacles should the need arise to do so. Cluster grenades when placed in corners can deal a lot of damage to the Caretakers tentacles by focusing all bomblet explosions in one place.
Both Leadbursters and Cluster grenades can deal decent chunks of damage against stationary enemies but have difficulty providing value against moving targets (Patrol Bots) out in the open.

The Shield configuration remains the same at either max duration + range or max range + duration. The max duration shield will keep the team safe for longer. The larger shield will give more room to maneuver which makes it easier to dodge attacks that go through shields such as the Caretakers phase bombs.

Scout
The Scout is the most mobile of all the classes. This, coupled with the fact his primaries usually have good accuracy, and the Scout can easily keep himself relatively safe during the Caretaker fight in Deep Rock Galactic. His high single-target-damage potential and the ability to easily follow the Caretaker’s eye weakpoint make him good at taking on the boss.
Deepcore GK2
The GK is a decent option against robots since it can put bullets into weakpoints with reasonable accuracy. The non-OC version of the gun is usually built for accuracy, damage, and maximum fire rate to help it do its job.
The Gk2 is usually paired with the AI Stability Engine OC. Unlike the non-OC version of the gun, it takes the mag size increase rather than the accuracy mod for great sustained damage at range.
The amount of damage dealt from 15 bullets (half a mag) to a Haz5, 4-player scaled Patrol Bot by a no-OC GK2 built for max damage if all shots connect to the weakpoint.
The Bullets of Mercy OC can put in some good work but it struggles as the usual on fire! effect, freeze, and stuns don’t work on robots, leaving the scout only with the crossbow’s special bolts and grenades to trigger its increased damage bonus.
M1000 Classic
The M1k is usually simply built for damage. Honestly, it is probably the most capable of Scouts primaries, and there are many options available as a result. The non-OC M1K is such a great gun on its own that just about any Overclock works fine on it. Hoverclock for extra mobility, Active Stability System for faster Focus Shots, Minimal Clips for more Mag Size, all of them work nicely.
Hipster when properly built turns the M1K into a generalist weapon that’s decent in just about any role and gives Scout a lot of flexibility as a result.

Two Focus shots from a non-OC M1K built for maximum damage.
Even the Supercooling Chamber OC finds its niche on IS, turning the M1K into a devastating anti-robot weapon that can 2-shot a Patrol Bot. Naturally, this comes at the expense of flexibility.
(Make sure to grab the weakpoint mod in T4B when running SC, otherwise, the OC won’t be able to confer its bonus since the gun by default deals 0% extra damage to weakpoints)
DRAK-25 Plasma Carbine
The Drak is the weakest of the Scout’s primaries in this role. This isn’t surprising since it’s Scout’s crowd-clear option. So our recommendation for Scouts just starting would be to stick with the first two.
The Drak can do good work with the Thermal Exhaust Feedback OC. For every 10% on the heat meter above 50%, the gun adds +3 fire/heat to its projectiles up to a maximum of +12 fire/heat at over 90%. This way the Drak can be used to ignite.
Thermal Exhaust Feedback DRAK overheating a Patrol Bot.
This takes some getting used to as the gun’s default heat meter is lackluster, to say the least. Our recommendation would be to install the better heat meter mod. Another OC the Drak is sometimes paired with is the Overturned Particle Accelerator.
It boosts the Drak’s damage but it comes with a significant accuracy penalty. We’re pretty indifferent about this OC as it sacrifices so much of the gun’s flexibility.
Jury-Rigged Boomstick
The Boomstick is a generalist weapon that’s usually used as a source of Burst damage to support Scout’s “Get in get out” playstyle. Against the Caretaker itself its slow reload and massive spread make it an unimpressive choice.
However, it can find its place in anti-robot loadouts thanks to its T5C upgrade White Phosphorous Shells which allow it to ignite enemies.
With it, the shotgun converts 50% of its direct damage to fire damage, which in turn does the same amount of heat to the target. This heat can also apply through armor allowing it to kill tentacles by shooting their indestructible armor point-blank.
Boomstick with White Phosphorus Shells overheating a Burst Turret.
A non-OC shotgun with just the T3C damage mod can kill a tentacle by heat in 4x shots, for instance. More damage is a must-have for the shotgun to be effective in this role as more damage means more heat. Half of its Overclocks simply juggle its stats around which allows users to customize the shotgun to their preference.
It takes 3 to 4 shots from a Jumbo Shells Boomstick with the T3C damage mod to overheat a Patrol Bot depending on how many pellets connect.
Jumbo Shells would be the standout mod for this role. With it, a Boomstick with the T3C damage mod can one-shot all turrets at point blank (getting close might be difficult). 4x shots can kill a Patrol Bot or a tentacle if they’re not given enough time to cool down.
Zhukov NUK17
The Zhukovs are somewhat of the opposite of the shotgun. Single-target damage is usually the only thing they do better than it, but in return, they don’t have the shotgun’s flexibility. It’s more accurate, so it can actually shoot the Caretaker’s weakpoints.
Grabbing the Accuracy mod In T3B is pretty much a must-have for this. It is then often paired with the weakpoint mod in T4B. Conductive bullets in T5A to help it deal damage to targets affected by electricity/IFGs are also recommended.
Damage done by one magazine of Embedded Detonators to a Patrol Bot (Aimed at the weakspot, but mostly just Spray and Pray..so some randomness is involved when it comes to damage done)
The non-OC gun is nothing special on its own. For this reason, most who use the Zhukovs for this role bring the Embedded Detonators OC. Bullets that deal HP damage will deal 38 internal damage to the target upon reload. This allows the gun to do good damage to the Caretakers 1x weakpoint. If using this OC it’s best to build for max ammo rather than weakpoint damage.
Nishanka Boltshark X-80
The Nishanka Boltshark X-80 is an interesting one. The regular arrows are okay at taking out robots. With the damage-up mod in T2A, it takes 3 Arrows to kill Turrets (2 for the snipers) and Patrol Bots. Provided the player hits weakpoints, of course, which can be difficult sometimes.
Out of the 3 special arrows, Phermone bolts, and Taser bolts are an option. Phermone bolts work on Robots and, as a result, can be used to turn them against one another. Patrol Bots are most affected by this, but the Burster Turrets will usually keep firing on the dwarves.
Taser bolts can deal some good damage to Rival tech due to their electricity weakness. But as they’re a fairly slow DoT effect, it takes them time to do so. Taser bolts can enable the T5B mod, Magnetic Shafts. This way they can be comboed with the Trifork Volley OC for some good damage.
A Taser Bolt + Trifork Volley combo on a Haz 5, 4-player scaled Patrol Bot.
The Nishanka also has access to the Fire Bolts OC. Once embedded into an enemy (or the ground next to them in the case of turrets) the bolts will heat them. the bolts don’t cancel out their natural cooling rate so several bolts will be required to overheat an opponent.

Four Fire Bolts overheating a Patrol Bot.
Since they only last for a few seconds they have to be applied in quick succession. It takes 2 to kill snipers, 3 to kill turrets, and 4 to kill Patrol Bots and Tentacles after a while.
Other Gear
This is an interesting one because Scout grenade’s main purpose is to provide potent crowd control in a pinch, and robots do a good job at resisting/avoiding their effects. IFGs can be used to deal extra damage to Turrets for instance, or to slow down Shredders but they do not affect Caretaker’s weakpoints and usually can’t reach Patrol Bots.
Cryo grenades are made weak thanks to Rival Tech having high freezing values. Since a Cryo grenade deals 250 Cold, it takes 4 of them to freeze turrets. Patrol Bots are their only reasonable use case, as it takes 2 grenades to freeze them. Pheromones probably work the best since they affect Patrol Bots.

Although they should affect Burster Turrets, they mostly prefer to keep shooting at the dwarves rather than pheromone-affected enemies. Voltaic Stun Sweepers are a good anti-Shredder option. They also seem to briefly immobilize flying Patrol Bots on hit.
Caretaker Fight: General Class Function
Now that the arena has been prepared for combat, the next question is “What do I actually do during the fight?”. As with most things in Deep Rock Galactic, especially in the Caretaker fight, this isn’t an easy question to answer.
And of course, random teams bring with them random loadouts so who gets to prioritize what may change. Drillers usually tend to take a supportive role due to them often lacking direct damage against the Caretaker. Engineers and Gunners are the most flexible due to their varied loadouts. Scouts’ single-target nature usually sees them focus on the Caretaker and Patrol Bots if needed.
Driller
As the Driller it’s best to adopt a supportive style of play in the Caretaker fight in Deep Rock Galactic. The Driller class has amazing crowd-clear capabilities, so the devs balanced this by making his single-target damage capabilities weaker than average. Depending on the build, Drillers can struggle with targets who boast massive HP pools.
Drillers have tricks that help them deal with large targets, such as freezing a Praetorian and then using Impact Axes, but as we’ve already mentioned many of those tricks don’t work on the Caretaker. At the start of the fight, Drillers are usually seen throwing C4 from above the Caretaker (either from a ceiling bunker or C4 bridge).
![]()
Even with the Taker’s large explosive resistance, being able to hit all 4 of his vents with a C4 can deal tremendous damage to it. Thanks to this trick, the entire vent phase can outright be skipped with enough C4. Such high is the value of this maneuver that some organized teams give the Driller his own resupply pod exclusively to keep him stocked with explosives.
Once the vents have been taken care of, the Driller rejoins the rest of the team to assist, sometimes with the help of a Gunner’s zipline. The flamethrower is a powerhouse when dealing with robots. With it, the Driller is the most capable class when it comes to dealing with machines.
![]()
However, it only deals moderate direct damage, which makes it unimpressive when wielded against the Caretaker. For this reason, Drillers support their team by fighting Caretaker tentacles and Patrol Bots rather than the boss itself. This greatly reduces pressure on the team and lets them throw more firepower at the boss.
A similar story repeats itself when not using the flamethrower, but usually with a lesser emphasis on Patrol Bots. (varies based upon build). Drillers usually do good work against Shredders, so it helps the team to focus on them. A driller can destroy a lot of Shredders just by throwing C4 from his position right after they spawn above the Caretaker.
![]()
Dealing with Snipers is a mixed bag. It can be quite good with a Fuel Stream Diffuser, a Heavy Hitter EPC, or maybe even an Explosive Reload Subata. In that case, focus on them heavily as they spawn since turrets present a great danger to the team.
When it comes to dealing with the Caretaker directly, the Driller can do a burst of damage to the eye by animation canceling Impact Axes as mentioned previously. Before the red HP bar is depleted, it’s best to return to the starting position to be ready to throw C4s when needed.
Be careful when staying in the ceiling bunker, as tentacles and phase bombs can still reach you there. Make some room to move.
Engineer
Engineers are a class that can dish out large bursts of damage when necessary. Contrary to popular belief Engineers carry a reasonable ammo supply, they just have the option to dish it out quickly in combat. For that reason some consider him to be a Burst DPS class, in addition to his defensive capabilities.
In the Caretaker fight, this means a good amount of damage done to the boss will usually come from the Engineer. A Shard Diffractor with Overdrive Booster or a LOKI with the Executioner OC can make a mockery out of the Caretaker’s eye weakpoint, for instance.
![]()
With the Fat Boy OC, the Engineer can be used as a replacement for the Driller in the vent destruction maneuver. Engineers’ turrets do a good job of keeping the Caretaker suppressed. On their meta configuration, they usually have 25 meters of range, so they have to be placed closer to the Caretaker.
Usually, it’s best to put them in an elevated position so they can deal with threats easier. This way turrets can shoot tentacles and shredders as they spawn from the boss. When using the Turret whip, wait for the tentacles to stop their laser barrage.
![]()
Turrets won’t shoot the Caretaker’s weakpoints.
Once they stop shooting there’s a window of opportunity where they sit pretty still. This is the time to hit them with blasts from both turrets. As turret whip deals explosive damage, the two hits will deal devastating amounts of damage to the tentacle if they connect.
The Engineer usually stays close to his turrets so he can reload them. Be warned that standing still in such proximity to the Taker can often have painful consequences, so make sure it’s relatively safe to do so (don’t reload while under fire).
![]()
Turrets can keep the Engineer (and not to mention the team) safe from shredders, and even tentacles after some work. Lure grenades can be used to keep the Engineer safe from just about most threats when needed (Snipers will ignore them most of the time though).
Anti-Sniper capabilities depend on loadout. An Engi with a Shard Diffractor is a powerhouse against Snipers and as such should always prioritize them. To conclude Engineers are flexible in what opponents to prioritize in a team, but have a strong emphasis on the boss itself.
![]()
Gunner
The Gunner is a sustained DPS class with the strongest anti-mistake tool in the game. He doesn’t have the Engineer’s burst potential, but he has a large ammo pool and amazing uptime on his primary weapons.
Add the large variety of weapons that can do good single-target damage, and his role in the team is probably the most flexible. Gunners are also the most team-oriented class. This can be seen as a tendency to stick close to the team in regular play and provide assistance through the use of shields and a large amount of suppressive fire.

This doesn’t change much in IS, and the Gunner will usually prioritize killing the highest-value targets. This could be the Patrol Bots that spawn at the start of a phase, for instance. The Gunner’s primaries are usually good at taking out Sniper Turrets.
If none of the other classes in the team can deal with them well, this task usually falls on Gunner’s shoulders. Basically, prioritize what poses the most danger at the moment, or is applying a lot of pressure on a teammate.
![]()
If this danger can’t be eliminated quickly, throw your team a shield. Oftentimes this is at the start of a phase when Snipers/Shreddes Patrol Bots and tentacles all spawn almost at once. This shield also serves the Gunner as his builds oftentimes don’t have a great answer to Shredders.
The Engineer who usually sticks relatively close to his turrets in particular enjoys having shields. If the threats are dead, or the team can handle them well, then focus fire on the Caretaker, but keep an eye out for trouble.
Like Engineers, Gunners are also flexible on what targets they can comfortably engage, but their sustained damage output over a long period of time usually puts a higher emphasis on enemies the Caretaker spawns during the fight.
![]()
Scout
Scouts have their high mobility to assist them in the Caretaker fight. For this reason, staying out of danger is sometimes as simple as grappling away. As the class with potent single-target damage, Scouts are often found doing damage to the Caretaker’s weakpoints.
![]()
His high mobility means he can easily follow the Caretaker’s eye as it changes position. Alternatively, he can quickly get in close to deal damage with his secondaries. Patrol Bots are a good target for the Scout if they start causing too much of a problem for the team.
Scouts weapons aren’t anything special when it comes to dealing with Snipers as they have no weakpoint, but since they’re accurate enough to actually hit them, you’ll probably have to burn some ammo to help deal with them.
![]()
Players can stand atop the Caretaker. However, this will aggro its Tentacles. Reviving someone who was downed while on the Caretaker can be messy business.
This single-target nature often means that Shredders can pose a problem without Voltaic Stun Sweepers. Either keep your distance or go to a teammate who can deal with them easily. In an organized team, the Scout is the class that initiates the Caretaker fight. This way the team can properly get in position before the Caretaker fight begins.
Additional Notes
Some more important tips are to remain mobile at all times. With so many things shooting dwarves around it’s hard to tell when something’s begun targeting the player, so maintain constant movement.
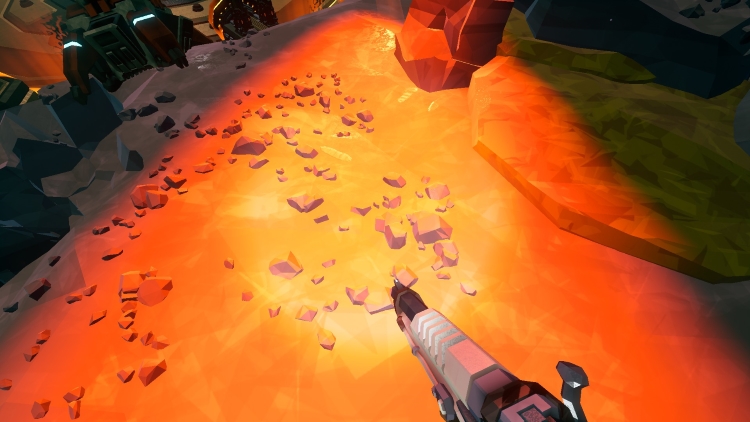
Stay mobile during a phase bomb attack. Trying to resupply or revive a teammate can be dangerous. Consider weathering the storm until the Caretaker exhausts its supply of phase bombs.
![]()
The Caretkaer’s tentacles have a 500% weakness to melee damage. A pickaxe power attack with the damage-up mod can always instakill them.
Dwarves on ziplines will aggro just about any nearby robot in the arena. Best use them for quick traversal.
![]()
Lure aggroing a Tentacle.
Walking on the Caretaker’s platform triggers a powerful shock attack after a few seconds. This attack slows dwarves down and can open them up for additional damage from other sources as a result. Be mindful of your team’s position before attempting to run over the platform.
Keep in mind that the Tentacles always respawn at the start of the Caretaker’s phases, so there’s sometimes no point in spending ammo on them if they respawn while the Caretakers is about to have its weakpoints destroyed (Destroying all vents or depleting a red HP bar).
![]()
Note that in our guide we put a lot of emphasis on taking down the Caretaker’s tentacles. A common argument is that the tentacles don’t pose much of a threat and that the team is better off just focusing on the boss itself to speed up the fight.
![]()
We find this to be a valid argument, as teams of experienced players playing to the strengths of their class can make an absolute mockery out of the Caretaker fight in Deep Rock Galactic on Haz 5. However, this approach increases the chance of things spiraling out of control as mistakes become more punishing.
![]()
Since most players play with randoms, all of whom bring their random loadouts, We’ve adopted a “slow and steady” approach to our beginner guide. Because while it might be slower to systematically dismantle the Caretaker’s defenses, in public plays it usually results in better success rates.
![]()
As player skill increases, some of the steps written here can be skipped, or priorities flipped around to increase mission progression speed. This will come with experience, however.
Enemy Roster: General Notes
This section includes notes on enemies most commonly encountered on Industrial Sabotage missions or the Caretaker fight in Deep Rock Galactic.
All robots are instakilled when set on fire except for the bosses. Rival tech can’t be frozen in ice but will take extra damage from the status as expected. That being said, most robots have absurdly high freezing temperatures ranging from 999 to 2000, making freezing them often an exercise in futility.
Robots can’t be poisoned and are immune to neurotoxins. All robots have a weakness to Ice-type damage excluding Shredders and Nemesis. All robots are weak to explosions, and electricity. The exception to the previous rule is Nemesis who has no weaknesses and the Caretaker who receives no bonus damage from electricity and resists explosions. The Caretaker is the only Rival enemy type that has a weakness to fire (5% Fire weakness)
Shredder
100% explosion weakness, 30% electricity weakness, 200% Melee weakness, 100% Poison resistance.
It has no weakpoint. It uses normal enemy scaling (doesn’t scale with player count). 35 Base HP. On haz 5 it gains 1.2x resistance, or 42 eHP.
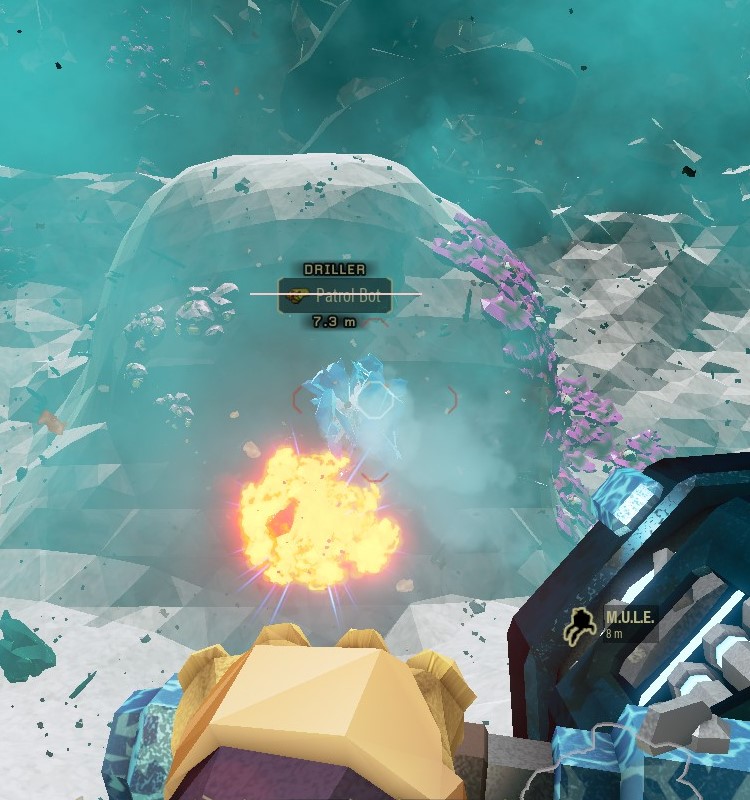
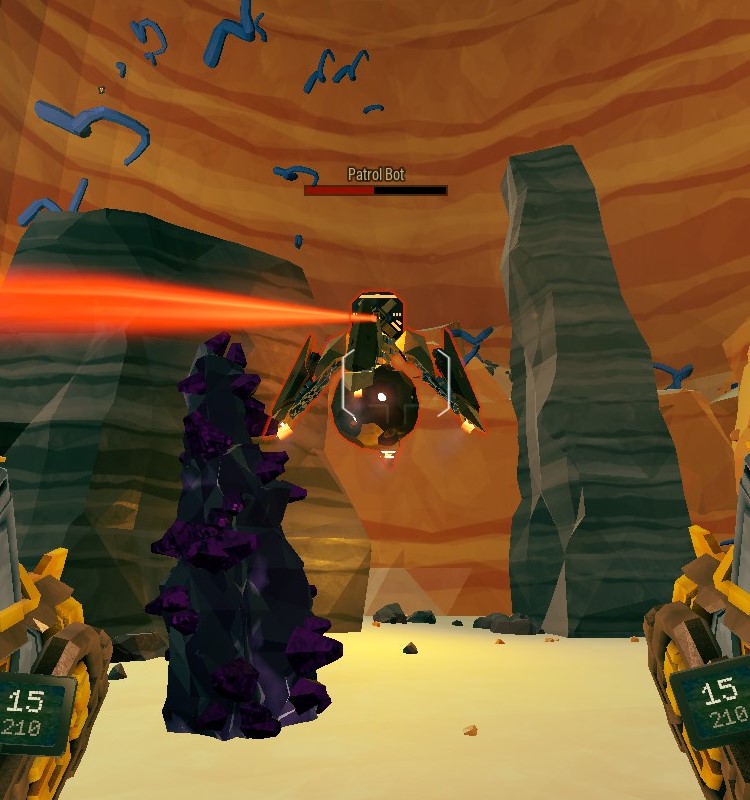
Patrol Bot
100% explosion weakness, 30% electricity weakness, 100% Ice weakness, 200% Melee weakness, 100% Corrosive weakness, 100% Poison resistance.
Its “head”, the orange glowing gun on top of it, is a 3x weakpoint. The bot uses large enemy scaling. It has 900Base HP. On a 4-player haz 5, it gains 1.5x resistance or 1350 eHP.
Burns at 250. With its erratic movement, it can be hard to hit, freeze, or set on fire. It has a freezing temperature of 375, making it the only Rival enemy that can be reasonably frozen.
It can be hacked once destroyed. The chance of hacking decreases with each hacked bot on the field. Bots spawned during the Caretaker fight in Deep Rock Galactic are never hackable.
Once a Patrol bot spawns it assumes this “flight” configuration and usually gains altitude. This can make hitting its weakpoint a difficult task.

While in flight mode, in addition to its basic burst laser attack, it will also use its focus shot attack. It stops tracking the player just before it fires; keep moving.

If the Patrol Bot assumes this configuration it’s preparing to use its missile attack.
It only performs this attack while in flight mode, and quite rarely at that.
These missiles are destructible. Shooting them out of mid-air can prove a challenge, though. Sometimes it’s best to take cover instead.

After some time in flight mode, it will plummet to the ground and start rolling on its hover-ball. It will only use its basic attack while in this mode. Coming into contact with the patrol Bot will now deal damage to the player.
Burst Turret
100% explosion weakness, 30% electricity weakness, 100% Ice weakness, 200% Melee weakness, 150% Corrosive weakness,100% Poison resistance.

Its weakpoint is the yellow glowing vent on top of the Burst Turret. It’s a 2.5x weakpoint. The turret uses large enemy scaling. It has 750 base HP. On a 4-player haz 5, it gains 1.5x resistance or 1125 eHP.
Burns at 100, easy to kill with heat.
Its head will stop tracking the player just before it fires. They’re easy to avoid with just basic movement. To the point where a lone Burst Turret can be pickaxed to death just by spinning around it.
They’re rarely found alone, however. Drilling under it will instakill it.
Sniper Turret
100% explosion weakness, 30% electricity weakness, 100% Ice weakness, 500% Melee weakness, 100% Corrosive weakness, 100% Poison resistance.

It has no weakpoint. The Sniper uses normal enemy scaling. It has 300base HP. On haz 5 it gains 1.2x resistance, or 360eHP
Burns at 50 heat, making it the easiest bot to light on fire..if one can reach it.
Their projectile attack can be dodged. However, due to its impressive speed, dodging it is only possible if at a good distance from the turret. In short range, using the dash perk or some other powerful mobility option is the only way to realistically evade this attack.
Stick to cover. Gunners can use their shields to make ingress into a turret-infested cave easier. Drillers can hide in terrain. Scouts can dodge, and Engineers can hide behind platforms should the need to do so arise.
Repulsion Turret
100% explosion weakness, 30% electricity weakness, 100% Ice weakness, 200% Melee weakness, 100% Corrosive weakness,100% Poison resistance.

The yellow glowing vent is a 2.5x weakpoint. It has 600base HP. The turret uses large enemy scaling. On a 4-player haz 5, it gains 1.5x resistance, or 900 eHP.
Burns at 100, easy to kill with heat.
The repulsion fields it emits are perfectly aligned with the vent, making it an easy way to see where it’s going to fire. It fires after the assembly has stopped rotating. Drilling under it will instakill it.
Robotic Appendage (Tentacle)
100% explosion weakness, 30% electricity weakness, 100% Ice weakness, 500% Melee weakness, 100% Corrosive weakness, 100% Poison resistance.
The yellow glowing part of its head is a 1.5x weakpoint. It has 675 base HP. It uses normal enemy scaling. On Haz 5 it gains 1.2x resistance, or 810eHP.
Burns at 200. Igniting it is difficult because it sheds heat quickly.
It takes tremendous damage from melee attacks. A pickaxe power attack with the damage-up mod will always instakill it. Impact Axes can instakill it if they connect to its “head”.
Drillers C4 can deal massive damage to it if not outright instakill.
The orange light on the ground is often a good indication that a Tentacle is attacking the player; keep moving.
The Tentacle will first engage the player using its basic laser barrage attack. During this attack, the Tentacle will quickly move its head from side to side to make itself a harder target to hit.
When the Tentacle opens up its spikes(?) and spins them around its weakpoint, it is preparing its “Burrow Charge” (ground slam) attack.
If the Tentacle head is in this configuration it means it’s ready to use its ground slam attack.
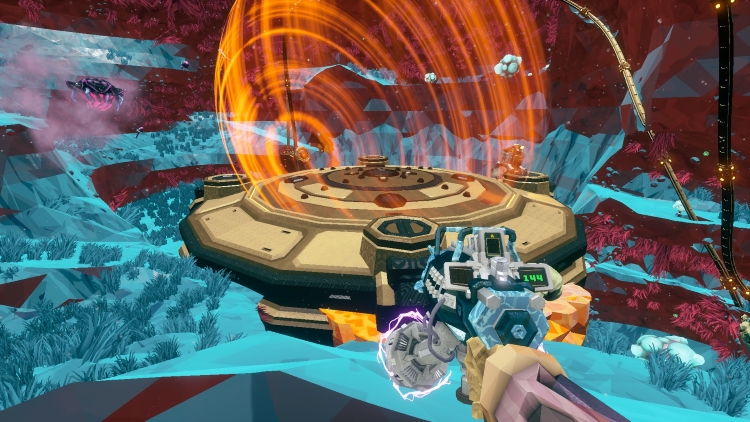
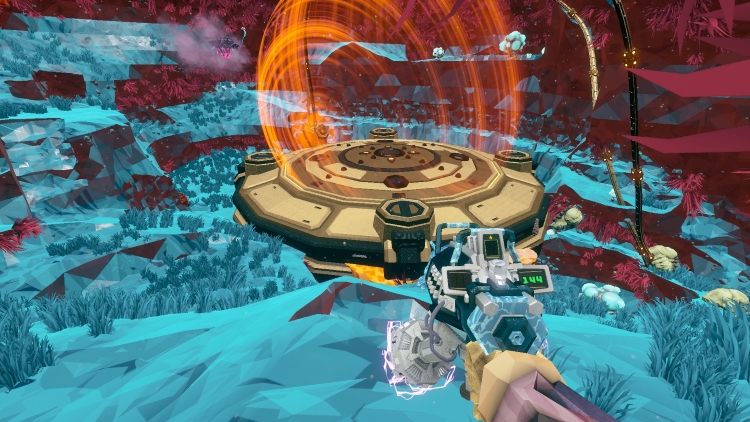
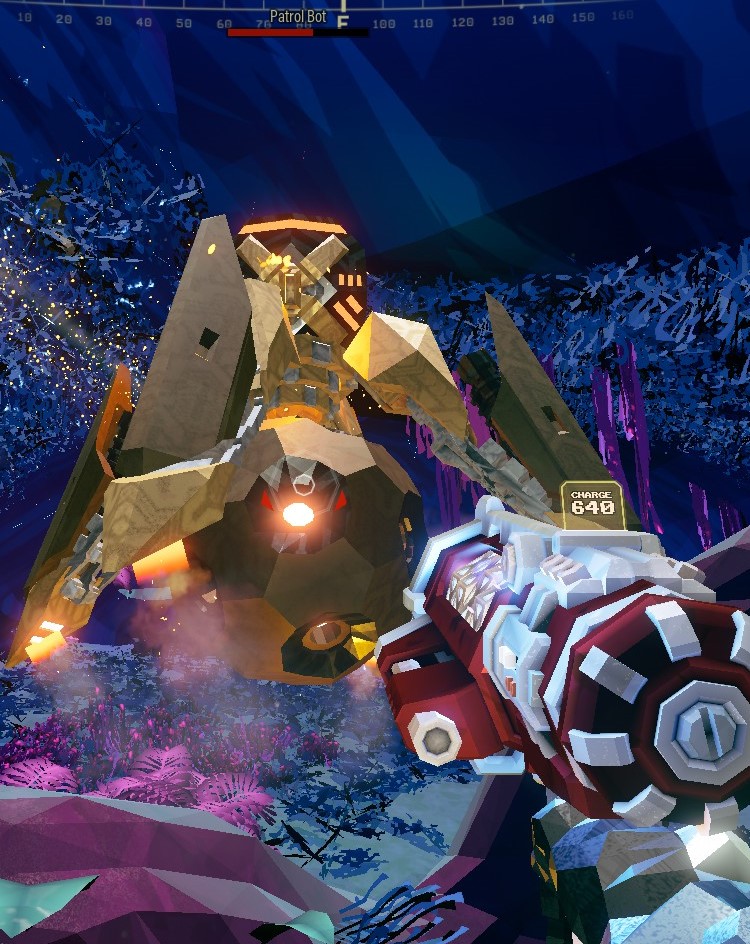
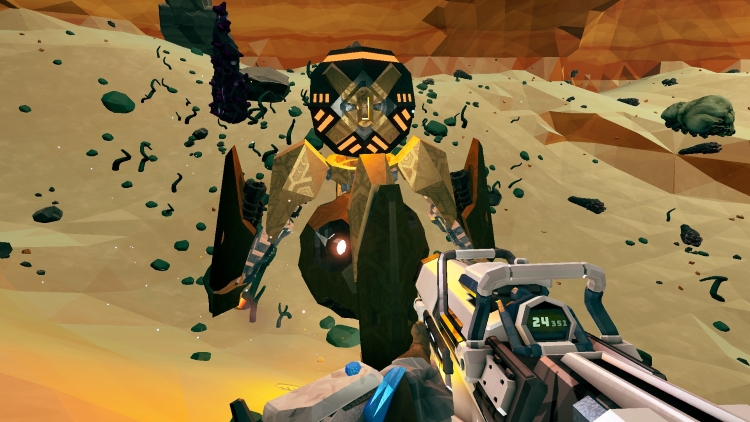
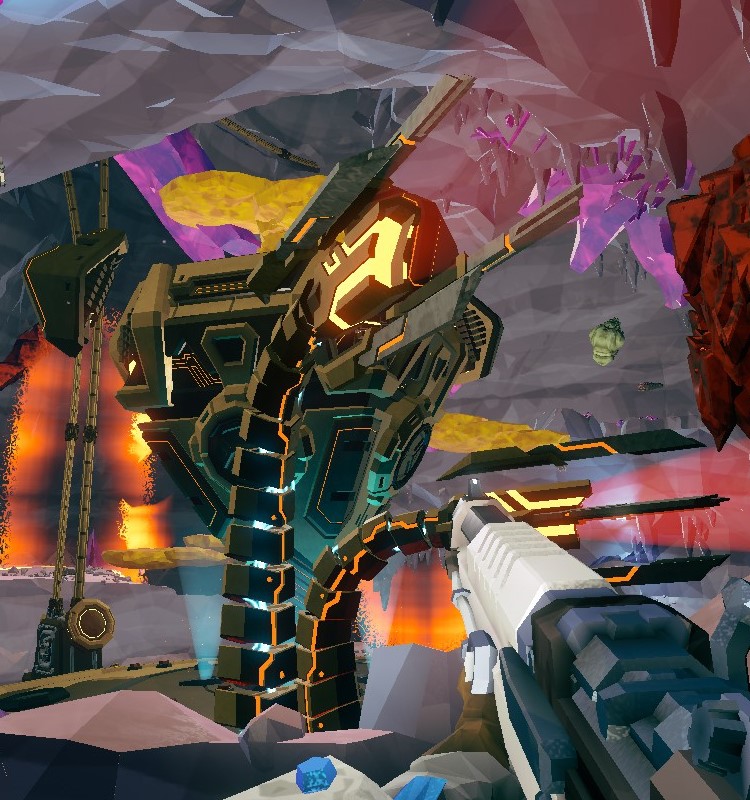
Caretaker
5% Fire Weakness, 20% Ice weakness, 160% Corrosive weakness, 45% Explosive resistance, 160% Corrosive weakness, 100% Poison resistance.
![]()
Its vents have 550 Base HP and its eye has 5500 Base HP (the sum of all 3 eye HP bars). It uses extra large enemy scaling. On a 4-player haz 5, it gains 1.7x resistance, or 935 eHP for the vents and 9350 for the eye.
Its maximum temperature is 200, but its burn temp is 2000, making it impossible to set this enemy on fire. It will respawn its tentacles at the start of each new phase. After one of its red HP bars is destroyed it will spawn Shredders, several Sniper Turrets, or Phase Bombs.
![]()
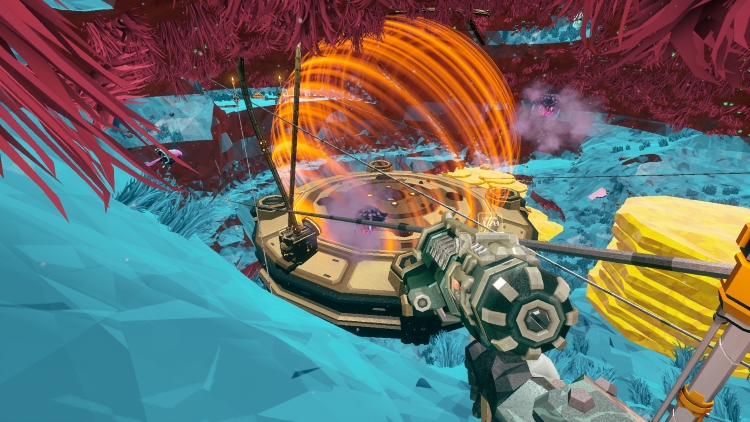
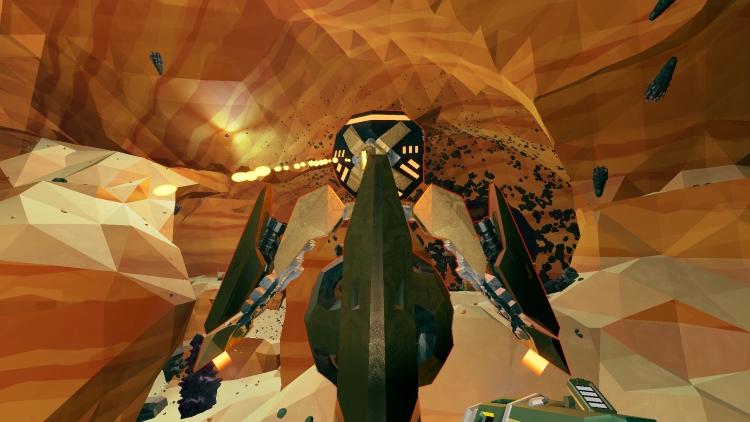
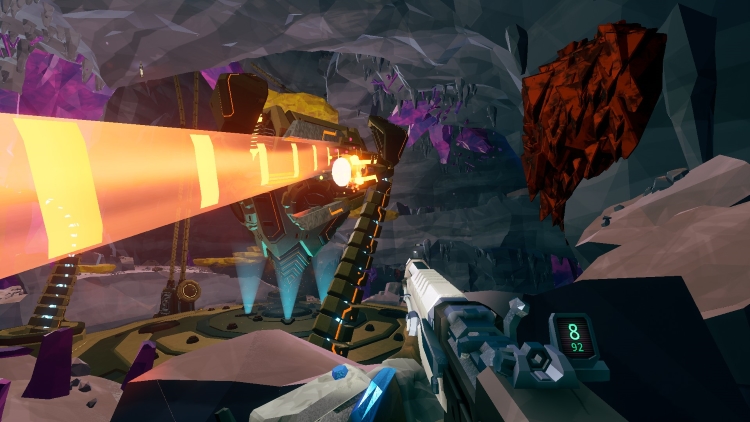
During the vent phase (destroying the yellow HP bar weakpoints), after some amount of time has passed, the Caretaker will unleash the Plasma Barrier attack. During the vent phase, the Caretaker will rotate around its axis. Rotation speed gets quicker as more vents are destroyed.
![]()
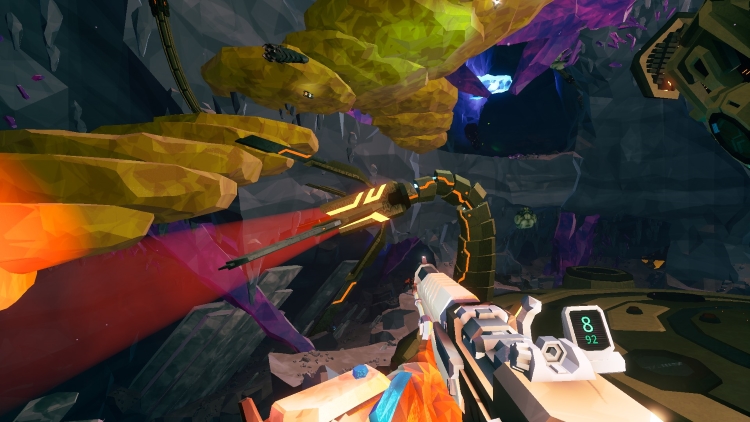
The Caretaker opens up to release Shredders/Sniper Turrets.
![]()
The Caretaker telegraphing its Phase Bomb attack during its fight in Deep Rock Galactic.
Conclusion
While not perfect, we hope that this guide provided some useful knowledge to help the fight against the Caretaker in Deep Rock Galactic.

Even with so many hours in Deep Rock Galactic, We find that there are always new tricks to learn in the Caretaker fight, but hopefully the info we’ve provided will be good to help get beginners started. Rock and Stone, miner!
Image credit: Ghost Ship Games.