They are Billions is a strange mixture of RTS, tower-defense, and city-management genres. Although most of the time it will feel like RTS, theoretically speaking, you can pause the game every few seconds and decide on your next move. Above all else, TaB is a decision-making game, a game much like Frostpunk. In this guide, I will try to cover the most important aspects of the game and provide various tips for different mechanics that are present in They Are Billions. I will focus mostly on Survival mode as it is much more popular than Campaign although most of the things in the guide can be applied to Campaign as well. Note that the economic aspect of the game will be covered in another guide. If you want more specific info on anything that is mentioned in the guide, this subreddit is a great place to start. Without further ado, check out the full strategy guide with tips for They Are Billions.
Campaign vs. Survival
Many players, including myself, wondered which mode was better to play: Campaign or Survival. I will keep this short: If you are a total beginner in RTS games and tower defense, it’s fine to go with the campaign first. The reason why I say this is the fact that, well, in all honesty, you will probably get bored pretty fast from the campaign if you have played games like TaB in the past. Missions are very repetitive and some are just straightforward grind. The ones in which you are commanding your hero are probably the most notorious as there is a problem with collectible items not being highlighted so you are squinting most of the time while in those missions. The fact that units and buildings are slowly unlocked in the campaign is not surprising but it just feels like a huge grind to me.
On the other hand, Survival is pretty straightforward – you set up the difficulty and your only objective is to survive for the time duration you set. All buildings and units are available to you during the mission and considering the length of each match, this is pretty fine for most players. It’s also very replayable as you can always increase the difficulty after you successfully survive on a map. Keep in mind that They Are Billions is essentially a game exclusively available in Ironman mode – meaning that no save, other than the one when you leave the game, is available to you. No do-overs, no reloads. And They are Billions.
Army Composition and Units Analysis
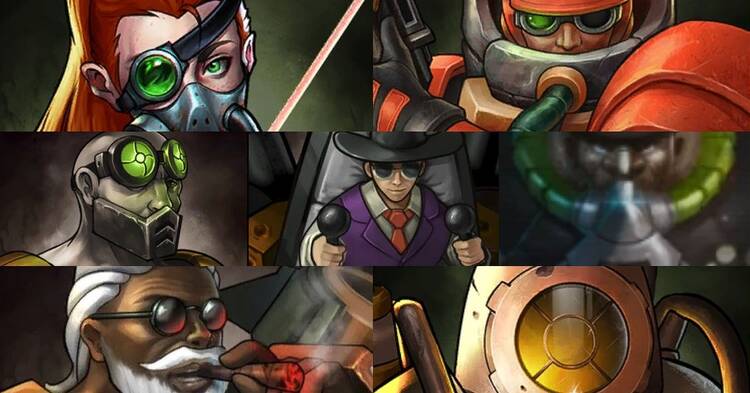
In this section, we will deal with unit types and army composition in They are Billions. The first thing you should know is that there are 7 types of infantry units available; 3 regular ones and 4 end-game units.
The regular units, recruited in the Soldiers Center are:
- Rangers: Scouts for clearing small groups of infected. Very quiet and should be used early on and even in mid-game in case there are Mutants nearby. Can be used for kiting as well. “Last night was amazing!”
- Soldiers: These chad soldiers will clear larger groups of infected and attract other zombies in an area with their sub-machine guns. This can be a good thing if you want to clear places fast and without much micro-managment but DO NOT use them if there is a Mutant that you don’t want to encounter nearby. Don’t ask how I learned this. “For Humanity!”
- Snipers: Very sluggish but highly effective at dealing with pretty much anything that comes their way. They take their time to reload but you should have hundreds of them set up in many sniper nests across your chokepoints so that no special Infected comes nearby.“Last night I dreamt of brains exploding.”
The specialized units, ones recruited in the Engineering Center are:
- Lucifer: Sluggish melle unit that, in all honesty, you can stay away from. Aside from the obvious high cost, Lucifer’s AOE flame attack can damage your own units as well. Although they are tanky, it is still not enough to handle anything close to the entire wave. You can get a couple of them, just so that you can use them if things go sideways but other than that not much. “Ashes to ashes!”
- Thanatos: A long-range AOE unit. As you might assume, having this kind of unit can really come in handy. The main idea is to either go for Thanatos or build AOE towers (Balistas and Shock towers). You need something that will deal with those hordes of regular Infected and a combo of Thanatos and Snipers is a clear way to go. Just don’t let Thantos come close to the Infected – he will pull out its brass knuckles and, although it sounds cool, the effect will be him dying in a matter of seconds and not firing his main weapon. “Ready and cool!“
- Titan: There is another option for dealing with large groups of Infected and that option is building Titans. The real problem is the price – it’s much more expensive than Thanatos and the overall payoff is not that good. That being said, Titans are extremely versatile and it’s fine to have several Titans for mid-game and provide support on breach points during the final wave. “Is it tea time already?“
- Mutant: Apart from gigachad voice line, this unit doesn’t really have much to offer when you consider the insane price it has (just the initial research and recruit gold price is 11000!). If you are looking for a trash tank, Lucifer is the way to go. If you want to clear a part of the map before the final wave hits, well I assume that you have other units to do so (cause if you don’t, then it really doesn’t matter if you can build a Mutant or not). Go for it, try it, but don’t rely on it, that’s my advice. “Speak, pathetic human.
Army Composition: Early-game Tips
These three units will be your main type for most of the game. Start with building a dozen Rangers and clear surrounding parts with them. Focus on the parts where you want to expand the base as the last thing you want to happen is for your economy to be halted by the lack of expansion space. Note that Rangers are super quiet and won’t draw any large groups of infected. You can handle the first or even the second Swarm with them. A simple Balista and just a few Scouts are what it takes to handle the first two waves (if you kite the Swarm properly). In mid-game, you can use them mostly for scouting and kiting while in late-game they kinda fall off which is to be expected considering their cost and overall contribution.
Army composition early game (Day 1 – Day 20):
- 20 Archers (for clearing, kiting and dealing with smaller groups)
- 5-10 Soldiers (used only in case of a breach because of noise problems)
Army Composition: Mid-game Tips
When it comes to mid-game, you need to be careful here with the amount of units that you build. Keep in mind that both Soldiers and Snipers have a Gold maintenance cost and Food cost (which basically means more gold). This can be very problematic on frozen or desolated maps where the food supply is low and energy cost is high for buildings. The optimal way to do this is to have a few dozens of Soldiers and a few sniper nests that you can quickly use for both, clearing the map and defending when the swarm comes. The common beginner mistake is to build many towers and man all of them with Snipers in mid-game all while turtling up. This will bottleneck your economy so it’s better to have around 30 soldiers and 20 snipers while you finish expanding the base and clearing the map. Another important thing to mention is that your Soldiers will get upgraded to Veteran rank if you use them to clear the Infected and this can really make a difference when the final Swarm comes.
Army Composition mid-game (Day 20 – Day 60):
- 20 Archers (for kiting)
- 20-40 Snipers (for dealing with Swarms)
- 30-60 Soldiers (for clearing the map and Doomsday cities)
Army Composition: Late-game Tips
As you get close to the end, start spamming Snipers. And when I say spam, I mean really spam – you need at least a hundred and preferably a few times more of them. They are your core infantry defense as you can mount them in towers and kill off the most dangerous units with them. Keep in mind that Snipers are pretty effective even when they are not in towers so if you are choosing between more towers or more Snipers, always for for the latter. To sum it up, snipers will deal with all elite Infected units but you need something for the regular ones as well. The best way to go with this is to use Thanatos – preferably 20 or more of them. Usually, you will have 6-10 choke points to man, meaning that you will be able to put at least a pair of Thanatos in each one. The reason why they work best in pairs is the fact that you need two of them in order to kill a Runner in a single shot. You will probably have other units, like elite soldiers that you used for clearing, at this point. Trust me on this one, somehow, there is always trouble on at least one of the choke points – keep this group somewhere in the middle so that they can reach that point fast once the trouble begins.
Army Composition late game (Day 60 – Day 100):
- 150-400 of snipers (in sniper nests or near the walls)
- 20 or more Thanatos (divided in pairs on all choke points)
- 30-60 veteran soldiers as a fast-response team (hot-keyed in 1 or 2 teams in the middle of your base)
- 1-10 Titans or Mutants as a part of a fast-response team (near or even in front of critical choke points)
Now that we got that over with, let’s see how you can organize your defense.
Setting Up Defenses: General Tips
Probably the most important thing in the whole game is the defense layout. I mean this is, after all, a type of tower-defense game so setting up the defense perimeter is of the utmost importance. Here are a few tips to know before we analyze the defense layout:
- Infected always go straight towards your command center from the spot which they spawned upon. This means that when the announcer says “They are coming from the North” this might not be entirely true, as they will spawn on the North side of the map and use the closest route towards your Command Center even if that means going through a passage leading them to the West side. Be aware of this and always keep your troops mobile.
- In terms of hit points and overall defense capabilities, gates are a bad option. I do use them during the game but on the final wave, you don’t really need any as it’s better to just make several rows of stone walls (you won’t be counterattacking infected anyway, right?).
- Infected have ranged units (Venoms) that will target your buildings (and towers) once they are in range. Keep this in mind when planning sniper nests.
- Infected have spec-op units (Harpies)that will jump over the wall and immediately go after the closest building. Keep this in mind as well.
- Snipers can’t fire over trees or mountains. Keep this in mind when building towers.
- Infected attack the closest thing to them and will not look for weak spots in your defense grid. This means that it’s not so important to cover every inch of your defense equally but it is important to know where the choke points will be and pile up defenses there.
- Generally speaking, during an attack, you will have time to build another layer of defense in case the first one falls. Keep this in mind when planning your defense layout.
Defense Perimeter Layout
One of the most important tips for They are Billions defense planning is to plan your defenses high. Before the final wave hits, you need to have at least 2 layers of defenses on all choke points. Generally speaking, it would be great if the entire base could have another layer of defense behind those two layers but most of the time this won’t be possible. Luckily, you can build that extra layer during an attack in case things go south.
The main composition of your defense layout is layers of walls with sniper nests shooting high-priority targets and AOE units or buildings shooting whatever comes near them. You can’t build more than 3 rows of walls in succession but what you can do is build several defense lines. This means that you can build 2 rows of walls, leave an empty space, and build 2 more. In that empty space you can put Wasps later or if you don’t have enough resources, you can just put some trenches.
A common mistake is to use the narrowest choke point to hold off the infected. Although in theory, this does seem right, don’t forget that you also need space to build your own defenses. The perfect choke point should be in a funnel shape, the wider side closer to your base, pilled up with defenses, and the narrow side closer to the infected. Sometimes this just won’t be possible due to the map layout but this is what you should aim for. Now that we finished with They Are Billions tips for defense, let’s see some examples of defense perimeter layouts:
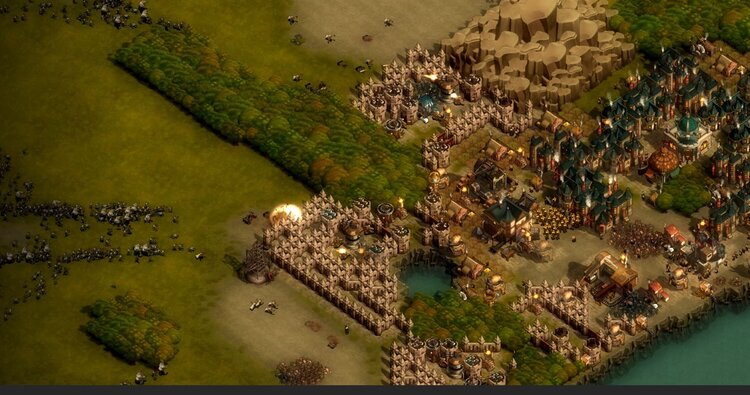
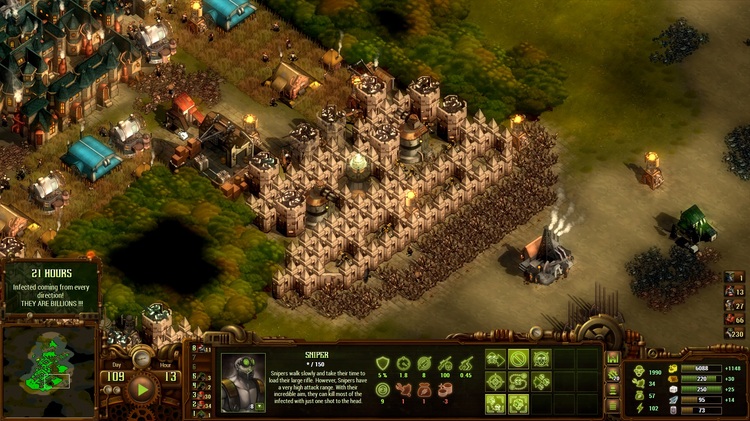
Example #1: Extremely Narrow Chokepoint
An example of a narrow choke point.
The first example shows probably the most effective choke point especially considering the low cost of it. As you can see in the far north, 3 rows of walls are the main outer layer of defense. I put the Shocking tower as I knew that all of the Infected will converge on that single tile but in all honesty, it was a bad call – the tower got knocked out by Harpies as soon as the fight started. The sniper nests were also not as effective since they can’t fire over trees so pretty much I had only 2 sniper nests here that were doing something. However, since this place is perfect for defense, 3 Thantos and Executor did their job marvelously, ending the final wave in just two rows of outer walls lost. The second layer of defense that you see is actually the old primary layer which I kept there just as a precaution.
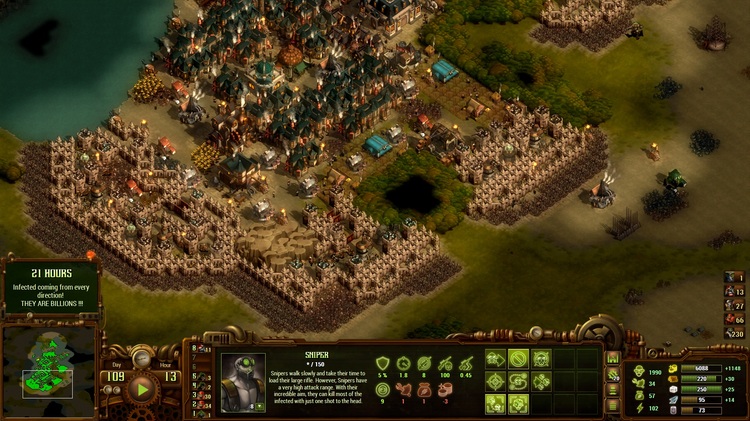
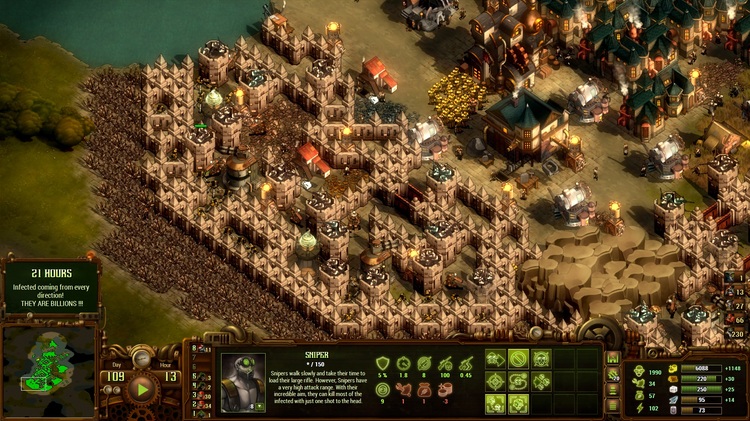
Example #2: Standard Chokepoint
Standard choke point defense layout.
This one is a standard type of defense in They Are Billions. As you can see, there are three sets of walls as a primary defense with trenches in front of them. I used trenches because wires are too expensive, but if you can, you should go for the wires. Behind the primary 3 sets of walls, there are 2 Executors and a Shocking tower although that one wasn’t actually necessary. In total, 8 sniper nests are protecting this chokepoint and there are a dozen Wasps in and behind the walls. The disadvantage of this type of choke point is the fact that, if it’s somehow overrun, there is very little space behind it and the Command center. Due to the map layout, I had to place it here (everything else was just an open field) but if you can, try to avoid placing your defenses this close to the Command Center as it is risky (keep reading to see why I say this). On the other hand, that’s why there are 7 Thanatos in place there – none of the infected made it past the first wall on this choke point.
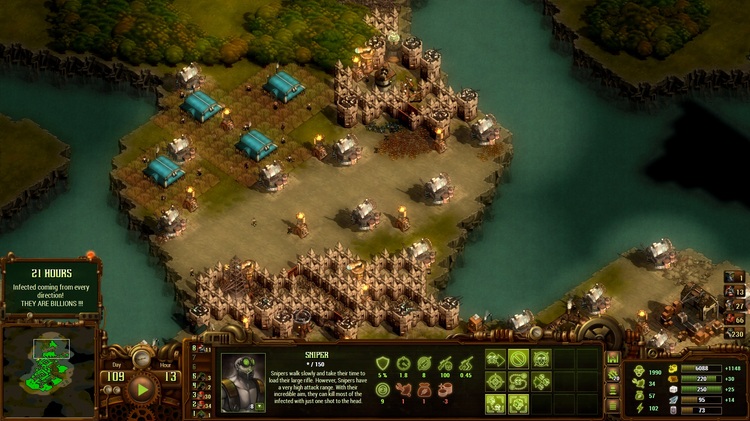
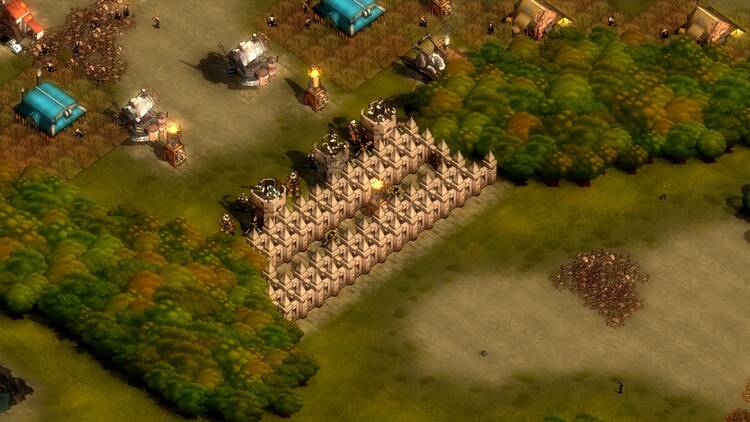
Example #3: Wide Defense Permiter
Wide defense layout.
I know that this is not the optimal place for setting up a defense, but the map layout gave me no other choice – this is something you will encounter often when playing open maps. To make things worse, there was a huge stone and gold deposit field around which I had to build this defense. But it survived with ease – because of the sheer volume of the defenses that were placed there. One of the best They Are Billions tips that I have heard is to never leave things for a chance, and this defense proves to be exactly that. Infected came from both sides, north and south but that’s the scenario which this type of defense was prepared for; 6 sniper nests on the North and 7 on the South were effective in dealing with priority targets. Thanatos and Wasps took care of all the Infected that came close to the wall. In the end, only the first two sets of walls were breached on the North and the choke point endured.
Example #4: No Tower Chokepoint
My next example is a chokepoint without any tower defenses. This one I use when I struggle with resources since it’s fairly cheap to make. As you can see, there are two rows of double walls with some Wasps in and behind them. A total of 12 snipers and 4 Tanathos are guarding this point. Note that this is not optimal – but this is the part of the map where I wasn’t expecting many infected to come to. It turned out that I was right and this choke point survived but barely – there is a lack of firepower here and I had to send a group of soldiers to help with this one. Generally speaking, this is not something that you should aim for, I am just giving this example of how to make anything with basically no upkeep cost (other than snipers and Thanatos which you will have anyway).
Example #5: What Not To Do (Fail Chokepoint)
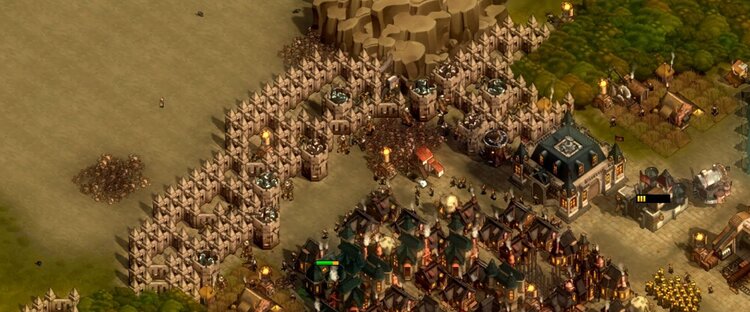
For the end, take a look ladies and gentlemen, this is how you lose the game. If you have a death wish this is the type of chokepoint you should make. Not only that it doesn’t have enough firepower (no Executors or Shocking Towers) but it also doesn’t have a fallback line – it’s all in on this one. And oh boy, was this a bad call. So the first tip here is never to build a chokepoint this close to the Command center. The second They Are Billions defense tip is never to align your sniper towers in this way as snipers can’t shoot over the mountain (not sure if I am writing this to the readers or making a mental note for myself). And most importantly, even if you make a chokepoint like this, you need more firepower – at least 2 Executors and 1 Shocking Tower. Anyway, many things I should have done differently – but hey, if I had done them, then we wouldn’t have this cool testimony of one of my soldiers on what happened here:
They came from all sides. First the banshees and chubbies, the ones that we didn’t clear on the far north side. Then, the rest of them. We held our ground on the Eastern and Western sides, pushing back the dead. To the South, we had to send our first group of soldiers because the Infected broke through the first two rows of walls. We thought that we had them but then we heard the news from the North … Three Swarms converged right on top of our Command Center. If only our Commander had built some towers there… We, as well as all remaining troops, were sent to defend that area. Once we got there, the first two rows of walls were already breached, and Infected were pouring in like an endless tide. Snipers couldn’t reload fast enough and most of them were eaten alive when those towers came down. I heard archers screaming for help somewhere near the mines. In desperation, Thanathoses stopped firing their primary weapon and charged in, wearing nothing but their brass knuckles. A valiant but ill-fated charge: that’s the last time we saw any of them. I wish they hadn’t done that, we could have used those grenade launchers of theirs but… It wouldn’t matter anyway. Most of my comrades died when, in panic, the commander rigged the whole area around the Command center with land mines. At least they went with a bang. I wish I could tell you more but I hear them, scratching the walls of the Command Center right now. The end is near. Judging by the sounds there are many of them … They are indeed billions.
Early-game Tips (Day 1-20)
- As soon as you start the game, pause and look at the surroundings. Send Archers to scout in each direction until you find the first zombie groups, then retreat.
- Check the map. If your position is no good (no food, no visible choke points, no stone or wood close by, City of Doom nearby) restart the map.
- As you build initial buildings, start scouting but do not engage. Try to determine which position is the most suitable for your residential area.
- Put Rangers on patrol so that your base is covered from all sides. Swarms won’t come at this point but all it takes is one bity boy to come near your residential area and it’s GG.
- Recruit a dozen Rangers and start clearing. Do not use the soldier as he can make too much noise and attract more enemies.
- First clear the areas where you identified the initial chokepoints. You don’t need to build walls there but keep in mind that patrols need to be set so that all areas are covered in that case.
- Try not to micro the rangers too much as you won’t be able to clear many infected areas anyway, focus on the economy and the most important parts that need to be cleared.
- The first wave won’t be too bad and you will have enough time to build defenses even if you don’t have any.
- Start recruiting soldiers but don’t use them until you have at least 10 of them (unless you have to).
- After you deal with the first wave, continue researching and start spamming soldiers – it’s time to start clearing the map.
Mid-game Tips (Day 20-60)
- Once you have 20 or more soldiers, you can slowly start attacking cities of Doom. The optimal number is 30 but if they have some Ranger support, it can be done with less.
- Secure the initial base completely with wooden walls since now the Cities of Doom will start sending raiders (small groups of infected).
- While you clear the map with soldiers, look for a good spot for your big expansion – do not turtle up.
- Be sure not to start expanding just before the wave hits. Wait for the Swarm to be dealt with and then expand.
- Continue clearing the map and especially focus on Cities of Doom as they will bring you resources.
- If all your soldiers are Veteran rank by now, consider making 20-30 more and using them to clear. You might need those chad boys before this is over.
- Start building snipers and towers for sniper nests. You don’t need to cover all your choke points with them, but be sure to put at least 2 Towers just in case the wave gets too difficult to handle
- Look for Mutants and Giants. The best way to deal with them is to kite them towards the walls. Have at least 2 or 3 rows of walls in that place. You can use Archers for this just be sure to have those snipers ready behind the walls!
- If you have Thanatos and fire with him, he will pull everything in 35 tile radius. Be careful.
End-game Tips (Day 60-100)
- Finish with the second expansion and secure it. Start building another layer of defense on all existing choke points.
- Max out the units that use Oil. I suggest simply spamming Thanatos as much as you can.
- Finish with the map clearing. You can use “chase” on your units so that they find all remaining infected on the map.
- The final way is approaching: Pause and look at where they are going.
- Monitor how the fight goes. If it gets too scary at a certain choke point, build another layer of defense behind it. Nothing too fancy – two rows of walls and a few towers.
- If you are building behind your troops in a fight, be sure that they can retreat, and don’t block them off.
- If the Infected breach the defenses, start destroying everything in their path. You need the money and you most certainly don’t want them to infect more of your buildings.
- Probably not all your choke points got breached – redirect the units from the ones that have dealt with Infected already to the critical ones.