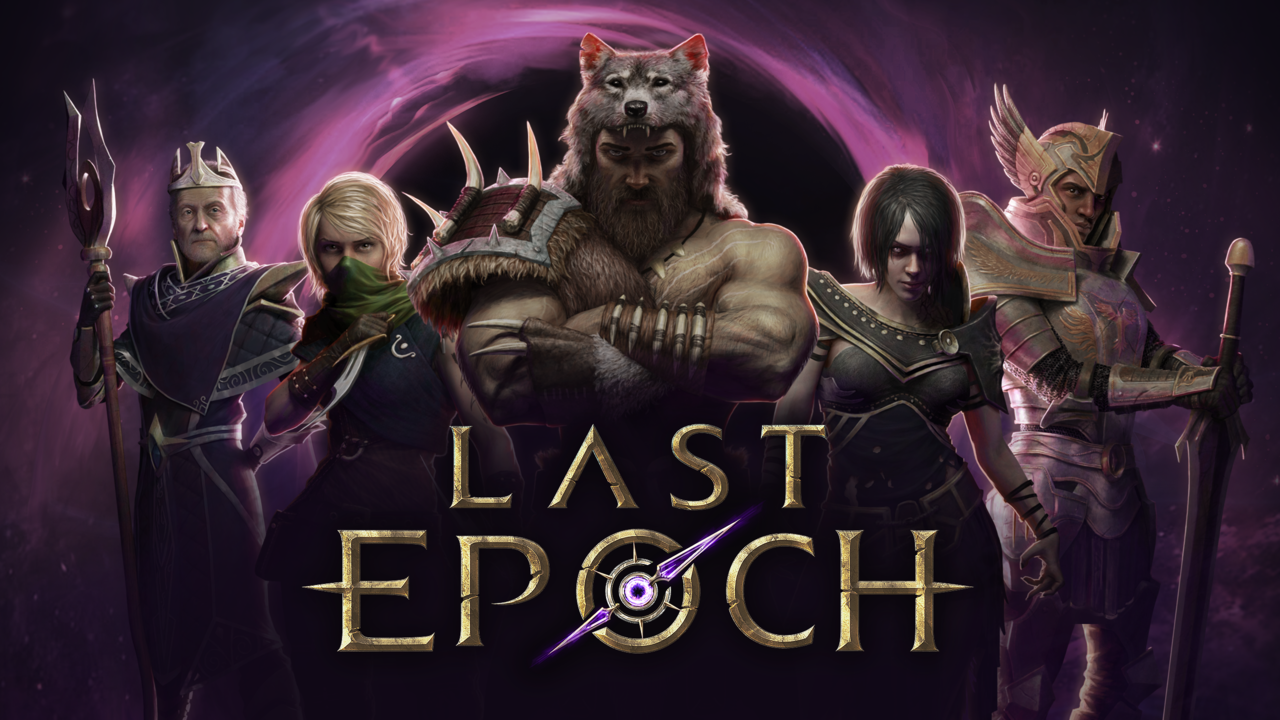
With the game finally entering 1.0, this just about gives us the excuse to cater to our altoholism by creating yet another character. On the more productive side of life, we’ve taken the opportunity to create a Last Epoch Beginner Guide to explain the basics of the game’s systems to those new to the genre.
Introduction to Last Epoch
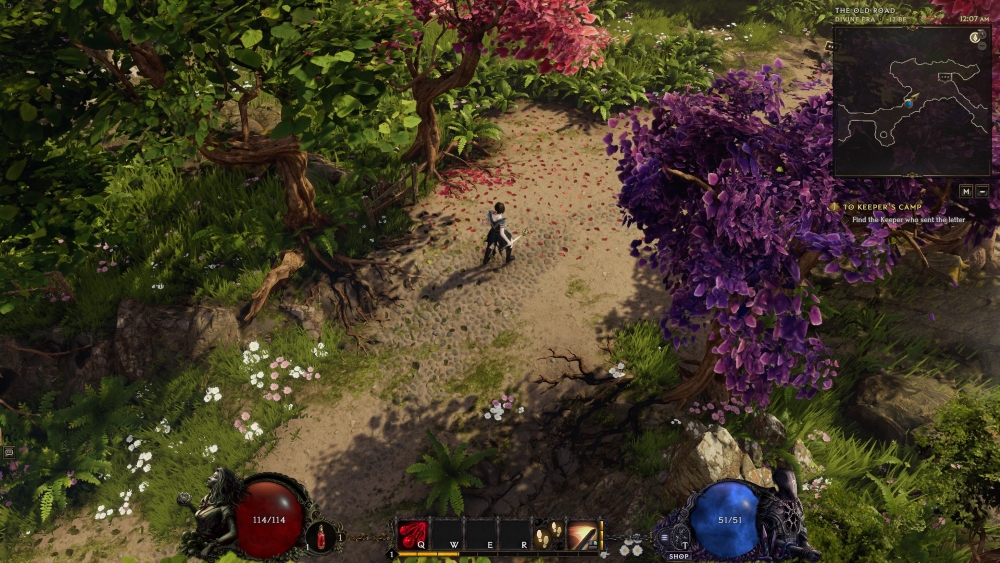
The starting zone. Already showing off the graphical updates that came with 1.0.
After a long, and we do mean long road, Eleventh Hour Games launches the 1.0 version of Last Epoch. The story of how the game came to be is quite an absurd one. It starts with the game’s CEO and art director asking for artists on Reddit(yes, Reddit) to help him create the “perfect” aRPG.
Once assembled, this team worked unpaid on it for a while before it ended up on Kickstarter. With the Kickstarter came a playable demo showcasing their work. It was nothing fancy, a pre-alpha skeleton of a game with bland lighting, janky animations, and lots of placeholders.
However, it showed that the team had what it takes to build a game, and what followed was a successful Kickstarter campaign that raised a quarter of a million US dollars. The team grew and kept working on the game, eventually launching it in Early Access.
Slowly, but surely, many systems were added and then polished until many years later, Last Epoch became one of the best examples in the Diablo-like aRPG genre. From these humble beginnings, all the way up to a fleshed-out game that`s now set to compete with the likes of Diablo 4 and Path of Exile..that’s quite the tale!
Last Epoch is an aRPG in the vein of Diablo. This means an impressive amount of enemies and a plethora of satisfying abilities to get rid of them. The camera hangs far from the player in an isometric perspective.
This gives the player a good overview of the battlefield. The most well-known part of these types of games, and one of the main motivators to keep playing, is the loot. There’s a lot of it, and its stats and attributes are randomly generated.
The other half of the game, and also half of the fun, is making a build. That is, figuring out how to efficiently combine these skills and equipment in such a way that they boost the strengths of a character or create a certain playstyle (often both).
And so, you’ll defeat foes, get their loot, grow stronger because of it, and then take on tougher opponents. Of course, there are more systems you’ll interact with during the main gameplay loop, but that would be the core around which games of these types are built.
To start the Last Epoch beginner guide proper, we’ll begin by showing the wonderful classes the game offers its players.
Classes in Last Epoch
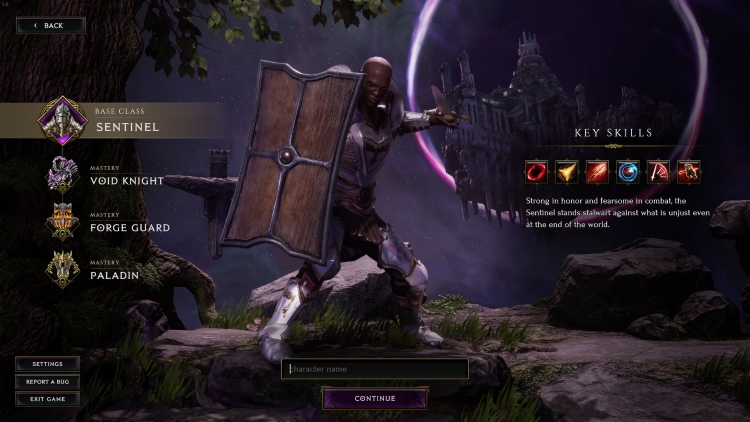
Tempt not the blade all fear the…
In Last Epoch, players choose from one of five base classes. Classes have abilities and passives unique to them, which ultimately leads to them having a different gameplay feel. Each of these has three masteries that the player will get to choose eventually. Masteries provide additional passive bonuses and skills that let the player lean more heavily in a certain aspect of the class. In this section we will describe all classes in Last Epoch as well as masteries for each class.
The Sentinel
The Sentinel is your basic melee/knight archetype, and his playstyle will immediately be recognizable to anyone who’s played an aRPG before. This doesn’t make him any less cool however, it’s a classic for a reason. Take your sword and shield, get up close and personal, and do the trademark spin-to-win(tm) maneuver.
Heavy plate armor and some defensive spells will keep you safe in glorious melee, as well as make you one of the tankiest classes around. The class can also wield two-handed weapons reasonably well if that suits your particular fancy. Sentinel masteries are Void Knight, Paladin and Forge Guard.
Void Knight
A Dark Knight archetype that wields the powers of the void to annihilate his foes. This means spectacular explosions of purple energy that punish foes with void damage but also some time-flavored abilities that help him on the battlefield. One such spell sends enemies several seconds into the future, temporarily removing them from the fight so you can remove them from existence altogether when they do return… which is also an ability.
Paladin
The holy knight archetype that fights in the name of all that is good. You probably guessed where this is going by name alone. Healing abilities, a holy aura that buffs the paladin and his allies, going to church on Sunday, and fire to burn away anything unholy. Has a pretty easy time staying alive. This is for those who like tanks, supporting allies, or burning heretics. (Interestingly, Smite, the signature ability of paladins everywhere is an unlock on the base Sentinel class)
Forge Guard
He’s a master of the forge who uses arcane blacksmithing knowledge to summon molten manifestations of his gear. This means summoning shields to protect yourself or living armor and swords to attack your foes. These act as minions, and they fight by your side in battle. Stats granted by your gear also carry over to the spawned armor/swords. As some of these summons are tied to abilities that damage foes you’ll have to work alongside your sentient arsenal during battle.
The Primalist
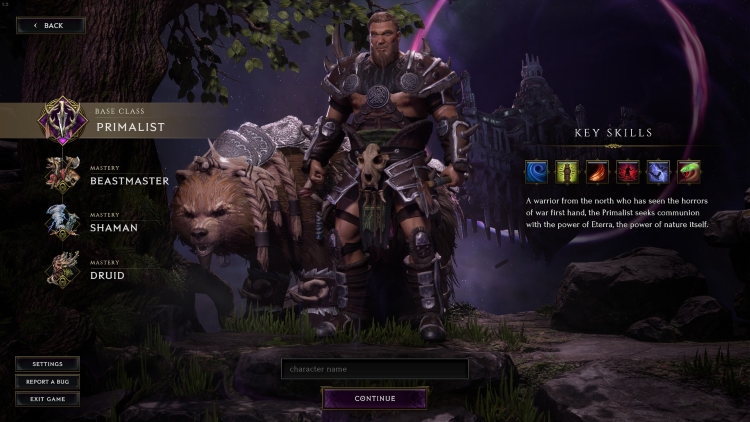
The Primalist is a bearded barbarian warrior who`s perfectly attuned to the natural world around him. He leverages his connection to nature and his impressive strength to call to his aid empowered animal companions, summon potent elemental attacks, or brutalize his foes in melee. With access to a healing ability, among others, this class is one of the tankier out there. His masteries are Druid, Shaman and Beastmaster.
Druid
Druids are the shapeshifter archetype. Using several powerful forms, Druids are jack-of-all-trade warriors who can easily be made to perform well in a multitude of battlefield scenarios. One of the forms lets you go literal bear mode, which is a bonus in our book. Shapeshifting requires managing a resource called “Rage”, luckily there are several ways to do so.
Shaman
The Shaman is a mastery that uses offensive spells and totems to dominate the battlefield. This means summoning tornados, using totems that call in lightning storms, or smashing the ground so hard it causes earthquakes. In short, add extra natural disasters to the natural disaster that is the Primalist.
Beastmaster
The Beastmaster is all about summoning an army of beasts to fight by your side if the name of the mastery didn’t make it obvious already. This mastery allows the Primalist to summon a variety of animals that fulfill a certain role on the battlefield. Such as bears that tank damage or scorpions that deal poison damage, for instance.
Re-summoning these companions usually triggers some secondary effect, so managing your menagerie is a bit more involved a process than it first appears. A particularly cool item in the game lets the Beastmaster turn his army of wild rabid wolves into an army of somehow equally ferocious squirrels.
The Acolyte
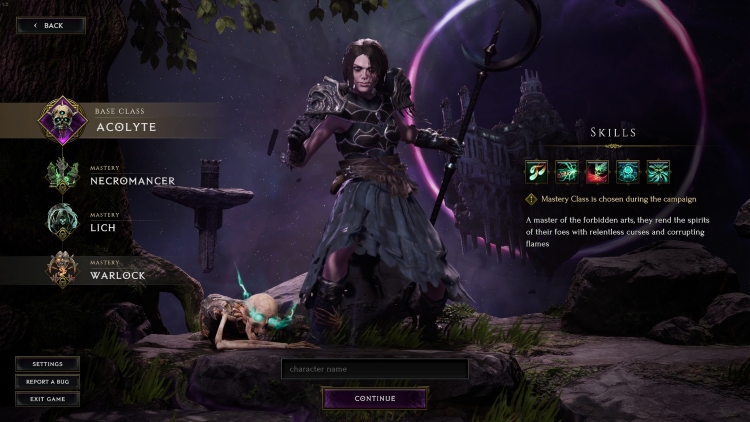
For fans of the dark arts look no further than the acolyte. Forbidden magic, body horror, the occult, hexes, and curses are the themes here. The Acolyte can engage enemies in combat directly, using a variety of debuffs, DoTs, and offensive spells that slowly (and painfully) drain the life from her foes, or indirectly, by overwhelming her foes with a tide of undead minions. Her masteries are Necromancer, Lich, Warlock.
Necromancer
This is the common summoner archetype. You can summon more minions and gain access to skills that let you sacrifice or buff them. One skill even lets you sacrifice the minions on the battlefield to summon a gigantic abomination of bone and undead flesh.
Summoning a wide variety of minions and then modifying their attributes through the use of their skill tree is the key to success here. A mastery with strangely passive gameplay, as in combat your army of skeletons will be the one taking your foes to the bone zone while you’ll be in the back lines spawning even more undead and telling them where to go and what to attack.
Lich
The lich is a mastery with some cool mechanics going for it. Its main skill lets you take the form of a reaper, a cloaked, levitating black figure that reaps souls using dual scythes.
This mastery also gives access to spells that let you drain life from foes and transfer it to yourself, afflict foes with curses to give you buffs, and just in general cause harm to your foes (and yourself) to empower your character. Your health decays rapidly while in reaper form so by managing skills and passives you can stay in it for much longer. Some great class theming here, blast black metal for added immersion.
Warlock
The Warlock is a new mastery that came with the 1.0 version of the game. It leans into the curse aspect of the Acolyte, afflicting enemies with debuffs and DoTs of such severity it’ll feel like an instant damage ability instead. Skills synergize well with each other leading to a smooth flow of combat. Some spectacular visuals in there as well. Don’t sleep on the Chtonic Fissure skill.
The Mage
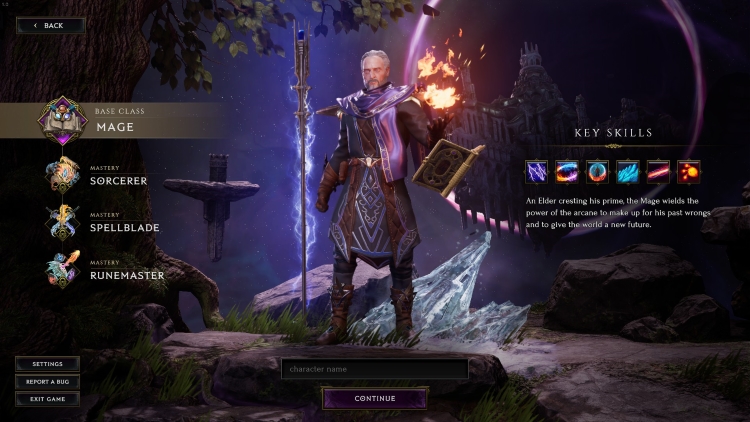
This is your wizard archetype, complete with fancy robes, white beard, and old creaking bones. Unsurprisingly, mages have some of the fanciest-looking spells in the game. Channeled beams of arcane energy, energy bolts, elemental novas, and other skills that let you freeze, burn, and electrocute your foes. This is the class for people who want to cover half their screen in particle effects.
Usually, in aRPGs the power of this particular archetype is balanced out by making them easy to kill … glass cannons, simply put. However, the mage has movement abilities like all the classes, and more importantly, an energy shield for extra safety, making survival a bit easier than expected. His masteries are Sorcerer, Spellblade, Runemaster.
Sorcerer
This is the mastery closest to the traditional wizard in aRPGs. Abilities scale with the amount of mana spent casting them, which encourages the use of powerful spells. The first skill from this mastery is literally throwing meteors at people. Later, you’ll get access to even more spells, such as a black hole to crowd control enemies. So, it’s big explosions all the time, just don’t forget to keep an eye on your mana gauge or you’ll find yourself in trouble.
Spellblade
Not something you’d expect on a class such as this, the Spellblade is a hybrid melee/magic user. The Spellblade gains skills that are magical melee attacks, a spell that buffs his weapons as well as an additional dash ability that can be used in lieu of the more conventional teleport skill to close the distance between the next group of foes. It works well, and seeing this old mage dashing across the battlefield and somehow holding his own in melee is a pretty cool theme.
Runemaster
The Runemaster is quite possibly one of the most interesting masteries in the game. Casting spells will generate runes. These runes will match the element of the spell that generated them. For instance, casting a fireball will spawn in a fire rune.Up to three runes can be held at the same time and by using a skill called “Runic Invocation“, the Runemaster can consume the runes to cast a wide variety of runic spells. Depending on the rune and their order Runic Invocation can cast 40 different spells.
It`s a simple system to grasp, but difficult to master. In combat, this means impressive tactical flexibility and a constant need to make decisions which keeps the Runemaster from getting boring. If you ever played Invoker in DOTA 2, or perhaps Magicka 1 and 2, you’ll feel right at home.
The Rogue
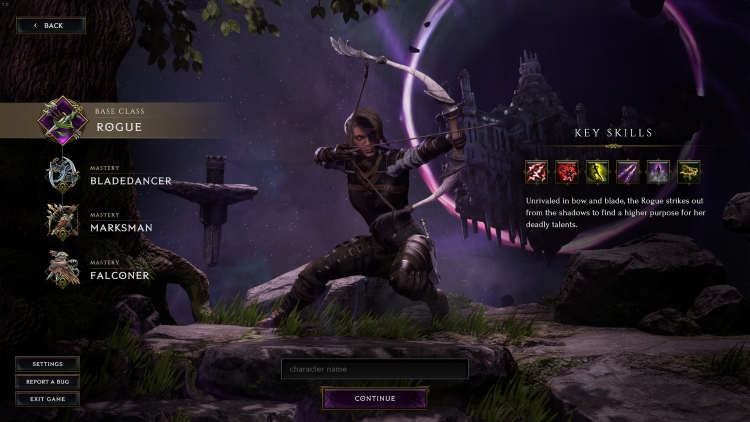
This is your trickster archetype, meaning dirty tricks, ethereal daggers, and teleporting behind your foe’s back. Rogues can specialize in either high-speed melee in close quarters or bringing down targets from range with a barrage of arrows.
Rogues are highly mobile, preferring to either dodge or avoid damage altogether while consistently doing high damage on the battlefield. With skills such as shurikens and smoke bombs, it’s also possible to roleplay as a ninja. Her masteries are Bladedancer, Marksman and Falconer.
Bladedancer
This mastery is all about quick movement, high-damage melee attacks and hit and run tactics. Certain skills or nodes in skill trees can create shadow clones that also attack your foes. Combining all those skills, attacks, and clones into a build that never stops moving and never stops dealing damage is one of the high points of this mastery. A good pick for speed demons and anime cosplayers.
Marksman
For those who prefer ranged combat over the melee, this is the Bow mastery. The mastery will give you passives that boost your bow’s damage and active skills that let you rain arrows on your foes, fire exploding bolts or do the time-honored tradition of firing a spread of several arrows to mop up groups of foes. When maxed you’ll be able to fire several hundred elemental arrows per minute, which might explain why nobody bothered to make a machinegun in this universe.
Falconer
The newest addition that came with 1.0, the Falconer is an interesting minion/rogue hybrid. The minion in this case is an unkillable falcon that will attack enemies around you on its own. Some of the skills are falcon attacks, such as Divebomb which does respectable damage to a single target and enemies around it.
Other skills will see the falcon carry you forward as a movement ability or rapidly attack enemies in spectacular fashion. Some nodes offer interesting synergy such as letting the flacon drop acid flasks on your opponents. Hybridize your rogue skills with those of your companion to succeed.
Skills in Last Epoch
In this part of the Last Epoch beginner guide, we’ll briefly introduce the several layers of skill progression in the game.
What are Passives?

One of the many passive trees in the game.
Your character starts with a single skill but you will quickly unlock more by simply leveling up. Every level-up brings with it a point that can be spent in the character’s passive trees. “Passives” are buffs to certain aspects of your character, they are often unique to the class you are playing and can sometimes even provide unique effects.
Unlike active skills, which have to be manually activated, a passive’s effects are constantly present throughout the game and require no input from the player (hence the name “Passives”). At first, only the main passive tree for your class will be unlocked. Putting points into this passive tree will eventually unlock even more skills for your character to use.
Once you choose a mastery, you will gain access to its passive tree as well. Much like with the main passive tree, putting points into the mastery passive tree will unlock, you guessed it, skills for you to use.
Important note: Although mastery selection is final, you can still spend passive points into the passive trees of other masteries, and even get their skills that way. However, you can only invest points into the left side of the passive trees of masteries you didn’t choose. Lastly, your character can only have 5 active skills equipped at a time.
What is skill specialization?
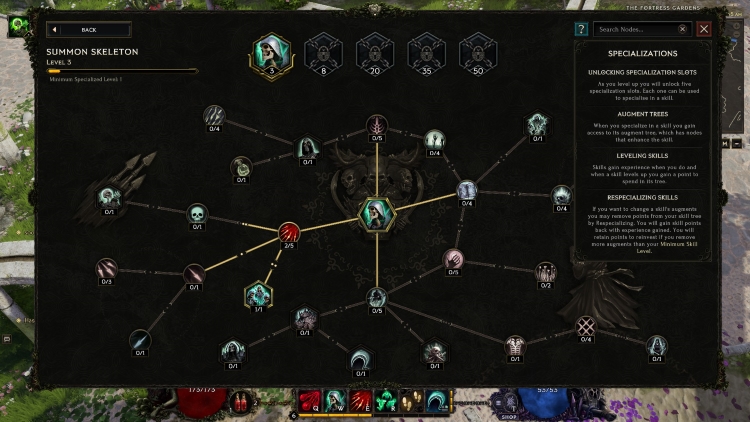
The Skill Specialization for just one of the many skills in the game.
This is the part where it gets interesting. Specializing in a skill means gaining access to its skill tree. As absurd as it sounds just about every single skill in the game has its own unique skill tree. The way it works is that you have 5 skill specialization slots which are unlocked one by one as you level up.
You can slot an active skill into the specialization slot to start specializing in it. Using this skill in combat will now give it experience, and when it levels up, you will gain a point to spend in its skill tree.
The skill tree consists of smaller circular nodes which are most often passive bonuses, and the usually much more build-defining hexagonal nodes that can drastically change how a skill works. The skill tree can enable a certain skill to synergize with other active abilities, change its element, and even entirely change its function.

The Skill window.
If this all sounds complicated, remember that a good rule of thumb for beginners is to find the hexagonal nodes needed to make the build work, then pick up the passive bonuses along the way that help it out. Keep in mind that a skill can only have a maximum of 20 points invested in it, so choices will have to be made.
How to respec?
When it comes to skill specialization respecing you have two options. The first is to remove skill points of your choosing. To spend these points again, you’ll have to re-level the skill as you would normally. Alternatively, you can choose to despecialize a skill. This will remove all points you’ve spent, and clear the skill from the skill specialization slot so you can put another skill in the now free slot.
What’s interesting is that as you level up your character, you will increase your minimum specialization level. This is the minimum amount of points you’ll have if you specialize in a new skill or remove points from an old one.
As an example, if your minimum specialization level is 4, and you then choose to slot in a new skill into the specialization slot, it will have 4 points ready for you to put them where you please. Newly specialized skills often gain an XP bonus to help them catch up to other skills faster.
With passives, the process is much simpler. Simply find a respec vendor located in some towns and use his services. It will cost you a little bit of gold for every point removed.
How to forge in Last Epoch (crafting)
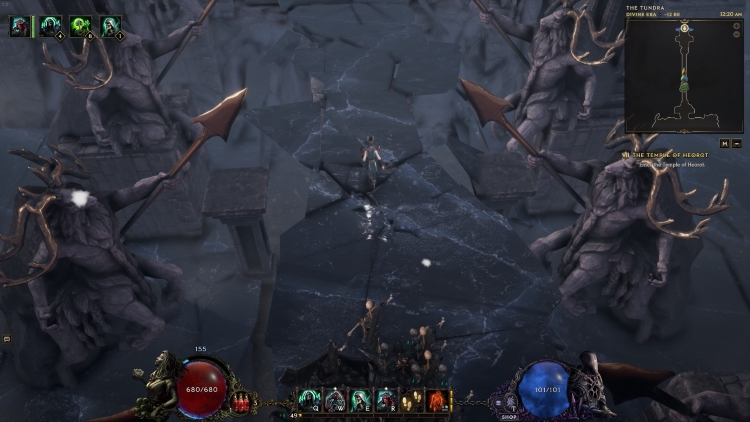
Another interesting system worth noting in the Last Epoch beginner guide, as well as just in general, is the forge. It tries to find a balance between finding loot and crafting. The system is not designed to let you craft an item from scratch but instead to improve the loot you find along the way, and in doing so ensure you always have an upgrade for your build.
Forging is thankfully a straightforward process. As such, it finds usefulness in just about every part of the game by letting you add, remove, improve, or even reroll stats on your gear (and more).
Item basics
These stats are simply referred to as Affixes in the game. For those new to aRPGs, affixes are names with certain attributes given to items. For instance, in Last Epoch, a melee weapon that has the word “Slayers” in its name (e.g. Slayer’s Two-Handed Axe) is always going to have an extra chance to critically strike an opponent.
Names in front of an item’s name are called Prefixes, and are usually offensive-type bonuses in Last Epoch, while Suffixes are located behind the item’s name, and are usually defensively orientated. Items themselves have stats that are inherent to them, and this is called an Implicit (For instance: A basic Silver Ring with always have +Movement speed on it).
In Last Epoch items can have a maximum of 2 Prefixes and 2 Suffixes, which is to say 4 Affixes in total. The items window can let you see at a glance which of its stats are prefixes/suffixes. In the window prefixes have an arrow to the left of them, conversely, suffixes have an arrow to the right.
An interesting thing about Affixes is that they come in 7 tiers, with each tier being more powerful than the last. Only the first 5 Tiers can be crafted. Items with T6 and T7 affixes must be found.
Additionally, the stat an affix provides at each of its tiers can roll within a certain range of values(Called a Stat Range in the game). This means that the same affix at the same tier on two different items (of the same type) can provide a slightly different bonus.
For the record, the lowest roll on a tier is always higher than the highest roll of the tier beneath it. Note: you can hold Ctrl + Alt to see the Tier and the Stat Range of an affix.
How to forge in Last Epoch?
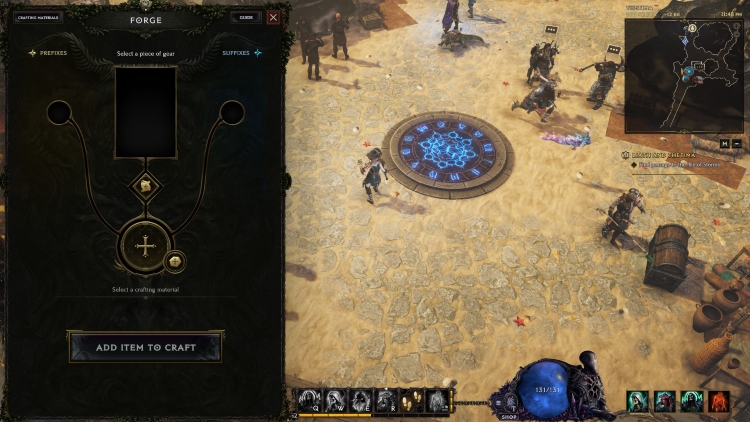
The Forge UI.
To forge you’ll need crafting materials. Those would be Affix shards, Glyphs, and Runes. Most of these are quite plentiful, and even in the early game, you will see some of them start clogging your inventory.
The cool thing about Last Epoch is that in the inventory screen, there’s a “Transfer Materials” button that will send all these items into your forge crafting inventory. The forge can store an infinite amount of materials so there’s no need to worry about inventory space.
The small circles on the left(for suffixes) and right(for prefixes) side of the Forge UI will let you add affixes to the item. The same can be accomplished by clicking the + sign on the largest circle in the UI. If you have the materials to upgrade an affix to a higher tier, you will get an Up Arrow next to the small circles We mentioned. The small slot in the center is where you will add glyphs, while the hexagonal slot next to the large circle is where you put in runes.
What is Forging Potential?
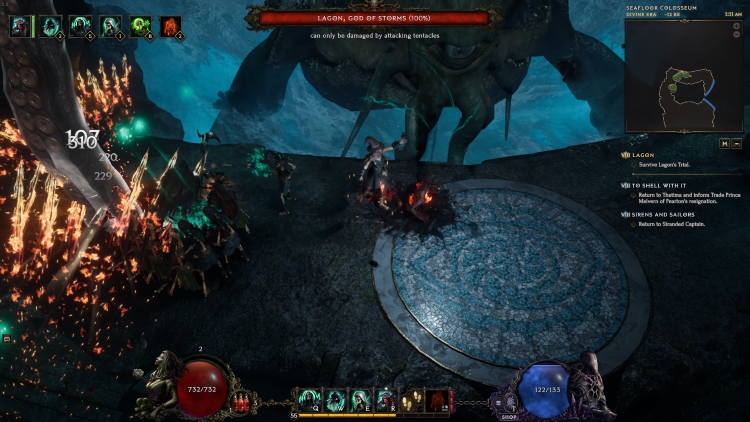
Before actually starting to forge it’s important to know that every item has a certain amount of Forging Potential. This is a stat that governs how much crafting you can do on an item. Most crafting operations you perform will consume Forging Potential, and once it has been reduced to 0, you can no longer do anything to the item.
What’s interesting is that the amount of crafting potential consumed depends on the action being performed and luck. As an example: a very basic crafting operation can cost 1-10 FP, while doing something more complex involving runes can cost 1-25 FP. (The numbers here are bogus, used for the purpose of explaining).
Any time you add an affix or upgrade an affix tier there is also a chance of getting a Critical Success. If this happens, the crafting operation will cost 0 resources, no FP will be consumed, and a random affix that isn’t tier 5 will also get upgraded.
Keep in mind that a critical success is wasted if there are no affixes that it can upgrade. If you’re planning on adding affixes to a weapon it might be better to put the affix in first so you can get free levels if a crit success occurs.
Affix shards, Glyphs, and runes Explained
Affix Shards
Affix Shards are the resource you will use the most in the Forge. They’re used to add affixes to empty slots or improve the Tier of an affix. To upgrade an affix you need an affix shard of the same type. Affix shards are named after what they are used for, making forging a much easier process. As an example: if you want to add or upgrade the casting speed on an item, you will use the “Increase cast speed shard”. Use the forge’s search function to find what you need.
Glyphs
Glyphs are items that help out in crafting operations. These are the most common Glyphs in Last Epoch:
- Glyph of hope: The Glyph of hope gives you a 25% chance not to consume Forging Potential. It is suggested to use these often when crafting and always when crafting high-end gear.
- Glyph of chaos – When you upgrade an affix on your gear, this glyph will reroll it into another random affix. Great if you have a good item with a stat that doesn’t benefit your build. Keep in mind that a Critical Success can sometimes upgrade an affix to T5, at which point it can’t be raised any further, preventing the use of the Glyph. We learned this the hard way, so it might be worth it to use the glyph at an earlier crafting stage as a safety precaution.
- Glyph of order – This glyph ensures that when upgrading an Affix it maintains the quality of its roll(Stat Range). Normally, when upgraded, an affix has its value within a tier randomized. This is good when you have a high roll in a tier and want to keep it when you upgrade.
- Glyph of despair – This glyph has a chance to “seal” an affix instead of upgrading it. What this means is that it takes an affix from its slot and puts it in its own special place. In doing so it frees up that slot so you can add another affix to the item, making it even more powerful.
Alternatively, if you have a good item with one very bad low-tier affix, you can use this glyph to try and get rid of that affix. The higher the tier of the affix, the less likely the chance for a successful seal, so be careful. Note: T5 affixes cannot be sealed as they’re fully upgraded.

Runes in Last Epoch
Runes are used to perform a wide range of operations, such as improving affixes or even removing them from an item. In this part of the Last Epoch beginner guide, we’ll cover the ones most commonly used. These runes in Last Epoch are:
- Rune of Shattering and Rune of Removal – The Rune of Shattering destroys the item and gives you a random amount of affix shards from the affixes it randomly selects. The Removal Rune on the the other hand selects a random affix and returns the full number of shards in it. You get affix shards equal to their tier (So a T5 affix will give you 5 affix shards). Of course, with the Rune of Shattering, this value is randomized. As the use of gold is very limited in the earlier part of the game, a common bit of advice is to use it to buy the Runes of Shattering from vendors. Runes of Removal are the preferred method of removing highly sought-after affixes, as using the rune of shattering risks destroying them. Note: removal costs Forging Potential, Shattering does not.
- Rune of Refinement and Rune of Shaping – The first rune rerolls the value of all affixes on an item within its tiers. If you finish crafting but the affixes have low rolls, and the item still has forging potential, then you have the option to try your luck with this rune to give it better rolls in its affix tiers. The Rune of Shaping works the same way, but it rolls the items Implicits instead (provided they have a range).
- Rune of Ascendance – It turns regular items into uniques of the same item type. Not all uniques can be obtained this way, so it might be worth doing some Google-fu to see if the rune can help you find what you need.
- Rune of Creation – It duplicates an item but then sets the Forging potential to 0 for both items. Good for duplicating rings and weapons(if dual-wielding).
- Rune of Discovery – It creates random T1 affixes on all empty affix slots on an item. Not particularly useful in the late game, this rune is best used during the campaign to give gear with missing slots a little boost.
Item Rarities Explained
This part of the Last Epoch Beginner Guide is a brief overview of the various item rarities that can be found in the game. There are 7 variations of item rarities :
- Normal: basic items with no affixes, and low Forging Potential.
- Magic: items with 1 or 2 affixes on them, low Forging Potential.
- Rare: gear that has 3 or 4 affixes, better Forging Potential.
- Exalted: The ones worth keeping an eye out for as they come with T6 or T7 affixes, and high Forging Potential.
- Uniques: Unique items that can have special stats and effects. These can drop with Legendary Potential, which is required to create Legendary items.
- Set : Items that are part of a set and grant bonuses when multiple set items are worn. Doesn’t have Forging or Legendary Potential.
- Legendary : These can be created by combining a Unique with an Exalted of the same item type.

Recoloring Idols in the Lootfilter might be a decent idea as their default light blue color makes them easy to miss in the chaos.
Legendary Potential & How to Craft Legendary Gear
Some Uniques drop with Legendary Potential. Legendary Potential can range from 1-4. By combining a Unique that has legendary potential with an Exalted item of the same item type, the Unique will absorb random affixes from the Exalted item equal to its legendary potential. (For Example: a unique with 1 Legendary potential can absorb 1 affix from the Exalted item, the affix is chosen randomly).
Doing so creates a legendary item that has all the properties of the unique item but with bonus stats from the Exalted item. To create a legendary you need to complete the “Temporal Sanctum” dungeon. Once completed you’ll get access to the Eternity Cache.
After putting the items into the cache, and a bit of time travel shenanigans, the two items will fuse into the legendary and you can collect it. Keep in mind that higher-level uniques will require running the dungeon at higher difficulties to be eligible for the process.
Loot Filter

The plus sign lets you create or import a new Lootfilter.
In this part of the Last Epoch beginner guide, we’ll take a quick look at what`s possible in one of the best features of the game, the Loot Filter. As its name implies, it is used to filter out loot so you always get to see what you want or need.
What makes it stand out in Last Epoch is the sheer level of customization players are given access to. Basic filters that come in other games just let you set the minimum quality of the gear you’d like to see on the screen. In Last Epoch you can create your own filter using custom rules you define yourself.
This can be something as basic as just telling the filter to get rid of all normal items, to complex filters that will only display one sought-after Affix on one specific type of item of a certain quality. For the record, a loot filter doesn’t destroy items, it just prevents them from being displayed on your screen. The loot that drops is still there, you just can’t see it.
By holding “X” you can temporarily disable your filter, allowing you to see everything that dropped on the ground. To access the loot filter interface press “Shift + F”
To create a loot filter you need to press on the Green + sign and select the “Create New Lootfliter” option. This will open a screen where you can set your loot filter’s name and description, as well as an icon and its color to make it easily recognizable. This is a useful feature if you intend to make multiple filters. You can select a filter using the drop-down menu that appears when you click the name of the filter.
There are also options to Edit and Copy your filter if you ever wish to make changes to your filter or create a new but similar one. You make the filter work by adding rules. This can be done by pressing the aptly named “Add rule” button.

Lootfilter customization options.
Visibility
In the screen that pops up “Visibility” determines if the item will be shown or not on your screen. The Hide option will stop an item from being displayed on the screen, while the Show option does the opposite. Recolor is a “Show” option that lets you select another color for the item’s nameplate.
Emphasize increases the size of an item’s nameplate, making it easier to see. Character level dependency means the rule will only work while your character is at a certain level(you set the values).
A brief Example: If you set Visibility to “Hide“, the Condition to “Rarity“, and the Condition Properties to “Normal“, your filter will now hide all Normal-quality items in the game. Rules are named by what they do(if you haven’t renamed them), so you can often read them to see if they’re doing what you want. This particular rule would be called “Hide all Normal items”
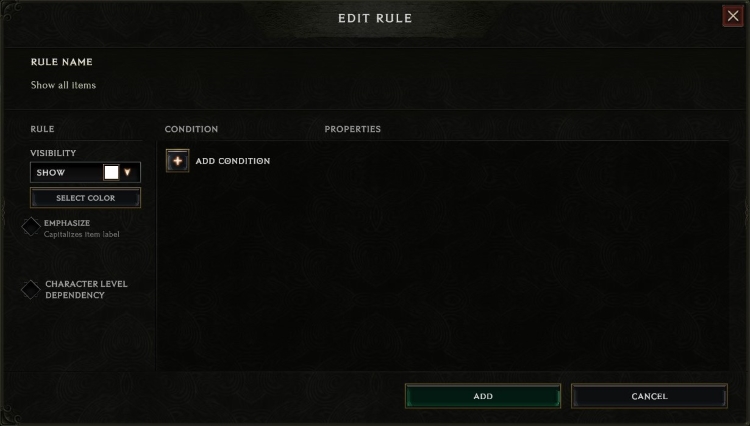
This window lets you add rules to the filter.
Conditions
This is where you tell the rule exactly what you want it to Show or Hide. The Properties option to the side just lets you be even more specific. When adding a new condition the options you’ll get are:
Class Requirement:
It lets you hide/show class-specific items. Multiple options can be selected from the drop-down menu if needed.
Level:
Lets you show or hide items based on their level. Below level “X” will show/hide items with levels below or equal to what you put into X. Above level “X” works the same way, just with items level above or equal to what you put into X.
Max Lvl below character level lets you show/hide items in a range of levels below or equal to your own. Setting its value to 5, for instance, will show/hide all items that are no more than 5 levels below your current level. So if you’re lvl 10, the filter will show/hide items lvl 5-10, if you’re lvl 20, then it will filter items lvl 15-20.
The highest usable level will show/hide items of the highest level you can use and all levels below that.

Rarity:
It lets you select which rarity of items the filter will show or hide. Multiple rarities can be selected from the dropdown menu if needed.
Item Type:
This one lets you show or hide certain item types. What’s more, when you select an item type, you get access to the subtypes windows, which let you select one specific item of that type.
For instance, if you’re looking for swords you can filter all of them by selecting “One-handed sword”, but if you want to find one specific sword type like a katana, you can use the subtypes windows to have the filter only show katanas. It can also be used to hunt for uniques.
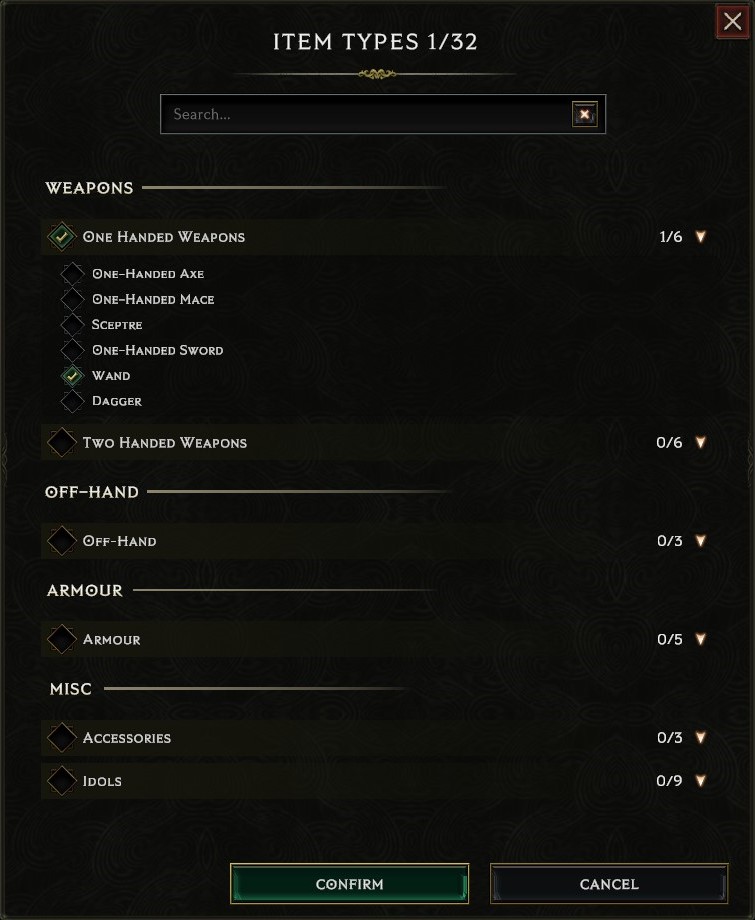
When one item type is selected in this window, you’ll also get access to the “subtypes” window under “Properties“, letting you hunt for even more specific bits of gear.
Affix:
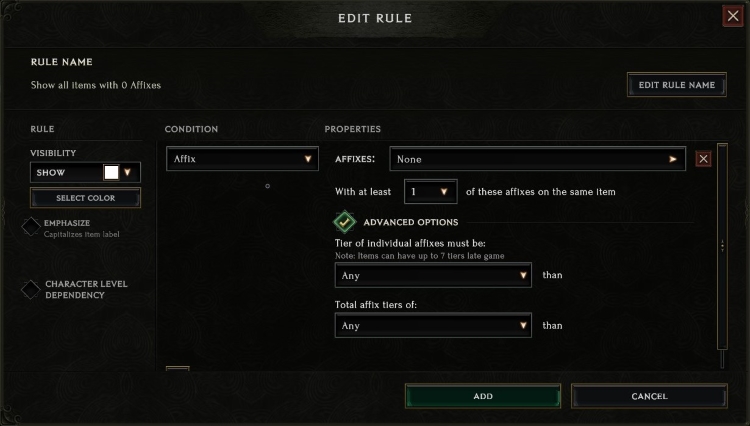
The affix option lets you show or hide items with certain affixes you want (or don’t want). You can filter for every single Affix in the game, so make sure you use the search option to find the one you’re looking for. You can also select multiple affixes to filter (so if you want to find an item with extra melee fire damage and extra melee crit chance..you`ll have to select both in the menu).
The “With at least X of these” option lets you configure how many matching affixes an item needs to have on it before it gets filtered. So if you’re looking for an item that has 2 of the affixes you need, but would be fine with an item that has 1 of those you want, by setting the option to With at least 1 of these, then the filter will also show you items that have one of the two affixes you were looking for.
The “Tier of individual affixes must be” option lets you filter the tier of the affix you’re looking for on an item. (Affixes come in tiers, tier 1 is the weakest, and tier 7 is the strongest).
On the other hand, the Total affix tiers option lets you filter out the sum of all the affix tiers on an item. (If you have an item with four T1 affixes then its total affix tier would be 1+1+1+1=4, if you have an item with two T1 affixes, one T2, and one T3 affix, then its total tier would be 1+1+2+3=7)
The last two fall under “advanced options” which let you find better gear in the late game where finding stronger gear is often an incremental affair.
Final Notice:
You can set several conditions within a rule. This is how you can tell the filter to show/hide items of a certain rarity, for instance. Add a condition for Rarity and a condition for Item type to get said effect. Be warned: in order for a rule to filter an item, that item needs to trigger all the conditions of the rule, so be careful not to make the rule too specific by adding too many conditions.
A final important notice in this section of the Last Epoch beginner guide is that rules are triggered in the order you put them. This means that the rules on top override those under them. For Example: if you make a rule that filters out all swords in the game but then put a rule that tells the filter to show you unique swords above it, the filter will show unique swords on your screen (Because, again, the unique swords rule overrides the hide all swords rule below it)
Importing filters
Another impressive feature is that lootfilters can be exported or imported into the game. In fact, many sites that host build guides usually have loot filters anyone can grab and use. One way to import a lootfilter is to download it. It comes in the form of an XML file.
In the game, open the same screen you would use to create a new loot filter, click on the “Open Filter Folder” button, and simply put that XML file into the folder. Your new loot filter should now appear.
The way the sites offer this filter does vary, however. Some sites will let you download it directly, while others will give you a link that you’ll have to right-click, and then click the “save link as…” option to save the file.
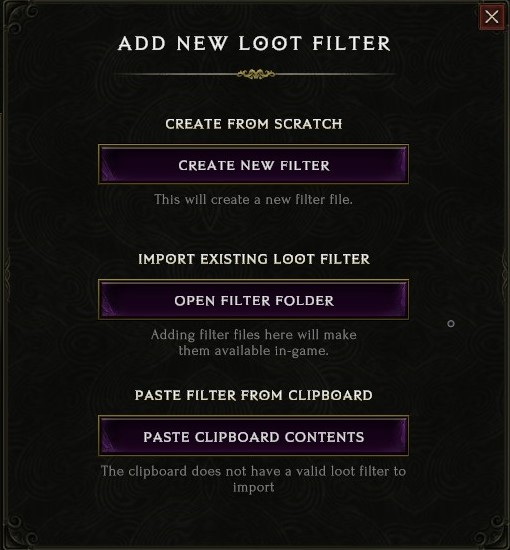
Another way to import filters is by copying them to Clipboard (the place where your PC keeps data when you tell it to copy something, at its most basic). What this means is that you basically just copy the XML text so you can paste it.
In the same window, you use to create a new filter, this time press the “Paste Clipboard Contents” button and the game will use the data provided to create the filter. The small text under the button will tell you if the contents of the clipboard are a valid loot filter or not.
Once again, the way you copy the contents varies by site. Some will give you the option to simply copy via a button. Others will blast your screen with a bunch of intimidating-looking text.. in this case simply copy all the text and then press the Copy Clipboard contents button in the game.
Factions in Last Epoch
In this part of the Last Epoch beginner guide, we’ll cover the game’s faction systems. According to the developers, the game was intended to have a trading system in it from the start. This presented a bit of a problem as when talking to their community, it turned out that half of them liked the idea, while the other half opposed its implementation.
On one end, having access to an auction house would allow players to assemble builds more easily. It can also give value to items the player might not have cared for otherwise, as a trading item this time around.
On the other side of the camp, there were concerns that the presence of such a system would compromise the process of getting loot, which is a core aspect of the game. Coming with the launch of the game is the developer’s attempt at a solution: Item Factions. The Merchants Guild, which lets players trade among themselves, and the Circle of Fortune which helps solo players find extra loot.
Merchants guild
The Merchants guild lets players trade with other players through the use of an auction system, provided they’re aligned with the guild. At rank 1, you can sell all equippable items that aren’t untradable. Climbing up the ranks will let you buy items of greater rarity.
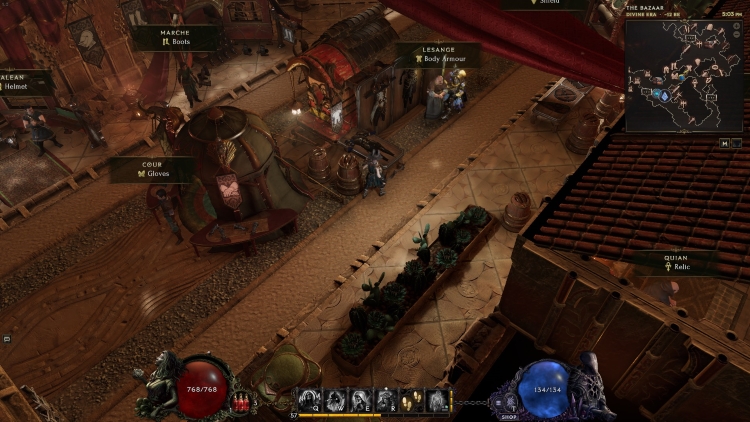
The Bazaar. A warm thanks to the many members of the Merchants Guild, generously selling the myriad items required for my lackluster meme-builds.
At the lowest rank, you can only buy common items but as your rank increases you will eventually be able to buy set items, idols, and exalted gear, going up to legendary items at maximum rank. Items bought through the bazaar, or traded amongst players will gain a faction rank requirement to be used.
These requirements will usually match the Merchants Guild rank that you need to have with them to trade for that type of item. For instance, if you buy a set item(Buying set items requires having rank 2 with the guild) it will gain a rank 2 requirement with the Merchants guild to be equipped.
The only exception to this rule is if you turn a unique into a legendary, its requirement will stay at that of the unique. This requirement means if you change factions, you can no longer wield the gear you bought. Some other things to keep in mind is that the Merchants Guild won’t allow you to trade gear from the other faction and once bought, an item can’t be resold again.
Circle of Fortune
This faction grants some powerful bonuses that make finding loot an easier process. Increasing rank with the Circle will grant buffs such as an extra chance for enemies to drop more loot, higher quality loot, loot with better affixes, and many more.
Additionally, it grants access to the “Prophecy” system which lets the player target farm for items (or increases the chance of getting stronger affixes) by completing objectives attached to them. Loot that drops as a result of the Circle faction bonuses will get a rank requirement that’s equal to your Circle of Fortune rank.
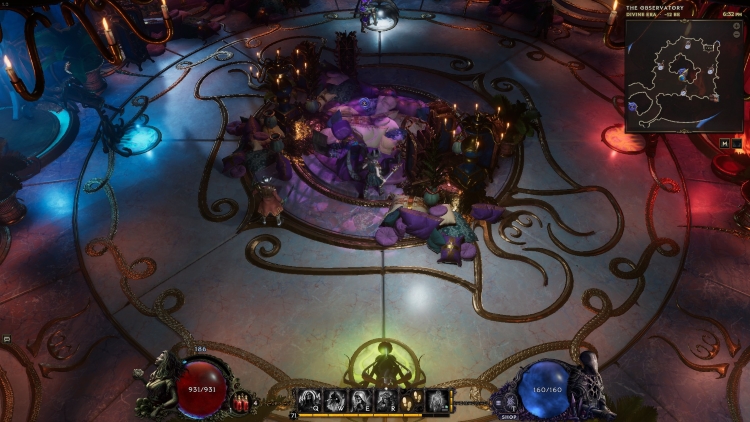
The Observatory. The heart of the Circle of Fortune faction.
Prophecies are bought at the Circles observatory. There are four telescopes looking North(Armor), East(Weapons), South(accessories), and West(Idols and crafting). By looking through them, you will get an offer of several prophecies.
By mousing over them you will see their events, condition, and reward. If none strike your fancy, you can reroll them. Events are the objectives you need to complete, stuff such as killing an X amount of a certain monster. Conditions are, as the name would imply, an additional condition that must be completed for the prophecy to activate(usually a location).
The game allows you to stack quite a number of prophecies to help you farm. Another interesting feature is that you can buy lenses from the faction vendor to slot into the telescopes. Lenses are permanent items that modify prophecies, further increasing the chance of finding what you need, or helping you find content you want to do.
Lenses can be regional, which only modify a certain telescope, or greater, that can slot into any of the four telescopes. Different types of lenses will unlock as your rank increases.
Faction rank and favor
Gain reputation to increase in rank. This is done by simply gaining XP. Defeating enemies and completing quests, in short. This is true for both factions. However, participating in the faction’s main activities nets you the most reputation.
For the guild, this means trading items, and for the Circle, completing prophecies. Spending favor at a faction vendor also increases reputation. Faction ranks are account-wide and cannot be lost. However, they are not shared amongst characters in different game modes, such as in solo or legacy.
Favor is the currency you’ll use when dealing with both of these factions and their vendors. Favor is once again earned by defeating foes and completing quests. In the guild, you’ll have to pay favor to trade, while in the circle it’s used to obtain prophecies and buy lenses.
How to gift items
Outside of the Merchants guild, there is also player-to-player gifting. Unlike trading, it can be done at no cost. However, you have to be playing together in a group when the item drops in order to gift it. As you play with someone the game will periodically drop Resonances.
This is a consumable material that can be used to bypass normal trading restrictions. The resonance that drops will have the name of your friend in its UI elements (Resonates with [Player_name]). This way, if you get an item your friend needs, you can spend this resonance to gift it to them.
There are two types of resonances. The more common Golden, which can be used to trade Normal/Magic/Rare/Unique/Set items and Obsidian resonance for exalted or legendary gear. It’s not known how often they drop at the time of writing, as the devs don’t want gifting to be used in place of the Merchants guild.
Faction gear can be traded this way. It follows the same rules as regular gifting, however, your friend needs to also meet the faction requirements to be able to use that gear.
Endgame in Last Epoch
As this is primarily a beginner guide for those new to Last Epoch, or aRPGs in general, the endgame is probably outside the purview of a guide such as this. However, we thought it prudent to include a brief overview of what awaits players once they’re done with the campaign. we’ll keep it brief. Last Epoch has three endgame systems. Those would be Dungeons, the Arena, and Monoliths.

Dungeons
Dungeons are more difficult..well, dungeons, than those found normally. What sets them apart is that they have a unique mechanic that needs to be mastered to succeed. They also feature a risk/reward mechanic in the form of doors which when opened increase loot quality but make the enemies more difficult.
There are four tiers of difficulty, each one requiring a higher character level. You must defeat the lower-tier difficulties to unlock the next one. Also, to enter the dungeons you need to find their keys, which drop as loot from many sources.
Once you’re in, you’ve only got one shot. Win or fail, the key is not refunded. The three dungeons are the Lightless Arbor, Temporal Sanctum, and Soulfire Bastion.
Lightless Arbor’s reward is the Vault of Uncertain Fate. It’s a gold sink where you trade gold for an impressive loot explosion. The vault will give you a series of modifiers that increase the Vault reward. You can pay a price in gold to accept these modifiers or decline them. After this process, you’ll enter the vault and get the rewards.
Temporal Sanctum gives access to the Eternity cache, which is required to craft Legendary gear, as mentioned previously.
Soulfire Bastion will give access to the Soul Gambler, which is the only way to obtain items with sealed T5 Affixes.
The Arena
Like with the dungeons before, to enter the arena you’ll need a special key. In the arena, you’ll fight off waves of foes. Every 10 waves you’ll get an offer of two modifiers that increase the difficulty but also the chance to get better rewards. The final fight is against an Arena champion, a boss that can drop certain uniques.
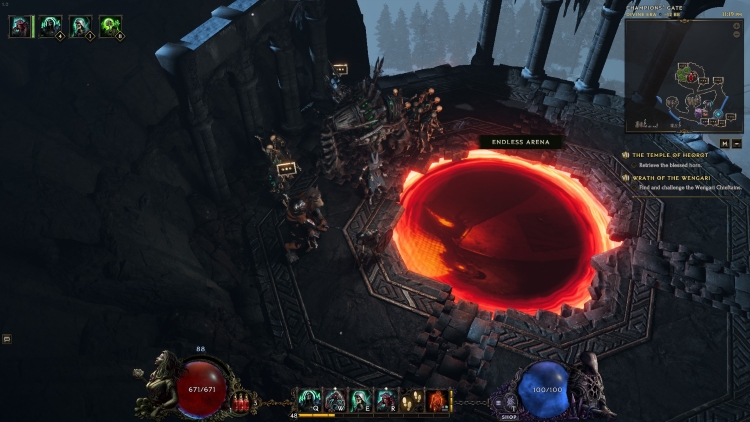
In addition to the four difficulties, the arena also comes with an endless mode. In endless mode, the enemies never stop scaling and the point is to simply go as far as possible. Also, bragging rights, as they put you on a leaderboard.
The monoliths of Fate
The main endgame system, and the one that players will use the most is the Monolith of Fate. This system becomes available quite early in the campaign, however, as enemies here are almost level 60, it’s best to avoid this unless you know what you’re doing.
This system has you going to various Timelines. Timelines are islands floating in the void all of which have their maps to play on, rewards, and quests. When a timeline is completed you can select new ones. Inside timelines, there is a web of small maps called echos.
These echoes all come with their rewards, as well as player and enemy modifiers. You choose your path on the web depending on modifiers or the loot you need. When you enter an Echo you will usually, but not always, be tasked with killing enemies on it. Completing echo objectives gives that timeline some Stability.
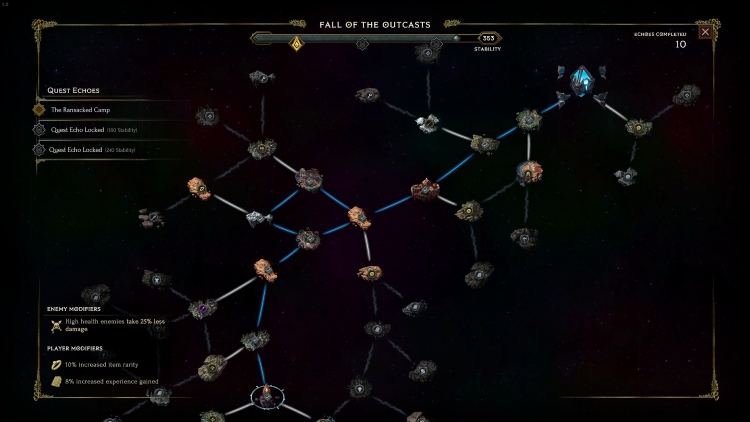
Some modifiers stick for several echos, make sure not to stack too many negatives when running difficult monoliths.
As you gather more stability you unlock quests and finally a bossfight. The reward for defeating the boss is a choice of powerful permanent buffs called a blessing, sometimes also uniques. Once those are completed you choose the next timeline. There is also a corruption mechanic.
Some of the echos are special places where you can fight the “Shade of Orobyss” boss. Successfully killing him will increase corruption levels(the further away he is from the start, the more corruption you get). The higher the corruption, the more powerful the enemies get but you also get more XP and better items.
When you start the Monolits, you’ll get access to the normal version. It functions as a tutorial, basically. Eventually, you want to make the transition into the Empowered version by defeating the final 3 timelines in the normal ones.
The empowered version starts at level 100 with 100 corruption, making it far more difficult and rewarding. Empowered timelines grant empowered versions of the blessings mentioned before.
Beginner Tips and Tricks for Last Epoch
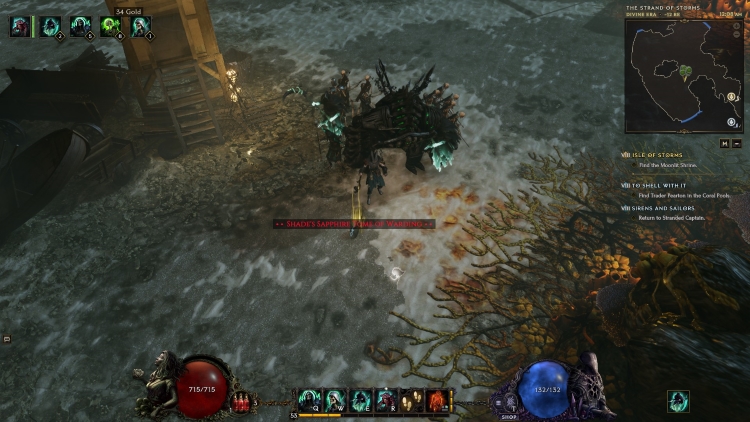
The Lootfilter can also be used to hunt down items with sought-after affixes for removal/shattering.
In this part of the Last Epoch beginner guide, we offer some basic, but helpful tips to help start you off on your journey.
- Hover your mouse over the skill to find out what stats buff it. At the bottom part of the card that pops up, you’ll see tags that`ll help you in this regard. Figuring out which stat you need to buff a fireball is easy. A ghostly purple dagger with boomerang properties…not so much.
- Read the skill card carefully, it’s not just flavor text, sometimes important info about its scaling can be hidden there. Press Alt to show more info about the skill.
- Active skills have damage-type icons next to them in the skills window that correspond to the damage type that the skill deals. Some damage types will be grayed out. This lets you know you can switch to that element by using its skill tree.
- The game has a Game guide that can be activated at any time by pressing G. It comes with a built-in search function and does a respectable job of teaching mechanics to new players. Keep it in mind if you find a mechanic you’re unfamiliar with.
- Some sidequests award extra passive points and idol slot expansions, don’t miss these. You can see what the rewards are for sidequests on the main map. Keep in mind that extra passive points obtained in this way are capped at 15.
- Gambling is somewhat lackluster on regular vendors you find during the campaign. The usual advice given to new players is to buy Runes of Shattering instead and use them in the forge to get affixes for future crafting endeavors.
- Extra stash tabs can be bought for gold, and you can have 200 of them. You can sort and rename them. Go nuts.
- Use the “Transfer Materials” button in the inventory to quickly store all forging resources. Additionally, there’s a sorting option to clean the mess of free inventory space they leave behind.
- Health potions are limited to several charges, determined by the belt your character is wearing. Potions can only be found on enemies.
- There are no mana potions. As long as your mana pool is above 0, you can keep casting even if the spell costs more mana than what you have left in the pool. This will put your mana pool into the negatives and you won’t be able to cast again until the pool is in the positives again.
- The little dots to the left and right of an item’s nameplate are prefixes and suffixes respectively. They help you see how many affixes an item has without picking it up.
Final Thoughts on Last Epoch
And that brings us to the conclusion of our beginner guide for Last Epoch. The game has many familiar aRPG systems in it but it polishes them to a mirror sheen.
The developers have made a concerted effort to make those systems as easy to understand as possible, as evidenced by the in-game guide, myriad tooltips, and not to mention various UI elements tracking player and gear stats.
Because of this, we have no trouble recommending this game to both fans and newcomers to the genre. Finally, we hope this Last Epoch beginner guide did a good job of explaining the game’s many systems. Good Luck out there, travelers.
If you’re interested in seeing more from us, check out our Deep Rock Galactic: Survivors Beginner Guide.
Image credit: Eleventh Hour Games.
